> ## Documentation Index
> Fetch the complete documentation index at: https://docs.wavix.com/llms.txt
> Use this file to discover all available pages before exploring further.
# Wavix Embeddable
> Embed the Wavix voice widget in your web app to add inbound and outbound calling with minimal code.
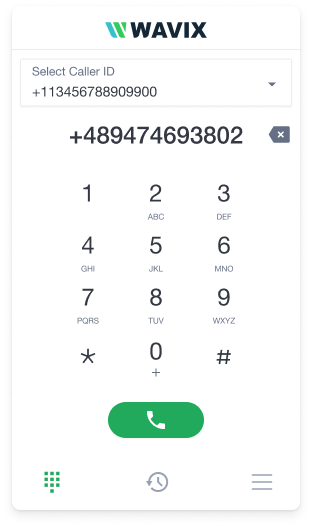
Wavix Embeddable is a ready-to-use web phone you can add to any web app, such as a CRM or support portal. It gives your users inbound and outbound calling, call history, custom styling, and real-time call events, with little code. Answering Machine Detection (AMD) and call recording work out of the box.
## Prerequisites
* A Wavix account on the **Flex Pro** account level. See [Go live](/getting-started/go-live).
* Your [API key](/api-reference/authentication).
* A phone number on your account. See [Buy a number](/numbers/buy-number).
* A SIP trunk that uses Digest authentication with a strong password. See [Create a SIP trunk](/sip-trunking/create-sip-trunk).
## How it works
The widget loads from a script that Wavix hosts. It signs in with a short-lived **widget token** tied to your SIP trunk: you create the token on your server, then start the widget in the browser. You can embed it inline on the page, or open it in a separate window.
## Step 1: Generate a widget token
Create the token on your server so your API key never reaches the browser.
```bash cURL theme={null}
curl --request POST \
--url 'https://api.wavix.com/v2/webrtc/tokens?appid=your_api_key_here' \
--header 'Content-Type: application/json' \
--data '{
"sip_trunk": "your_sip_trunk_id",
"payload": {},
"ttl": 3600
}'
```
* `sip_trunk`: the ID of the SIP trunk the widget connects through.
* `payload`: optional custom data to store with the token. It's returned when you look the token up.
* `ttl`: token lifetime, in seconds. The widget disconnects when the token expires.
If successful, the service returns the `HTTP 201 Created` status code:
```json theme={null}
{
"token": "WIDGET_TOKEN",
"uuid": "TOKEN_ID",
"sip_trunk": "SIP trunk ID",
"payload": {},
"ttl": 3600
}
```
Use the `token` value as `WIDGET_TOKEN` in the next step.
Always create widget tokens on your server. The widget signs in with the token, not your API key, so the key stays on your server.
## Step 2: Embed the widget
Load the widget script and start it. For `sip.server`, use the SIP gateway with the lowest ping from your users (find the gateway list on the **Numbers & trunks** page in the Wavix portal). Replace `WIDGET_TOKEN` with the token from Step 1.
Add the script to your page's ``:
```html theme={null}
```
Add a container element where the widget should appear:
```html theme={null}
```
Start the widget and open it in a separate window when needed:
```html theme={null}
```
Open the window from a button. Pass a number as `to` to pre-fill the dialer:
```html theme={null}
```
## Step 3: Enable inbound calls
Outbound calls work as soon as you embed the widget. Inbound calls reach the widget only if the number the customer dials is routed to the widget's SIP trunk. **If the number has no destination, or points to a different trunk, it won't ring the widget**, even though the widget loads and signs in correctly.
In the Wavix portal, go to **Numbers & trunks**, open the number, and set its destination to the SIP trunk your widget token uses. You can also set the destination with the API. See [Update number destination](/numbers/numbers#update-number-destination).
If inbound calls don't reach the widget, the usual cause is a number with no destination, or one routed to a different SIP trunk. Check that the number's destination is the widget's SIP trunk.
## Configuration options
Pass these in the `init` object.
| Option | Description |
| --------------------- | -------------------------------------------------------- |
| `widget.containerId` | ID of the element the widget renders into (inline mode). |
| `widget.windowTitle` | Title of the dialog window (dialog mode). |
| `widget.customStyles` | URL of a stylesheet to override the default appearance. |
| `widget.customLogo` | URL of a logo to display in the widget. |
| `widget.customLink` | URL the logo links to. |
| `widget.withLogo` | Whether to show the logo. Defaults to `false`. |
| `sip.server` | The Wavix SIP gateway to connect through. |
| `sip.token` | The widget token from Step 1. |
| `sip.autoDial` | Whether to dial automatically. Defaults to `false`. |
## Customize the appearance
Override the widget's CSS variables under the `#webrtc-widget` selector.
```css theme={null}
#webrtc-widget {
--text-high-contrast: #fff;
--text-medium-contrast: #d0d5dd;
--text-low-contrast: #667085;
--text-accent: #d4efdf;
--text-inverted: #fff;
--text-negative: #ff5655;
--bg-background: #292d33;
--bg-header: #292d33;
--bg-navigation: #292d33;
--bg-status: #333842;
--bg-brand: #333842;
--bg-border: #333842;
--fg-high-contrast: #667085;
--fg-accent: #22aa5c;
--fg-negative: #ff5655;
--fg-warning: #e7b006;
--fg-brand: #34c1ca;
--fg-inverted: #fff;
--fg-logo: #fff;
--a-high-contrast: #fff;
--a-active: #22aa5c;
--a-inactive: #667085;
--text-inverted-disabled: #98a2b3;
--bg-hover: #333842;
--bg-pressed: #333842;
--bg-border-active: #22aa5c;
--fg-accent-hover: #289c5c;
--fg-accent-pressed: #2c7351;
--fg-accent-disabled: #333842;
--fg-negative-hover: #e52625;
--fg-negative-pressed: #b61f1e;
--fg-negative-disabled: #333842;
--fg-high-contrast-hover: #333842;
--fg-high-contrast-pressed: #333842;
--fg-high-contrast-disabled: #333842;
--fg-inverted-disabled: #98a2b3;
--a-hover: #98a2b3;
--a-pressed: #fff;
--a-disabled: #333842;
--switch-background: #333842;
--switch-background-checked: #22aa5c;
--switch-foreground: #fff;
}
```
## Manage tokens
You can manage widget tokens through the API:
* List active tokens, or get a token by its ID.
* Update a token's `payload`. The new payload replaces the old one.
* Delete a token. The widget using it disconnects right away.
## Troubleshooting
**The incoming-call screen appears, but answering fails.** The call shows the answer buttons, then either throws a JavaScript error (such as `Cannot read properties of null (reading 'invite')`) or connects for about a second and drops with no audio.
This almost always means the dialed number isn't routed to the widget's SIP trunk. Set the number's destination to that trunk, as shown in [Enable inbound calls](#step-3-enable-inbound-calls).
## Learn more
For the full reference and the latest updates, see the [Wavix Embeddable repository](https://github.com/Wavix/wavix-embeddable) on GitHub.
 Wavix Embeddable is a ready-to-use web phone you can add to any web app, such as a CRM or support portal. It gives your users inbound and outbound calling, call history, custom styling, and real-time call events, with little code. Answering Machine Detection (AMD) and call recording work out of the box.
## Prerequisites
* A Wavix account on the **Flex Pro** account level. See [Go live](/getting-started/go-live).
* Your [API key](/api-reference/authentication).
* A phone number on your account. See [Buy a number](/numbers/buy-number).
* A SIP trunk that uses Digest authentication with a strong password. See [Create a SIP trunk](/sip-trunking/create-sip-trunk).
## How it works
The widget loads from a script that Wavix hosts. It signs in with a short-lived **widget token** tied to your SIP trunk: you create the token on your server, then start the widget in the browser. You can embed it inline on the page, or open it in a separate window.
## Step 1: Generate a widget token
Create the token on your server so your API key never reaches the browser.
```bash cURL theme={null}
curl --request POST \
--url 'https://api.wavix.com/v2/webrtc/tokens?appid=your_api_key_here' \
--header 'Content-Type: application/json' \
--data '{
"sip_trunk": "your_sip_trunk_id",
"payload": {},
"ttl": 3600
}'
```
* `sip_trunk`: the ID of the SIP trunk the widget connects through.
* `payload`: optional custom data to store with the token. It's returned when you look the token up.
* `ttl`: token lifetime, in seconds. The widget disconnects when the token expires.
If successful, the service returns the `HTTP 201 Created` status code:
```json theme={null}
{
"token": "WIDGET_TOKEN",
"uuid": "TOKEN_ID",
"sip_trunk": "SIP trunk ID",
"payload": {},
"ttl": 3600
}
```
Use the `token` value as `WIDGET_TOKEN` in the next step.
Wavix Embeddable is a ready-to-use web phone you can add to any web app, such as a CRM or support portal. It gives your users inbound and outbound calling, call history, custom styling, and real-time call events, with little code. Answering Machine Detection (AMD) and call recording work out of the box.
## Prerequisites
* A Wavix account on the **Flex Pro** account level. See [Go live](/getting-started/go-live).
* Your [API key](/api-reference/authentication).
* A phone number on your account. See [Buy a number](/numbers/buy-number).
* A SIP trunk that uses Digest authentication with a strong password. See [Create a SIP trunk](/sip-trunking/create-sip-trunk).
## How it works
The widget loads from a script that Wavix hosts. It signs in with a short-lived **widget token** tied to your SIP trunk: you create the token on your server, then start the widget in the browser. You can embed it inline on the page, or open it in a separate window.
## Step 1: Generate a widget token
Create the token on your server so your API key never reaches the browser.
```bash cURL theme={null}
curl --request POST \
--url 'https://api.wavix.com/v2/webrtc/tokens?appid=your_api_key_here' \
--header 'Content-Type: application/json' \
--data '{
"sip_trunk": "your_sip_trunk_id",
"payload": {},
"ttl": 3600
}'
```
* `sip_trunk`: the ID of the SIP trunk the widget connects through.
* `payload`: optional custom data to store with the token. It's returned when you look the token up.
* `ttl`: token lifetime, in seconds. The widget disconnects when the token expires.
If successful, the service returns the `HTTP 201 Created` status code:
```json theme={null}
{
"token": "WIDGET_TOKEN",
"uuid": "TOKEN_ID",
"sip_trunk": "SIP trunk ID",
"payload": {},
"ttl": 3600
}
```
Use the `token` value as `WIDGET_TOKEN` in the next step.