> ## Documentation Index
> Fetch the complete documentation index at: https://docs.wavix.com/llms.txt
> Use this file to discover all available pages before exploring further.
# How to configure 3CX with Wavix
> Configure 3CX PBX with Wavix SIP trunks for inbound and outbound calls using IP authentication.
## Prerequisites
Before you begin, ensure you have:
1. An active phone number on your Wavix account. If you need to purchase one, see our guide on [how to buy a phone number](/numbers/buy-number).
2. A SIP trunk ([How to create a SIP trunk](/sip-trunking/create-sip-trunk)).
## Configure SIP trunk in 3CX
To configure inbound and outbound calls on your 3CX instance:
1. **Log in** to the 3CX management console
2. In the left-hand menu, go to **Voice & Chat**
3. Click the **Add SIP Trunk** button
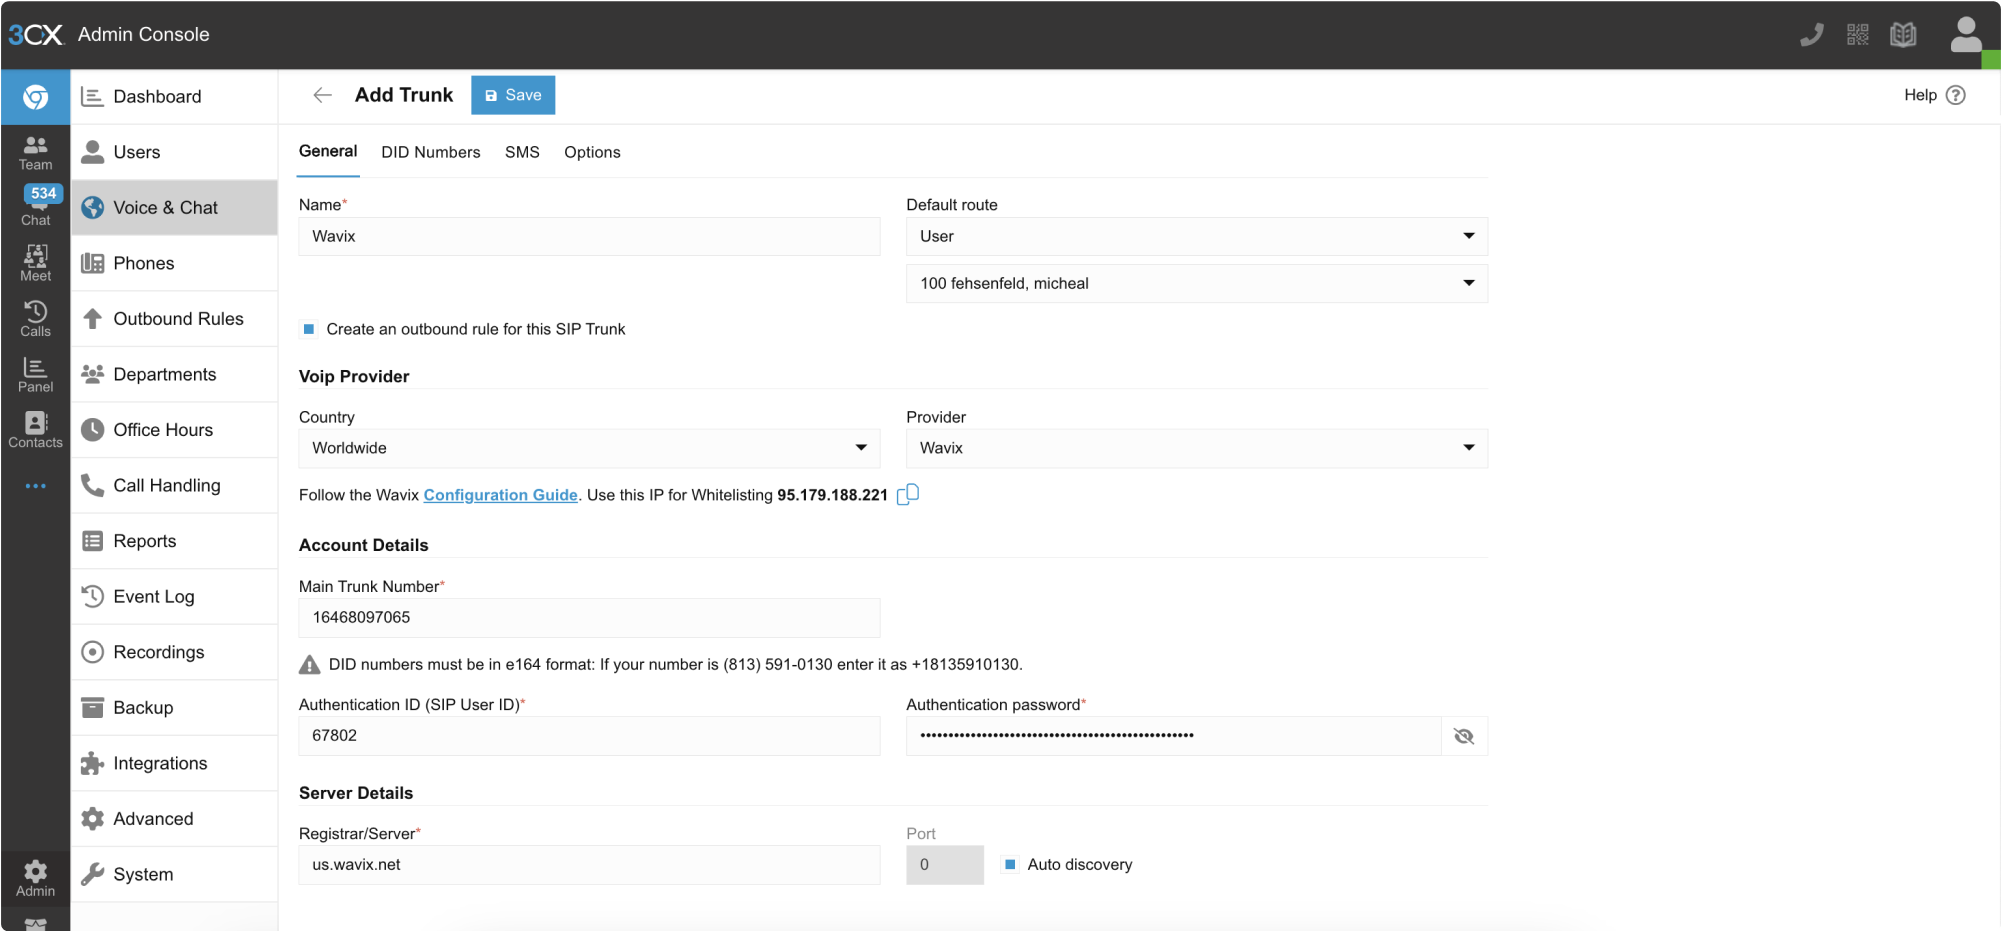
 Next, select your country and choose Wavix from the list of SIP Trunk providers in your country. If you do not see Wavix listed, try selecting ‘Worldwide’ in the Country list. You can check the list of supported SIP trunk providers on the 3CX website at [https://www.3cx.com/partners/sip-trunks/](https://www.3cx.com/partners/sip-trunks/).
If you do not see Wavix on the list of supported SIP trunk providers, download and import the `wavix.pv.xml` file. This will automatically populate some of the SIP trunk configuration parameters.
Follow these steps to add Wavix as your SIP trunk provider:
1. In the **Account Details** section, enter the **SIP trunk ID** and **password** that you set up for the SIP trunk on the Wavix platform
2. Enter your default **Caller ID** into the **Main Trunk Number** field. The Caller ID should be an active or verified phone number from your Wavix account.
3. In the **Server Details** section, enter the address of one of Wavix's regional SIP proxies in the field labeled **Registrar/Server**. We recommend using the address of the regional SIP proxy closest to your location. You can find the full list of Wavix regional gateways at the bottom of the Trunks section in Wavix.
4. Add a name for your 3CX Trunk
5. Click the **Save** button to save your configuration
Next, select your country and choose Wavix from the list of SIP Trunk providers in your country. If you do not see Wavix listed, try selecting ‘Worldwide’ in the Country list. You can check the list of supported SIP trunk providers on the 3CX website at [https://www.3cx.com/partners/sip-trunks/](https://www.3cx.com/partners/sip-trunks/).
If you do not see Wavix on the list of supported SIP trunk providers, download and import the `wavix.pv.xml` file. This will automatically populate some of the SIP trunk configuration parameters.
Follow these steps to add Wavix as your SIP trunk provider:
1. In the **Account Details** section, enter the **SIP trunk ID** and **password** that you set up for the SIP trunk on the Wavix platform
2. Enter your default **Caller ID** into the **Main Trunk Number** field. The Caller ID should be an active or verified phone number from your Wavix account.
3. In the **Server Details** section, enter the address of one of Wavix's regional SIP proxies in the field labeled **Registrar/Server**. We recommend using the address of the regional SIP proxy closest to your location. You can find the full list of Wavix regional gateways at the bottom of the Trunks section in Wavix.
4. Add a name for your 3CX Trunk
5. Click the **Save** button to save your configuration
 By default, a new 3CX Trunk supports up to 10 calls in parallel. However, all new Wavix accounts are initially limited to 2 simultaneous calls for security reasons. To request an increase, please contact [support@wavix.com](mailto:support@wavix.com).
Click on the **Options** tab and ensure that both **inbound** and **outbound** calls are allowed in the **Configuration** section.
By default, a new 3CX Trunk supports up to 10 calls in parallel. However, all new Wavix accounts are initially limited to 2 simultaneous calls for security reasons. To request an increase, please contact [support@wavix.com](mailto:support@wavix.com).
Click on the **Options** tab and ensure that both **inbound** and **outbound** calls are allowed in the **Configuration** section.
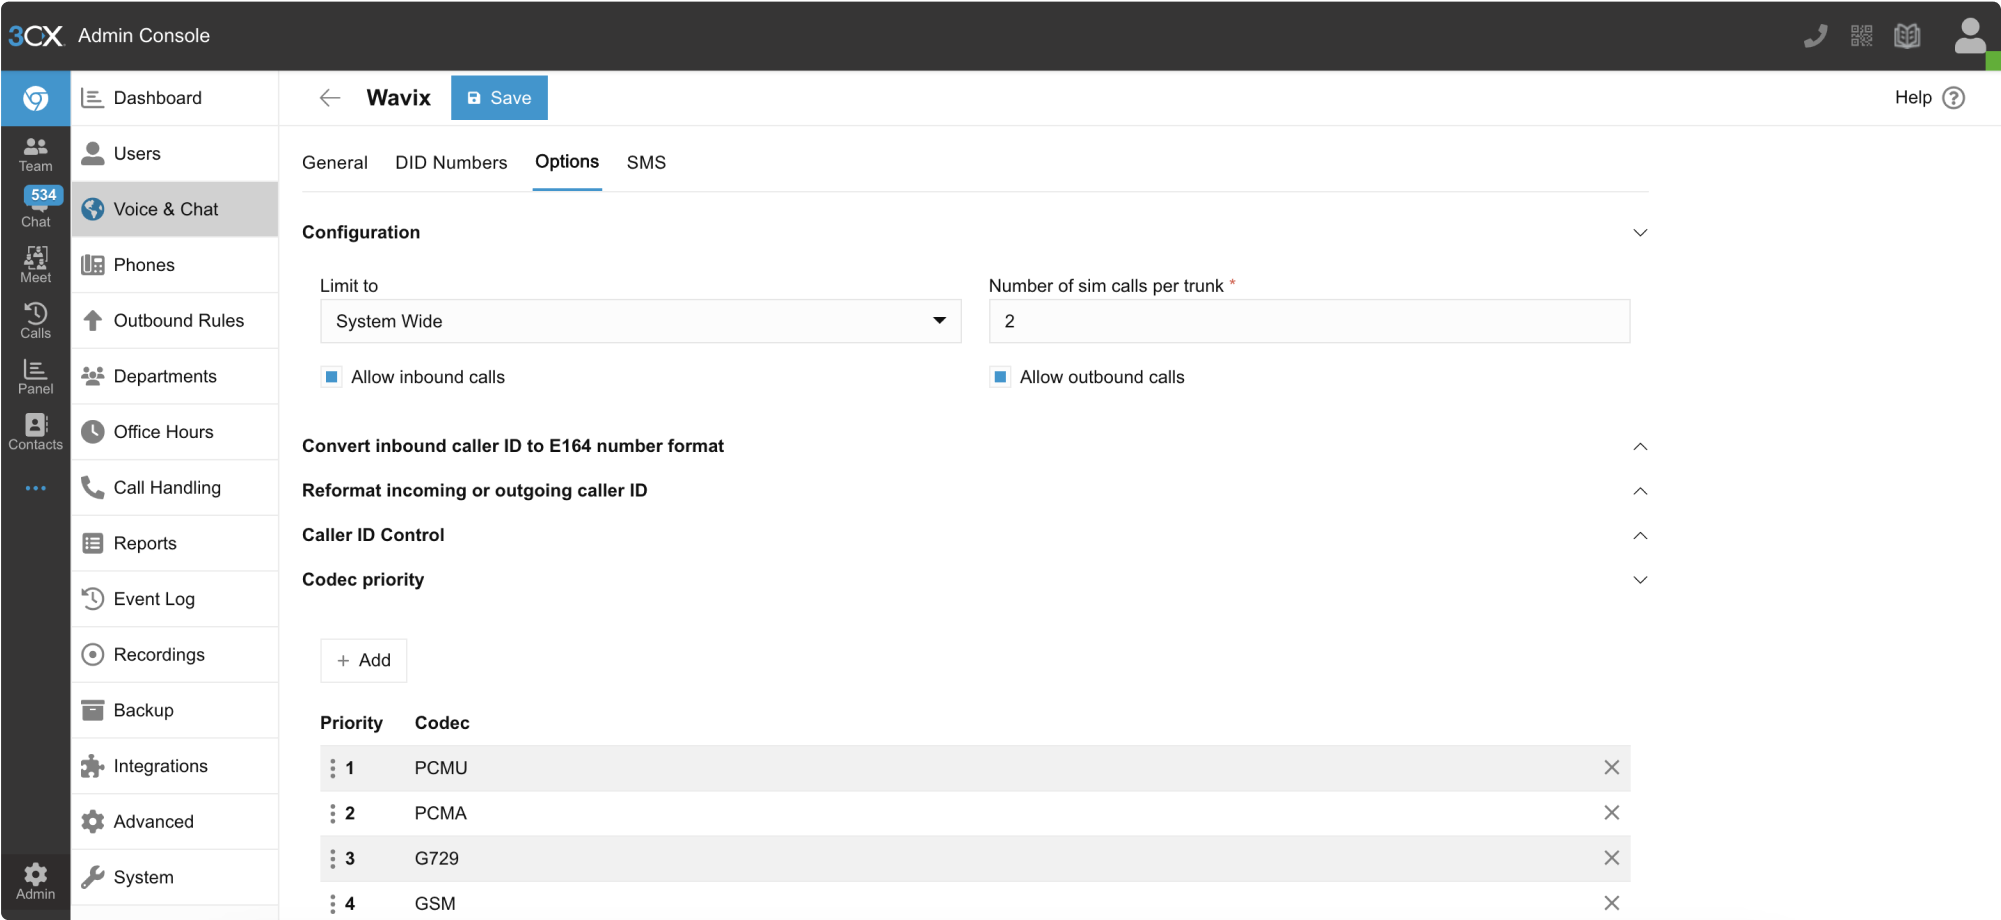 Scroll down to the **Codec priority** section. Wavix supports all the codecs listed, but **PCMU** is recommended for most cases. To save the SIP trunk configuration, click **OK** at the top of the page. It will take a moment for 3CX to register the SIP Trunk.
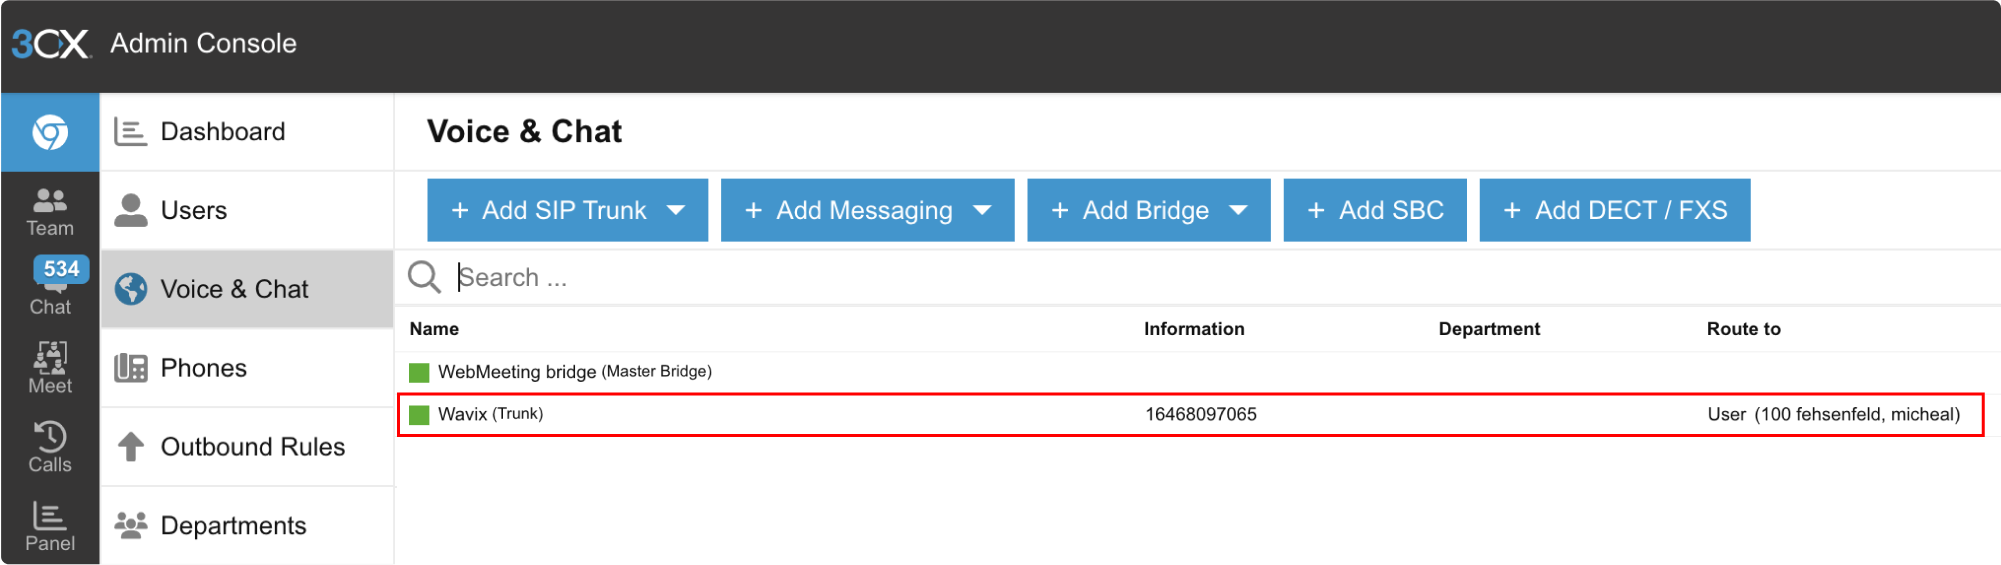
A green bubble will indicate that the SIP Trunk is successfully registered. If any issues occur, check the **Event logs** in the 3CX Management Console dashboard for more details.
Scroll down to the **Codec priority** section. Wavix supports all the codecs listed, but **PCMU** is recommended for most cases. To save the SIP trunk configuration, click **OK** at the top of the page. It will take a moment for 3CX to register the SIP Trunk.
A green bubble will indicate that the SIP Trunk is successfully registered. If any issues occur, check the **Event logs** in the 3CX Management Console dashboard for more details.
 ## Activate IP authentication
The Wavix platform supports IP authentication for dedicated IP addresses. To activate IP authentication for your SIP device, you need to enable this feature in your 3CX device and on the Wavix platform.
Follow these steps in your 3CX:
1. Open your 3CX **SIP Trunk** settings
2. Select the Worldwide option in the Country list and choose **Generic SIP Trunk (IP Based)** in the Provider list
3. In the **Account Details** section, enter the **SIP trunk ID** for the SIP trunk from the Wavix platform
4. Enter your default Caller ID in the **Main Trunk Number** field. The Caller ID should be an active or verified phone number from your Wavix account.
5. Set the **Type of authentication** to **Do not require - IP based** from the drop-down menu
6. In the **Server Details** section, enter the address of one of Wavix's regional SIP proxies in the field labeled **Registrar/Server**. We recommend using the address of the regional SIP proxy closest to you. The full list of Wavix regional gateways can be found at the bottom of the [Trunks section](https://app.wavix.com/trunks) in Wavix.
7. Add a name for your 3CX Trunk
8. Click the **Save** button to save the configuration
## Activate IP authentication
The Wavix platform supports IP authentication for dedicated IP addresses. To activate IP authentication for your SIP device, you need to enable this feature in your 3CX device and on the Wavix platform.
Follow these steps in your 3CX:
1. Open your 3CX **SIP Trunk** settings
2. Select the Worldwide option in the Country list and choose **Generic SIP Trunk (IP Based)** in the Provider list
3. In the **Account Details** section, enter the **SIP trunk ID** for the SIP trunk from the Wavix platform
4. Enter your default Caller ID in the **Main Trunk Number** field. The Caller ID should be an active or verified phone number from your Wavix account.
5. Set the **Type of authentication** to **Do not require - IP based** from the drop-down menu
6. In the **Server Details** section, enter the address of one of Wavix's regional SIP proxies in the field labeled **Registrar/Server**. We recommend using the address of the regional SIP proxy closest to you. The full list of Wavix regional gateways can be found at the bottom of the [Trunks section](https://app.wavix.com/trunks) in Wavix.
7. Add a name for your 3CX Trunk
8. Click the **Save** button to save the configuration
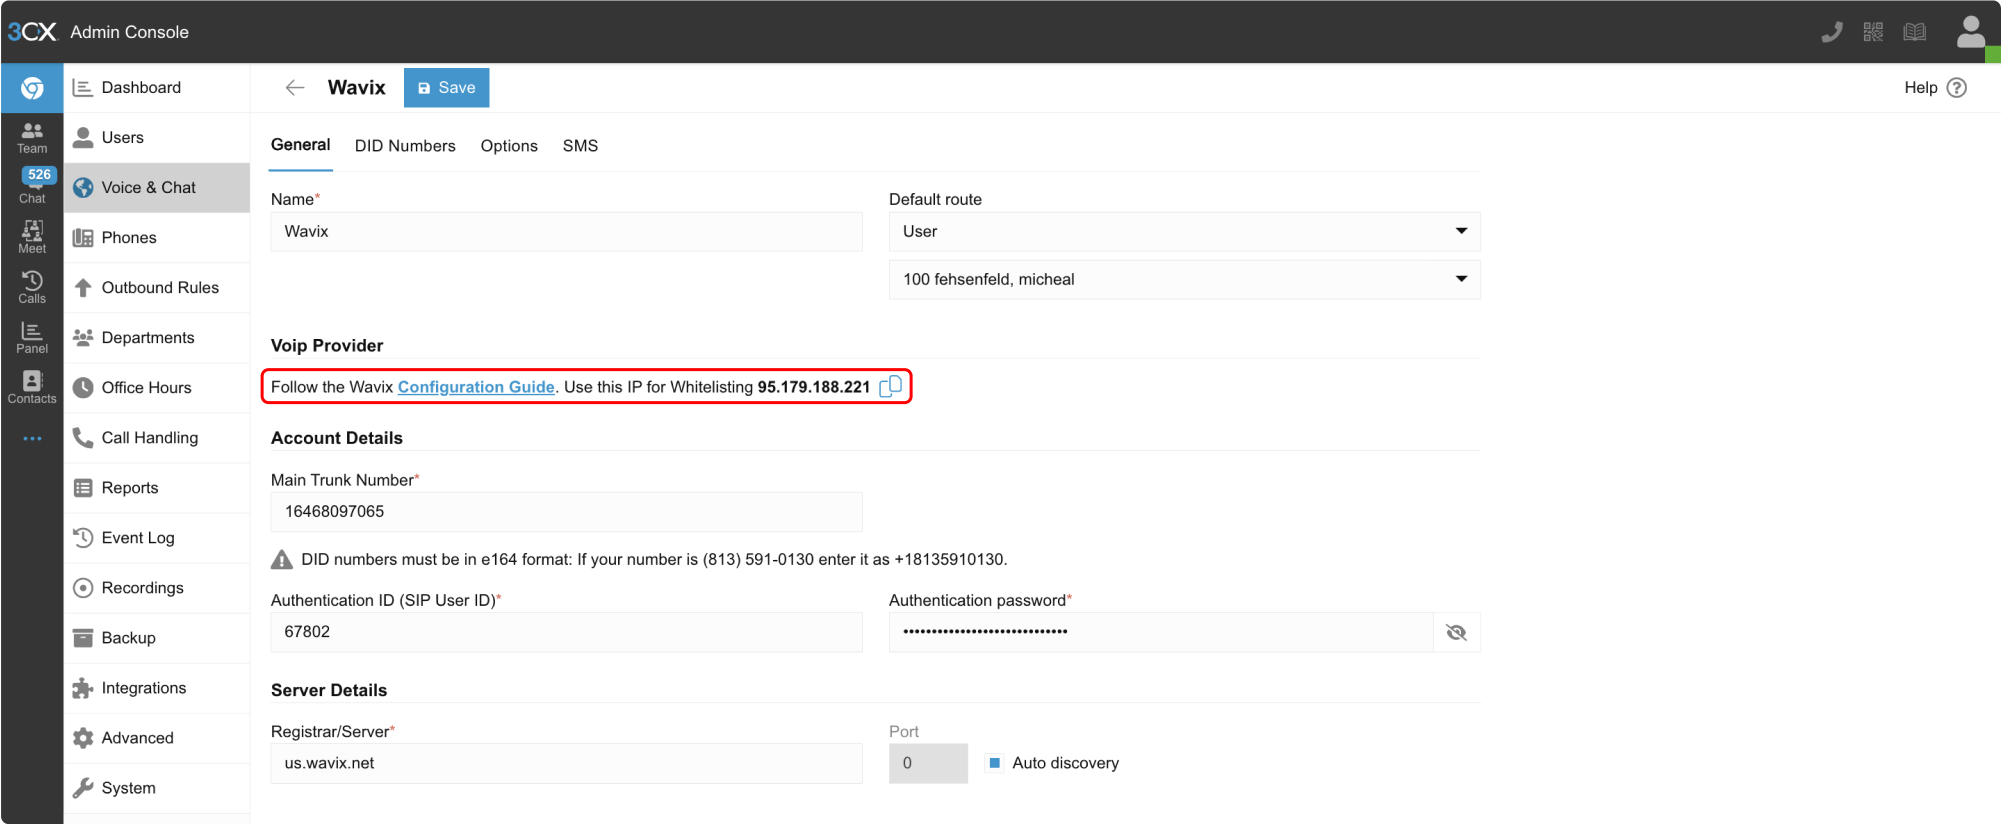 To activate the IP authentication on the Wavix platform:
1. Open the Wavix **SIP trunk** settings
2. Select **IP Authentication** in the Authentication method section
3. Enter your 3CX dedicated IP and click **Submit**
4. Click **Save** to apply the changes
To activate the IP authentication on the Wavix platform:
1. Open the Wavix **SIP trunk** settings
2. Select **IP Authentication** in the Authentication method section
3. Enter your 3CX dedicated IP and click **Submit**
4. Click **Save** to apply the changes
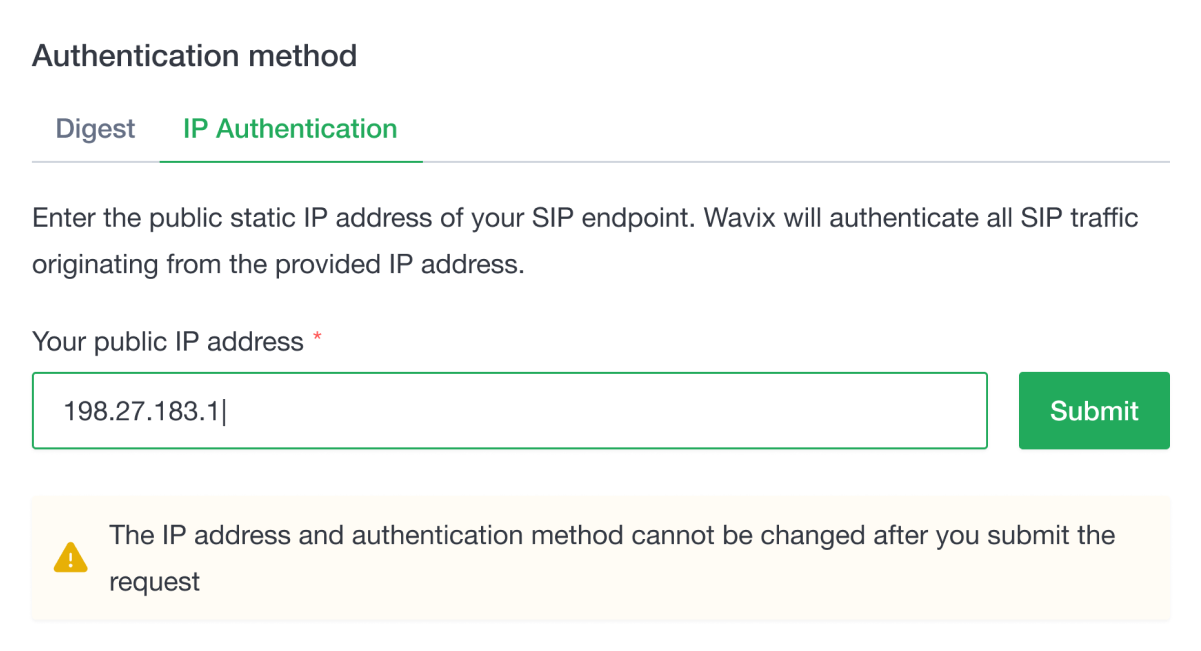 IP authentication will be activated on your Wavix SIP trunk once the request is approved by the Wavix OPS team.
After submitting the IP authentication request, you cannot update your IP address or change the authentication method. By default, an IP address can only be mapped to a single SIP trunk. If you need to have several Wavix SIP trunks sharing the same IP address, please contact [support@wavix.com](mailto:support@wavix.com).
## Configure outbound calls
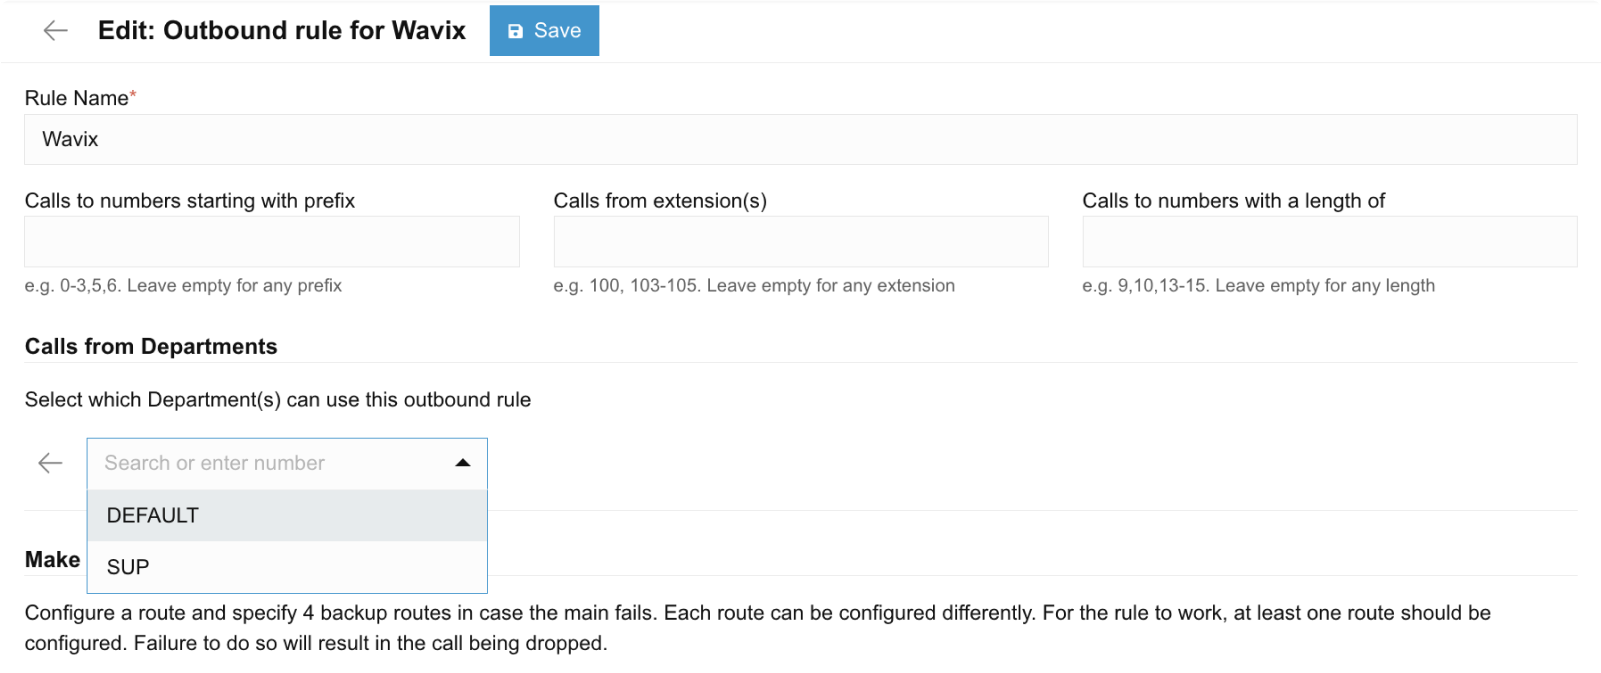
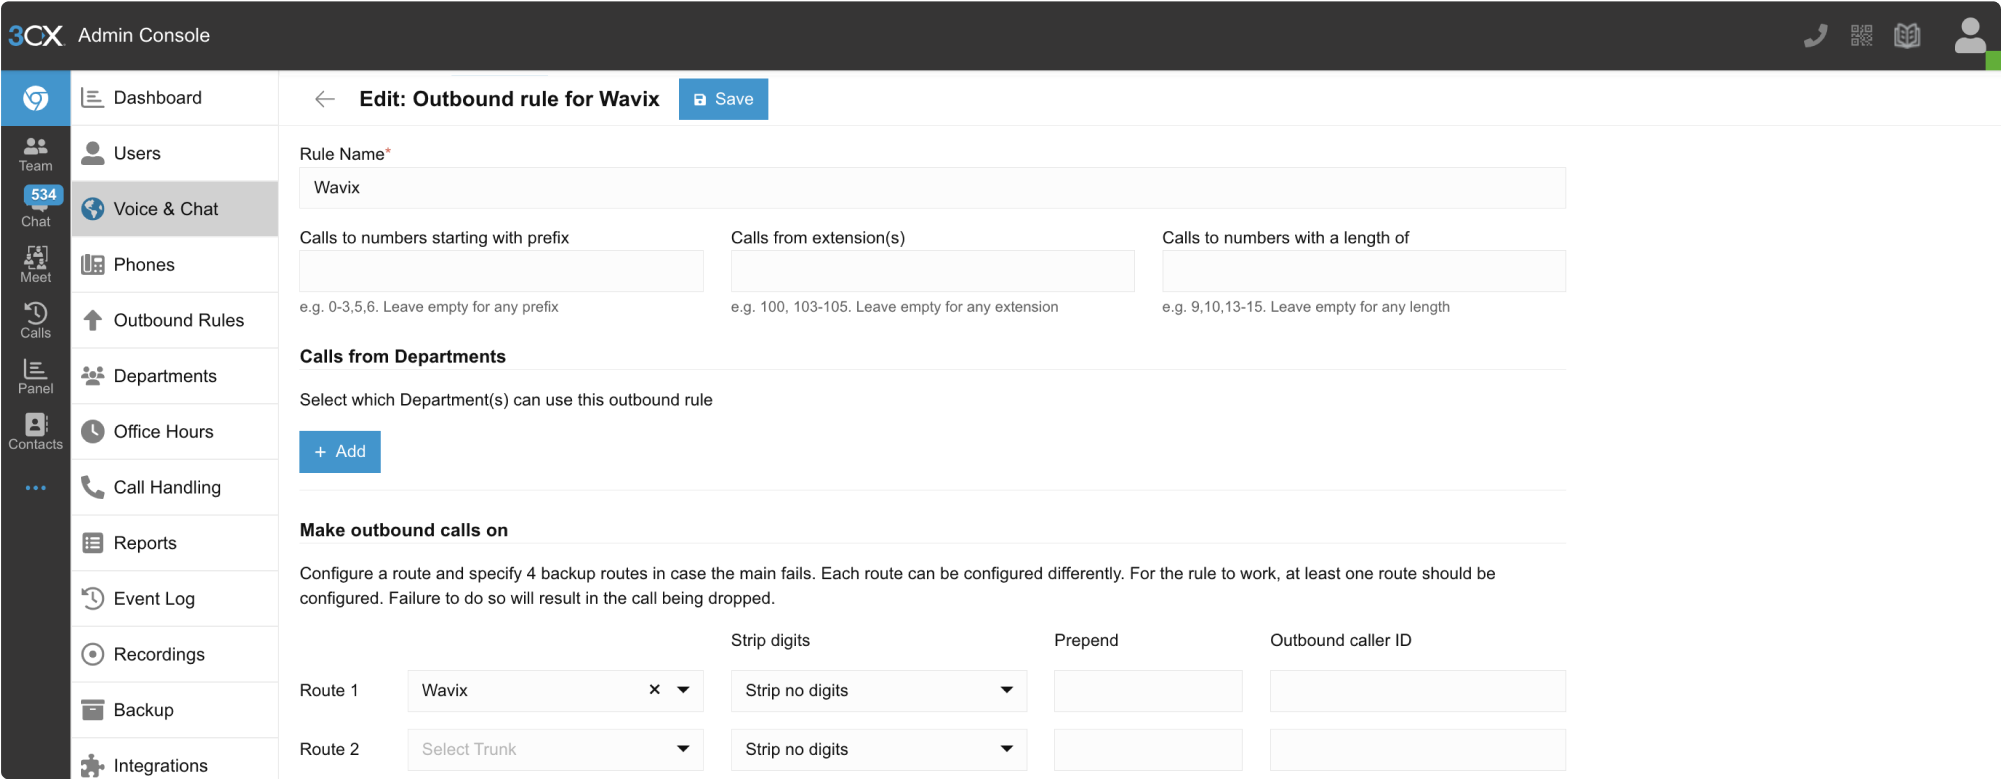
To place outbound calls you need to configure outbound rules. Follow these steps to configure your outbound rules:
1. Click on the **Outbound Rules** option in the left-hand side menu and click the **Add** button
2. Assign a name to your Outbound Rule and apply it to the default extension group by:
* Clicking the **Add** button in the **Apply this rule to these calls** section
* Selecting the **DEFAULT** group name
* Clicking **OK**
3. Scroll down to the **Make outbound calls on** section, select **Wavix**, and save the Outbound Rule
IP authentication will be activated on your Wavix SIP trunk once the request is approved by the Wavix OPS team.
After submitting the IP authentication request, you cannot update your IP address or change the authentication method. By default, an IP address can only be mapped to a single SIP trunk. If you need to have several Wavix SIP trunks sharing the same IP address, please contact [support@wavix.com](mailto:support@wavix.com).
## Configure outbound calls
To place outbound calls you need to configure outbound rules. Follow these steps to configure your outbound rules:
1. Click on the **Outbound Rules** option in the left-hand side menu and click the **Add** button
2. Assign a name to your Outbound Rule and apply it to the default extension group by:
* Clicking the **Add** button in the **Apply this rule to these calls** section
* Selecting the **DEFAULT** group name
* Clicking **OK**
3. Scroll down to the **Make outbound calls on** section, select **Wavix**, and save the Outbound Rule
 All destination phone numbers must be in the `E.164` international format. The E.164 format can handle numbers with up to 15 digits and is usually written as: `[+][country code][subscriber number including area code]`.\
**Example:** A US number in E.164 format would be `+16561223344`.
Calls to numbers without a country code or carrying national access codes will be rejected by the Wavix platform.
Below are typical examples of phone numbers incorrectly formatted according to the E.164 international standard:
| Country | Number | Reason | Number in E.164 format |
| ----------- | ------------- | -------------------------------------------- | ---------------------- |
| US | 6561223344 | No country code | +16561223344 |
| UK | 020 1122 3344 | No country code, national access code with 0 | +442011223344 |
| Switzerland | 0041797000777 | Leading 00 international prefix | +41797000777 |
Depending on your users’ dialing habits, you may want to strip leading digits or prepend a country code. For example, the configuration below can be used to prepend all dialed numbers with the leading 1 if your users are accustomed to US domestic numbers in the national format.
All destination phone numbers must be in the `E.164` international format. The E.164 format can handle numbers with up to 15 digits and is usually written as: `[+][country code][subscriber number including area code]`.\
**Example:** A US number in E.164 format would be `+16561223344`.
Calls to numbers without a country code or carrying national access codes will be rejected by the Wavix platform.
Below are typical examples of phone numbers incorrectly formatted according to the E.164 international standard:
| Country | Number | Reason | Number in E.164 format |
| ----------- | ------------- | -------------------------------------------- | ---------------------- |
| US | 6561223344 | No country code | +16561223344 |
| UK | 020 1122 3344 | No country code, national access code with 0 | +442011223344 |
| Switzerland | 0041797000777 | Leading 00 international prefix | +41797000777 |
Depending on your users’ dialing habits, you may want to strip leading digits or prepend a country code. For example, the configuration below can be used to prepend all dialed numbers with the leading 1 if your users are accustomed to US domestic numbers in the national format.
 ## Configure inbound calls
If you have enabled IP authentication for your SIP trunk, scroll down to the "Configure inbound call routing for trunks with IP authentication" section.
Open the **SIP Trunk configuration settings** and select the **Default route** for inbound calls.
## Configure inbound calls
If you have enabled IP authentication for your SIP trunk, scroll down to the "Configure inbound call routing for trunks with IP authentication" section.
Open the **SIP Trunk configuration settings** and select the **Default route** for inbound calls.
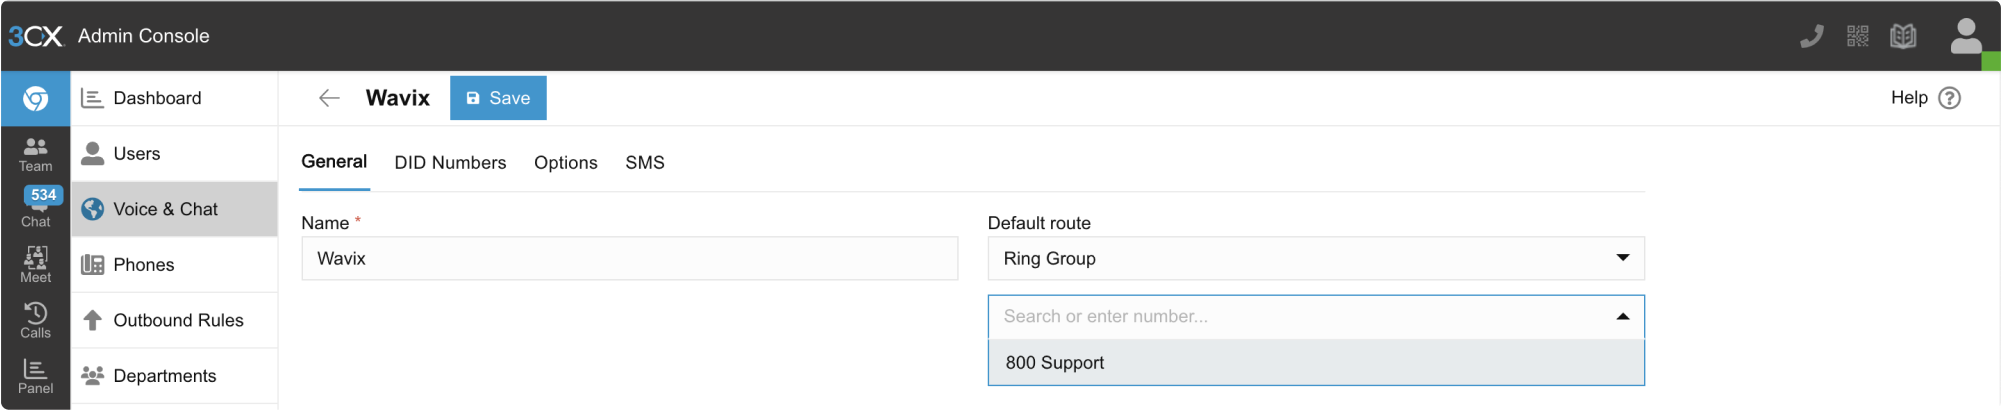 Depending on your business needs, you can set specific office hours for inbound calls and route them to different extensions, voicemail, or drop calls based on schedule.
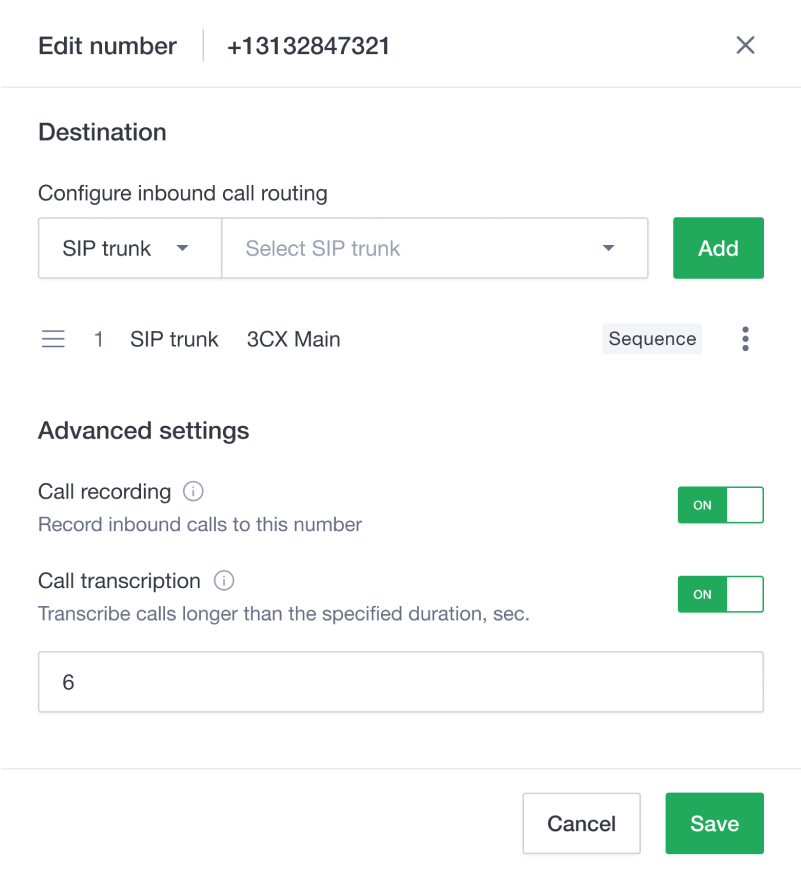 For calls to be routed to your 3CX instance, follow these steps in your Wavix account:
1. **Log in** to your Wavix account
2. Select **My numbers** under **Numbers & trunks** in the top menu
3. Click on the three dots next to the number you want to edit (right-hand side) and select **Edit number**
4. **Select** the destination trunk in the **Destination** section
5. Click **Add** to add the destination for the DID
6. Click **Save** to confirm the settings
For calls to be routed to your 3CX instance, follow these steps in your Wavix account:
1. **Log in** to your Wavix account
2. Select **My numbers** under **Numbers & trunks** in the top menu
3. Click on the three dots next to the number you want to edit (right-hand side) and select **Edit number**
4. **Select** the destination trunk in the **Destination** section
5. Click **Add** to add the destination for the DID
6. Click **Save** to confirm the settings
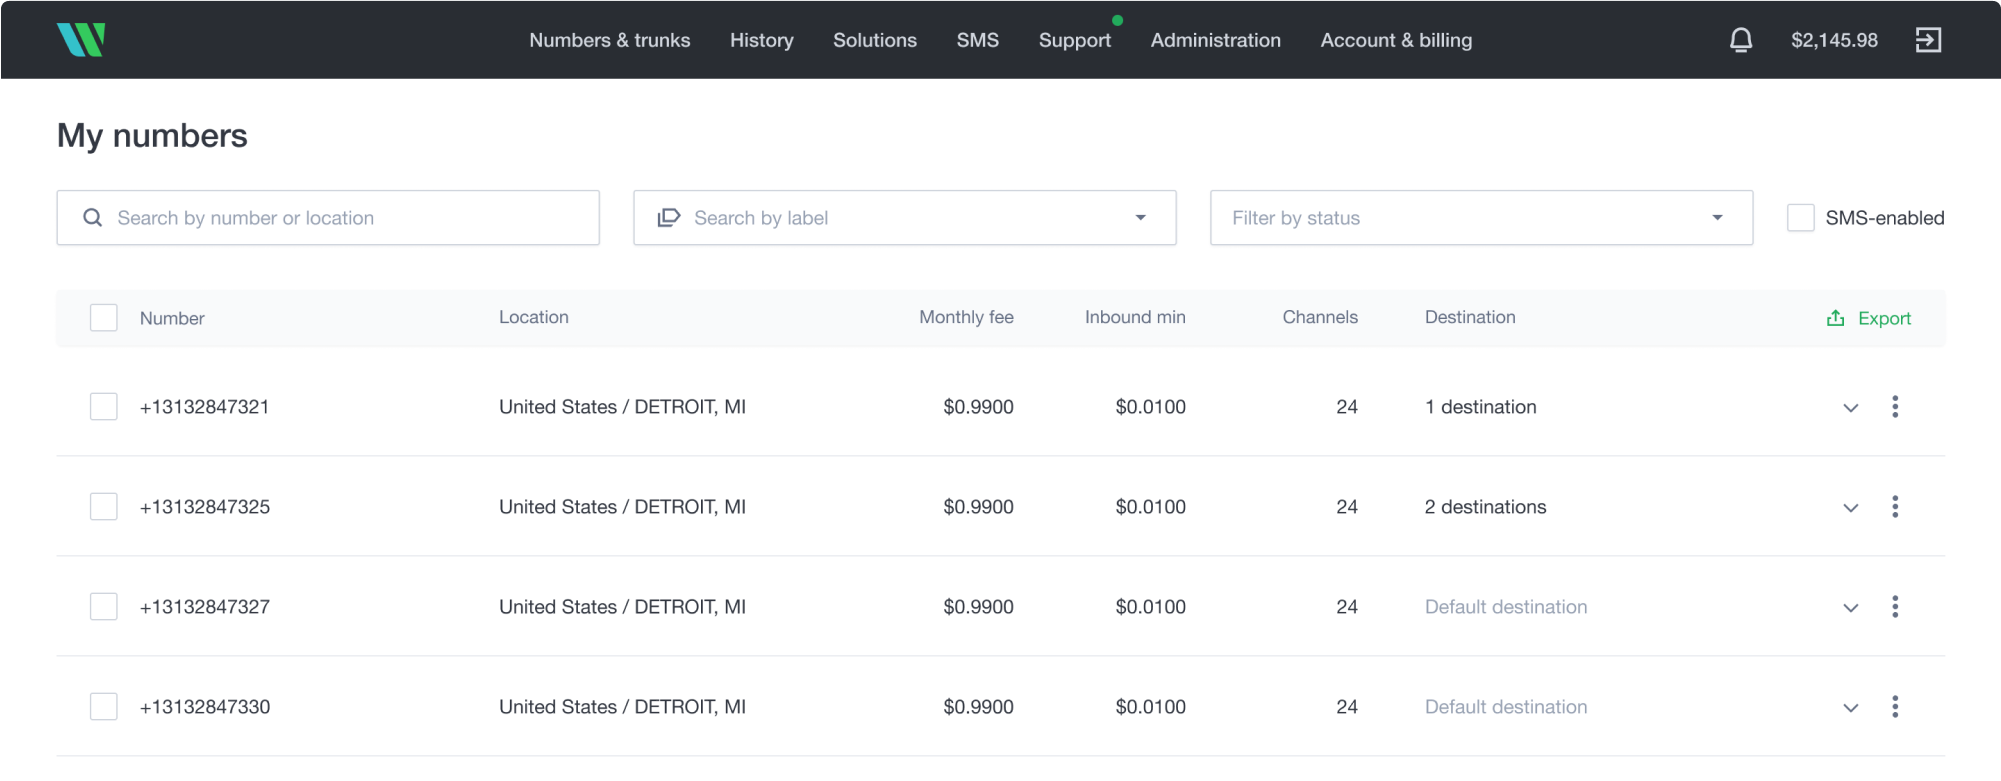 Changes will be applied to all selected numbers.
***
### Configure inbound call routing for trunks with IP authentication
Skip this section if your trunks are configured to use account-based authentication.
When an inbound call reaches Wavix, it can be routed to your SIP trunk, a SIP URI, or a PSTN number.
SIP trunks with IP authentication enabled cannot be used for inbound call routing as they do not maintain registration with Wavix SIP proxies. To configure inbound routing for your numbers, you must specify a valid SIP URI address instead.
To configure inbound call routing to a valid SIP URI:
1. **Log in to** your Wavix account
2. Select **My numbers** under **Numbers & trunks**
3. Click on the three dots on the right-hand side and select **Edit number**. Double-click is also supported.
4. In the **Transport** drop-down menu, select **SIP URI**
5. **Enter a valid SIP URI** using the following format: `+[did]@FQDN:port;transport=connection`, where:
* `FQDN`: fully qualified domain name or IP address of your 3CX instance
* `Port`: SIP port used by the PBX
* `Connection`: can be `udp`, `tcp`, or `tls`. The default transport is udp.
6. Click **Add** to add the destination for the DID
7. Click **Save** to apply settings
The `[did]` parameter will be automatically updated with the actual dialed phone number when routing the call.
You can also edit multiple numbers simultaneously. To do this, select multiple numbers you want to modify, then click on the **Bulk actions** button. The changes will apply to all selected numbers.
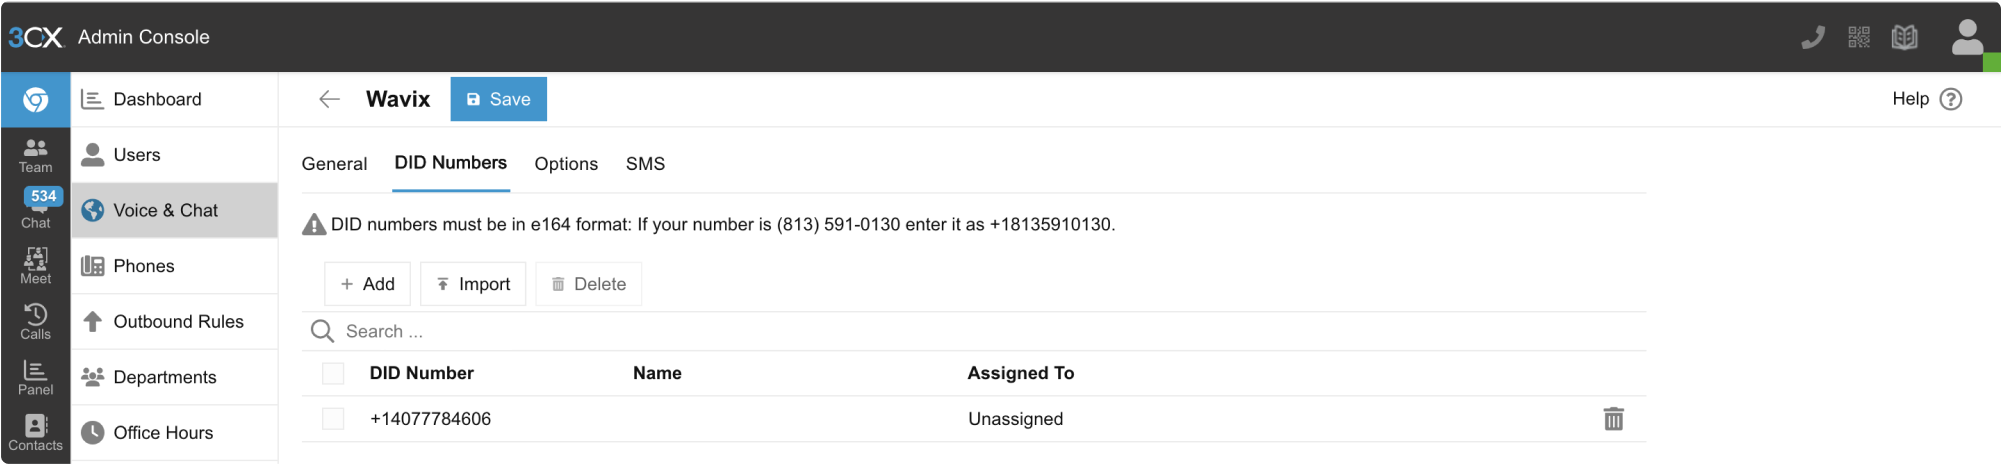
Make sure that all your Wavix numbers are listed under the DIDs tab of the 3CX SIP trunk.
Changes will be applied to all selected numbers.
***
### Configure inbound call routing for trunks with IP authentication
Skip this section if your trunks are configured to use account-based authentication.
When an inbound call reaches Wavix, it can be routed to your SIP trunk, a SIP URI, or a PSTN number.
SIP trunks with IP authentication enabled cannot be used for inbound call routing as they do not maintain registration with Wavix SIP proxies. To configure inbound routing for your numbers, you must specify a valid SIP URI address instead.
To configure inbound call routing to a valid SIP URI:
1. **Log in to** your Wavix account
2. Select **My numbers** under **Numbers & trunks**
3. Click on the three dots on the right-hand side and select **Edit number**. Double-click is also supported.
4. In the **Transport** drop-down menu, select **SIP URI**
5. **Enter a valid SIP URI** using the following format: `+[did]@FQDN:port;transport=connection`, where:
* `FQDN`: fully qualified domain name or IP address of your 3CX instance
* `Port`: SIP port used by the PBX
* `Connection`: can be `udp`, `tcp`, or `tls`. The default transport is udp.
6. Click **Add** to add the destination for the DID
7. Click **Save** to apply settings
The `[did]` parameter will be automatically updated with the actual dialed phone number when routing the call.
You can also edit multiple numbers simultaneously. To do this, select multiple numbers you want to modify, then click on the **Bulk actions** button. The changes will apply to all selected numbers.
Make sure that all your Wavix numbers are listed under the DIDs tab of the 3CX SIP trunk.
 ***
## Verifying the setup
To test the SIP trunk, place a call to your mobile phone number. Follow these steps:
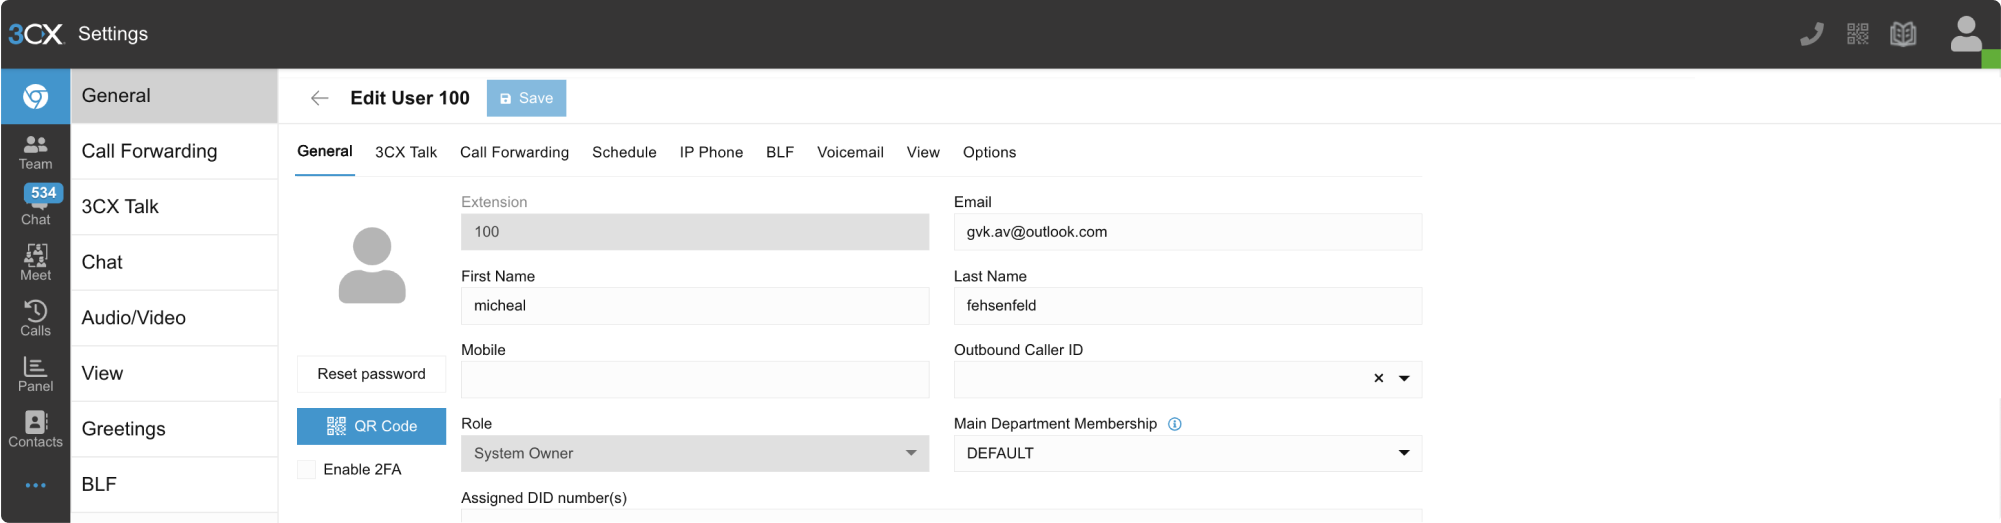
1. Go to Users in the left-hand side menu
2. Click on the default 100 extension
3. Download the 3CX mobile application by scanning the **QR code** displayed on the page
4. Place a test call using the app
***
## Verifying the setup
To test the SIP trunk, place a call to your mobile phone number. Follow these steps:
1. Go to Users in the left-hand side menu
2. Click on the default 100 extension
3. Download the 3CX mobile application by scanning the **QR code** displayed on the page
4. Place a test call using the app
 ## Troubleshooting
If an outbound call fails, check the following:
* You have completed all the steps in this guide.
* The phone number you are dialing is in the international E.164 format.
* The maximum call rate limit on your SIP trunk or account is enough to call the desired destination. You can check your effective rates in the My account section at [app.wavix.com](https://app.wavix.com).
## Troubleshooting
If an outbound call fails, check the following:
* You have completed all the steps in this guide.
* The phone number you are dialing is in the international E.164 format.
* The maximum call rate limit on your SIP trunk or account is enough to call the desired destination. You can check your effective rates in the My account section at [app.wavix.com](https://app.wavix.com).