> ## Documentation Index
> Fetch the complete documentation index at: https://docs.wavix.com/llms.txt
> Use this file to discover all available pages before exploring further.
# How to connect ElevenLabs Agents with Wavix
> This guide explains how to connect ElevenLabs Agents with Wavix voice infrastructure to place and receive calls.
## Prerequisites
Before you begin, ensure you have:
1. An active phone number on your Wavix account. If you need to purchase one, see our guide on [how to buy a phone number](/numbers/buy-number).
2. An active [ElevenLabs account](https://elevenlabs.io/) with access to ElevenLabs Agents.
Most steps in this guide can be completed in the Wavix portal and the ElevenLabs dashboard, or programmatically using the [Wavix API](/api-reference/getting-started) and the [ElevenLabs API](https://elevenlabs.io/docs/api-reference/introduction). Both paths are provided where available.
## How it works
1. A customer calls your Wavix phone number, or your ElevenLabs agent places an outbound call.
2. Wavix and ElevenLabs exchange call signaling and audio over SIP.
3. Your ElevenLabs agent processes the audio and generates spoken responses in real time.
```mermaid actions={false} theme={null}
sequenceDiagram
participant Caller as Caller
participant Wavix as Wavix platform
participant EL as ElevenLabs Agents
Caller->>Wavix: Telephony network
Wavix->>EL: SIP
EL->>EL: Voice AI orchestration (LLM, TTS, conversation logic)
EL->>Wavix: SIP
Wavix->>Caller: Telephony network
```
## Create a SIP trunk in Wavix
ElevenLabs authenticates outbound calls with your Wavix SIP trunk credentials using digest authentication.
1. In the top menu, go to **Numbers & trunks → Trunks**.
2. Click **Create new**.
3. Under **Authentication method**, select **Digest**.
4. Enter a **SIP trunk name**, set a **SIP trunk password**, and choose one of your account's numbers as the Caller ID.
5. Optionally, configure additional limits. If not specified, global account limits apply:
* Max outbound call duration.
* Max number of simultaneous calls via the SIP trunk.
* Max call cost.
6. Click **Create**.
Once created, the trunk appears in your account's SIP trunk list.
Create a SIP trunk with the [Create a SIP trunk](/api-reference/sip-trunks/create-a-sip-trunk) endpoint:
```bash theme={null}
curl -X POST "https://api.wavix.com/v1/trunks" \
-H "Authorization: Bearer your_api_key" \
-H "Content-Type: application/json" \
-d '{
"label": "ElevenLabs",
"password": "YOUR_SIP_TRUNK_PASSWORD",
"callerid": "YOUR_WAVIX_NUMBER",
"ip_restrict": false,
"didinfo_enabled": true,
"call_restrict": false,
"cost_limit": false,
"channels_restrict": false,
"rewrite_enabled": false
}'
```
* Replace `YOUR_SIP_TRUNK_PASSWORD` with a strong password.
* Replace `YOUR_WAVIX_NUMBER` with an active number on your Wavix account, for example `14067704205`.
Copy the value of the `name` field from the response — it's the system-generated 5-digit SIP trunk ID that you'll use as the SIP trunk username in ElevenLabs. Don't use the `id` field, which is an internal identifier.
Your 5-digit SIP trunk username is generated automatically. In the Wavix portal, it's displayed in the **SIP trunk ID** column on the Trunks page.
## Import your number into ElevenLabs
1. Sign in to your ElevenLabs account.
2. In the ElevenLabs Agents dashboard, open the **Phone Numbers** section.
3. Import a phone number from a SIP trunk.
4. Enter your Wavix phone number in E.164 format with the leading `+` sign, for example `+61290597521`, and assign a **Label** to it. ElevenLabs can't import numbers without the leading `+`.
5. Leave the **Inbound Configuration** unchanged.
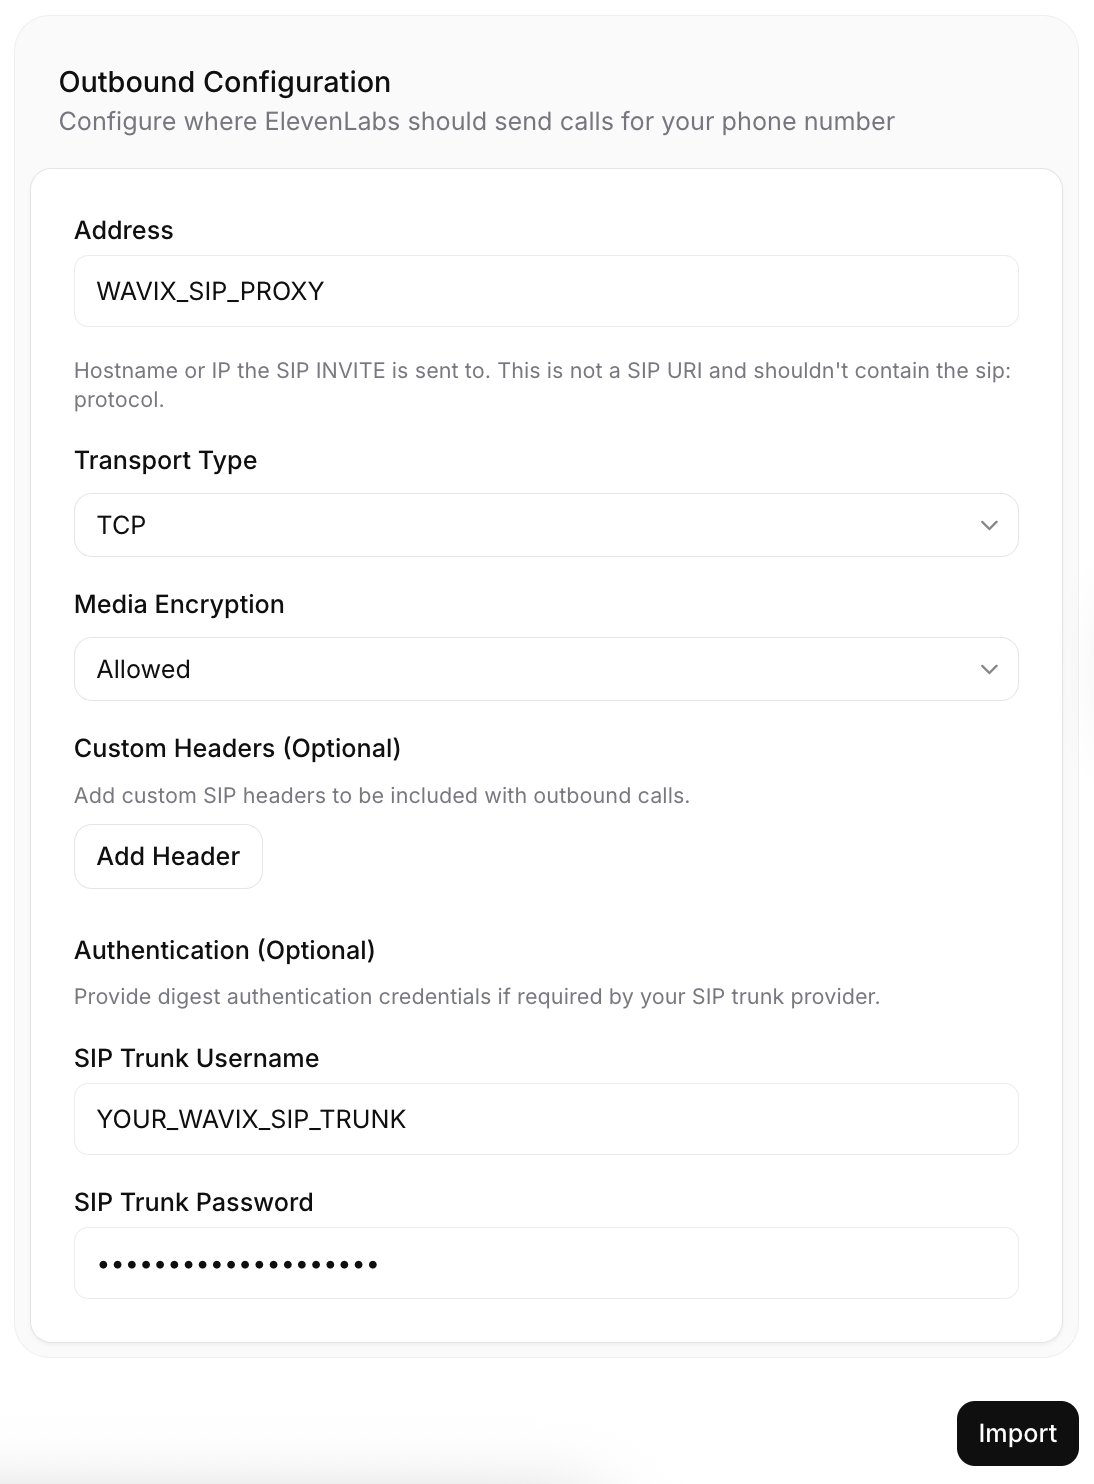
6. In the **Outbound Configuration** section:
* In the **Address** field, enter `us.wavix.net`, the recommended Wavix SIP gateway. ElevenLabs hosts its infrastructure in the US.
* Set **Transport Type** to **TCP**.
* Keep **Media Encryption** set to **Allowed**.
* Under **Authentication**, enter your Wavix **SIP trunk ID** in the **SIP Trunk Username** field and your SIP trunk password in the **SIP Trunk Password** field.
7. Click **Import**.
 Import a number with the ElevenLabs [Create phone number](https://elevenlabs.io/docs/api-reference/phone-numbers/create) endpoint:
```bash theme={null}
curl -X POST "https://api.elevenlabs.io/v1/convai/phone-numbers" \
-H "xi-api-key: YOUR_ELEVENLABS_API_KEY" \
-H "Content-Type: application/json" \
-d '{
"provider": "sip_trunk",
"phone_number": "+YOUR_WAVIX_NUMBER",
"label": "Wavix number",
"outbound_trunk_config": {
"address": "us.wavix.net",
"transport": "tcp",
"media_encryption": "allowed",
"credentials": {
"username": "YOUR_WAVIX_SIP_TRUNK_ID",
"password": "YOUR_WAVIX_SIP_TRUNK_PASSWORD"
}
}
}'
```
* Replace `YOUR_ELEVENLABS_API_KEY` with your ElevenLabs API key.
* Replace `YOUR_WAVIX_NUMBER` with your Wavix number in E.164 format with the leading `+` sign, for example `+61290597521`.
* Replace `YOUR_WAVIX_SIP_TRUNK_ID` and `YOUR_WAVIX_SIP_TRUNK_PASSWORD` with the SIP trunk credentials configured in Wavix.
If successful, the response contains the `phone_number_id`. Copy it for later use.
`us.wavix.net` is the recommended gateway because ElevenLabs hosts its infrastructure in the US. A full list of regional gateways is shown at the bottom of the Trunks page in the [Wavix portal](https://app.wavix.com/trunks).
Optionally, you can encrypt call media on your Wavix numbers and SIP trunks:
1. Contact [support@wavix.com](mailto:support@wavix.com) with a list of the numbers and trunks you want to encrypt media for.
2. Wait for the Wavix Support team to confirm that encryption is active.
3. After confirmation, set **Media Encryption** to **Required** in the **Inbound Configuration** and **Outbound Configuration** sections of the number in ElevenLabs.
To learn more about ElevenLabs SIP trunk configuration, see the [ElevenLabs SIP trunking documentation](https://elevenlabs.io/docs/eleven-agents/phone-numbers/sip-trunking).
## Create an ElevenLabs agent
1. Sign in to your ElevenLabs account.
2. In the ElevenLabs Agents dashboard, open the **Agents** section.
3. Create a new agent from a template or start from a blank one.
4. Configure your agent: set the system prompt and first message, choose an LLM and spoken language, and select the ElevenLabs voice you want the agent to use.
For more information, see the [ElevenLabs Agents quickstart](https://elevenlabs.io/docs/eleven-agents/quickstart). You can also create agents programmatically with the [Create agent](https://elevenlabs.io/docs/api-reference/agents/create) endpoint.
### Assign the agent to your number
1. In the **Phone Numbers** section, select your imported Wavix number.
2. Click **Assign Agent** and select the agent you want to answer calls to this number.
Assign an agent with the ElevenLabs [Update phone number](https://elevenlabs.io/docs/api-reference/phone-numbers/update) endpoint:
```bash theme={null}
curl -X PATCH "https://api.elevenlabs.io/v1/convai/phone-numbers/YOUR_PHONE_NUMBER_ID" \
-H "xi-api-key: YOUR_ELEVENLABS_API_KEY" \
-H "Content-Type: application/json" \
-d '{
"agent_id": "YOUR_AGENT_ID"
}'
```
* Replace `YOUR_PHONE_NUMBER_ID` with the `phone_number_id` returned when you imported the number.
* Replace `YOUR_AGENT_ID` with the ID of your ElevenLabs agent.
## Set up inbound call routing in Wavix
Wavix can route inbound calls to a SIP trunk on the platform, a SIP URI, or forward them to a phone number. ElevenLabs requires calls to be routed to a **SIP URI**.
1. In Wavix, open **Numbers & trunks → My numbers**.
2. Select your number by clicking the **⋯** menu → **Edit number**.
3. Set the **inbound call destination type** to **SIP URI**, and enter the destination. The port is required:
* If media encryption is not enforced on your number:
```bash theme={null}
[did]@sip.rtc.elevenlabs.io:5060;transport=tcp
```
* If media encryption is enabled on your number:
```bash theme={null}
[did]@sip.rtc.elevenlabs.io:5061;transport=tls
```
4. **Save** your changes. Wavix will automatically replace `[did]` with your actual number.
First, find the ID of your phone number with the [List phone numbers](/api-reference/my-numbers/list-phone-numbers) endpoint:
```bash theme={null}
curl -X GET "https://api.wavix.com/v1/numbers" \
-H "Authorization: Bearer your_api_key"
```
Then update the number's inbound call destination with the [Update a phone number](/api-reference/my-numbers/update-a-phone-number) endpoint:
```bash theme={null}
curl -X PATCH "https://api.wavix.com/v1/numbers/YOUR_NUMBER_ID" \
-H "Authorization: Bearer your_api_key" \
-H "Content-Type: application/json" \
-d '{
"destinations": [
{
"destination": "[did]@sip.rtc.elevenlabs.io:5060;transport=tcp",
"priority": 1,
"transport": 1
}
]
}'
```
* Replace `YOUR_NUMBER_ID` with the ID of your Wavix number.
* `transport: 1` sets the destination type to SIP URI.
* The port in the destination is required. If media encryption is enabled on your number, use `[did]@sip.rtc.elevenlabs.io:5061;transport=tls` instead.
Now, all calls to your Wavix number are routed to your ElevenLabs agent.
## Test your configuration
To test inbound calls, dial your Wavix number. You'll be connected to your ElevenLabs agent shortly.
To place an outbound test call:
1. In the ElevenLabs Agents dashboard, open the **Phone Numbers** section.
2. Select the imported Wavix number.
3. Select **Outbound call**.
4. Select an agent and enter a destination phone number.
5. Click **Send Test Call**.
Import a number with the ElevenLabs [Create phone number](https://elevenlabs.io/docs/api-reference/phone-numbers/create) endpoint:
```bash theme={null}
curl -X POST "https://api.elevenlabs.io/v1/convai/phone-numbers" \
-H "xi-api-key: YOUR_ELEVENLABS_API_KEY" \
-H "Content-Type: application/json" \
-d '{
"provider": "sip_trunk",
"phone_number": "+YOUR_WAVIX_NUMBER",
"label": "Wavix number",
"outbound_trunk_config": {
"address": "us.wavix.net",
"transport": "tcp",
"media_encryption": "allowed",
"credentials": {
"username": "YOUR_WAVIX_SIP_TRUNK_ID",
"password": "YOUR_WAVIX_SIP_TRUNK_PASSWORD"
}
}
}'
```
* Replace `YOUR_ELEVENLABS_API_KEY` with your ElevenLabs API key.
* Replace `YOUR_WAVIX_NUMBER` with your Wavix number in E.164 format with the leading `+` sign, for example `+61290597521`.
* Replace `YOUR_WAVIX_SIP_TRUNK_ID` and `YOUR_WAVIX_SIP_TRUNK_PASSWORD` with the SIP trunk credentials configured in Wavix.
If successful, the response contains the `phone_number_id`. Copy it for later use.
`us.wavix.net` is the recommended gateway because ElevenLabs hosts its infrastructure in the US. A full list of regional gateways is shown at the bottom of the Trunks page in the [Wavix portal](https://app.wavix.com/trunks).
Optionally, you can encrypt call media on your Wavix numbers and SIP trunks:
1. Contact [support@wavix.com](mailto:support@wavix.com) with a list of the numbers and trunks you want to encrypt media for.
2. Wait for the Wavix Support team to confirm that encryption is active.
3. After confirmation, set **Media Encryption** to **Required** in the **Inbound Configuration** and **Outbound Configuration** sections of the number in ElevenLabs.
To learn more about ElevenLabs SIP trunk configuration, see the [ElevenLabs SIP trunking documentation](https://elevenlabs.io/docs/eleven-agents/phone-numbers/sip-trunking).
## Create an ElevenLabs agent
1. Sign in to your ElevenLabs account.
2. In the ElevenLabs Agents dashboard, open the **Agents** section.
3. Create a new agent from a template or start from a blank one.
4. Configure your agent: set the system prompt and first message, choose an LLM and spoken language, and select the ElevenLabs voice you want the agent to use.
For more information, see the [ElevenLabs Agents quickstart](https://elevenlabs.io/docs/eleven-agents/quickstart). You can also create agents programmatically with the [Create agent](https://elevenlabs.io/docs/api-reference/agents/create) endpoint.
### Assign the agent to your number
1. In the **Phone Numbers** section, select your imported Wavix number.
2. Click **Assign Agent** and select the agent you want to answer calls to this number.
Assign an agent with the ElevenLabs [Update phone number](https://elevenlabs.io/docs/api-reference/phone-numbers/update) endpoint:
```bash theme={null}
curl -X PATCH "https://api.elevenlabs.io/v1/convai/phone-numbers/YOUR_PHONE_NUMBER_ID" \
-H "xi-api-key: YOUR_ELEVENLABS_API_KEY" \
-H "Content-Type: application/json" \
-d '{
"agent_id": "YOUR_AGENT_ID"
}'
```
* Replace `YOUR_PHONE_NUMBER_ID` with the `phone_number_id` returned when you imported the number.
* Replace `YOUR_AGENT_ID` with the ID of your ElevenLabs agent.
## Set up inbound call routing in Wavix
Wavix can route inbound calls to a SIP trunk on the platform, a SIP URI, or forward them to a phone number. ElevenLabs requires calls to be routed to a **SIP URI**.
1. In Wavix, open **Numbers & trunks → My numbers**.
2. Select your number by clicking the **⋯** menu → **Edit number**.
3. Set the **inbound call destination type** to **SIP URI**, and enter the destination. The port is required:
* If media encryption is not enforced on your number:
```bash theme={null}
[did]@sip.rtc.elevenlabs.io:5060;transport=tcp
```
* If media encryption is enabled on your number:
```bash theme={null}
[did]@sip.rtc.elevenlabs.io:5061;transport=tls
```
4. **Save** your changes. Wavix will automatically replace `[did]` with your actual number.
First, find the ID of your phone number with the [List phone numbers](/api-reference/my-numbers/list-phone-numbers) endpoint:
```bash theme={null}
curl -X GET "https://api.wavix.com/v1/numbers" \
-H "Authorization: Bearer your_api_key"
```
Then update the number's inbound call destination with the [Update a phone number](/api-reference/my-numbers/update-a-phone-number) endpoint:
```bash theme={null}
curl -X PATCH "https://api.wavix.com/v1/numbers/YOUR_NUMBER_ID" \
-H "Authorization: Bearer your_api_key" \
-H "Content-Type: application/json" \
-d '{
"destinations": [
{
"destination": "[did]@sip.rtc.elevenlabs.io:5060;transport=tcp",
"priority": 1,
"transport": 1
}
]
}'
```
* Replace `YOUR_NUMBER_ID` with the ID of your Wavix number.
* `transport: 1` sets the destination type to SIP URI.
* The port in the destination is required. If media encryption is enabled on your number, use `[did]@sip.rtc.elevenlabs.io:5061;transport=tls` instead.
Now, all calls to your Wavix number are routed to your ElevenLabs agent.
## Test your configuration
To test inbound calls, dial your Wavix number. You'll be connected to your ElevenLabs agent shortly.
To place an outbound test call:
1. In the ElevenLabs Agents dashboard, open the **Phone Numbers** section.
2. Select the imported Wavix number.
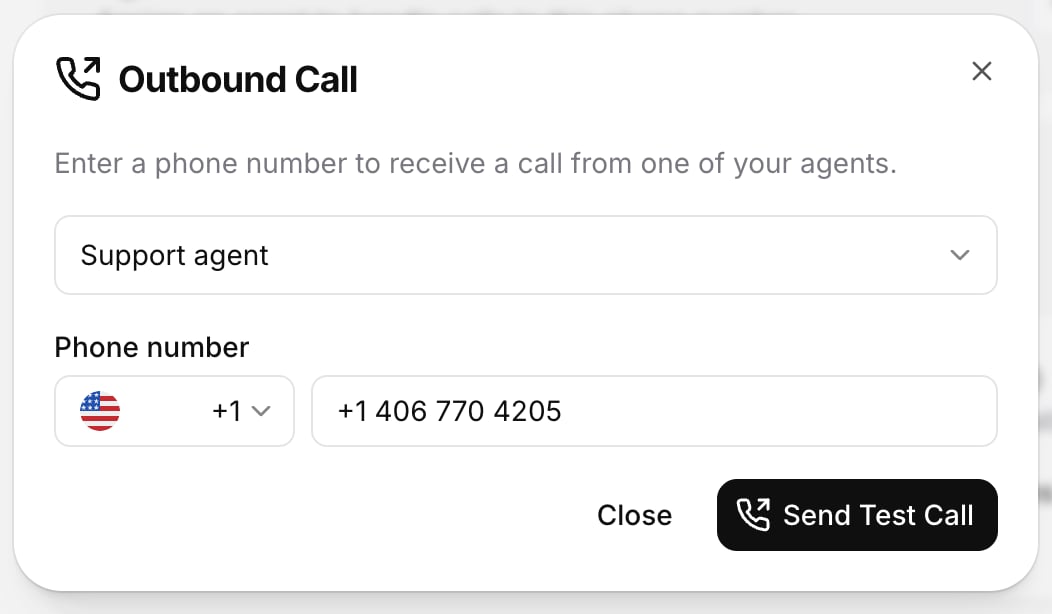
3. Select **Outbound call**.
4. Select an agent and enter a destination phone number.
5. Click **Send Test Call**.
 Place an outbound call with the ElevenLabs [Outbound call via SIP trunk](https://elevenlabs.io/docs/api-reference/sip-trunk/outbound-call) endpoint:
```bash theme={null}
curl -X POST "https://api.elevenlabs.io/v1/convai/sip-trunk/outbound-call" \
-H "xi-api-key: YOUR_ELEVENLABS_API_KEY" \
-H "Content-Type: application/json" \
-d '{
"agent_id": "YOUR_AGENT_ID",
"agent_phone_number_id": "YOUR_PHONE_NUMBER_ID",
"to_number": "+DESTINATION_NUMBER"
}'
```
* Replace `YOUR_AGENT_ID` with the ID of your ElevenLabs agent.
* Replace `YOUR_PHONE_NUMBER_ID` with the `phone_number_id` of the imported Wavix number.
* Replace `DESTINATION_NUMBER` with the phone number you want to call in E.164 format.
## Send a call follow-up SMS
You can let an ElevenLabs agent send an SMS after a call when the caller asks for a written follow-up. For example, after a scheduling call, the agent can send an appointment confirmation, reference number, or support link to the same phone number that placed the call.
Before you enable SMS follow-ups:
* Register the SMS Sender ID you want to use. For setup instructions, see [Sender ID registration](/messaging/send-sms#sender-id-registration).
* Create a dedicated Wavix API key with only the scopes required to send SMS.
* Confirm that the caller has agreed to receive the follow-up SMS.
* Keep the SMS content short and include opt-out text when required by your destination country or messaging use case.
### Connect the Wavix MCP server to ElevenLabs
The Wavix MCP server exposes Wavix messaging tools, including `sms_and_mms_messages_send`, to your ElevenLabs agent.
1. In the ElevenLabs dashboard open **Settings** and add a new **Auth Connection**:
* **Auth Type**: `Bearer token`
* **Name**: `Wavix API`
* **Authentication Token**: `YOUR_WAVIX_API_KEY`
2. In the ElevenLabs **Agent's** dashboard, open **Tool**, then open the MCP server integrations page.
3. Select **Add Custom MCP Server**.
4. Enter the following values:
* **Name**: `Wavix`
* **Description**: `Wavix MCP server`
* **Server type**: `Streamable HTTP`
* **Server URL**: `https://mcp.wavix.com/mcp`
* **Authentication**: `Wavix API`
* **Tool Approval Mode**: Leave recommended `Fine-Grained Tool Approval`.
5. Leave custom HTTP headers empty unless your security policy requires additional headers.
6. Select **I trust this server**, test the connection, and save the integration.
7. Attach the Wavix MCP server to the ElevenLabs agent that handles calls.
8. In the MCP tool approval settings, keep only the tools the agent needs. For follow-up SMS, enable `sms_and_mms_messages_send`.
Wavix MCP uses bearer authentication. Send the Wavix API key in the `Authorization` header as `Bearer YOUR_WAVIX_API_KEY`.
Create the MCP server configuration with the ElevenLabs [Create MCP server](https://elevenlabs.io/docs/eleven-agents/api-reference/mcp/create) endpoint:
```bash theme={null}
curl -X POST "https://api.elevenlabs.io/v1/convai/mcp-servers" \
-H "xi-api-key: YOUR_ELEVENLABS_API_KEY" \
-H "Content-Type: application/json" \
-d '{
"config": {
"url": "https://mcp.wavix.com/mcp",
"name": "Wavix MCP server",
"description": "Send Wavix SMS follow-up messages after calls.",
"transport": "STREAMABLE_HTTP",
"approval_policy": "require_approval_per_tool",
"request_headers": {
"Authorization": "Bearer YOUR_WAVIX_API_KEY"
}
}
}'
```
Then attach the MCP server to your agent with the ElevenLabs [Update agent](https://elevenlabs.io/docs/eleven-agents/api-reference/agents/update) endpoint:
```bash theme={null}
curl -X PATCH "https://api.elevenlabs.io/v1/convai/agents/YOUR_AGENT_ID" \
-H "xi-api-key: YOUR_ELEVENLABS_API_KEY" \
-H "Content-Type: application/json" \
-d '{
"conversation_config": {
"agent": {
"prompt": {
"mcp_server_ids": ["YOUR_MCP_SERVER_ID"]
}
}
}
}'
```
* Replace `YOUR_ELEVENLABS_API_KEY` with your ElevenLabs API key.
* Replace `YOUR_WAVIX_API_KEY` with a restricted Wavix API key.
* Replace `YOUR_AGENT_ID` with the ID of your ElevenLabs agent.
* Replace `YOUR_MCP_SERVER_ID` with the `id` returned when you created the MCP server.
If you configure the MCP server through the API, store the Wavix API key as an ElevenLabs secret where possible instead of keeping it as a plain request header value.
### Capture the caller number
ElevenLabs provides `{{system__caller_id}}` as an automatic dynamic variable for voice calls. Use this value as the SMS recipient when the agent calls the Wavix `sms_and_mms_messages_send` tool.
Configure the agent so it sends SMS only after explicit caller consent. In the agent prompt or tool configuration, use:
* `from`: Your registered Sender ID.
* `to`: `{{system__caller_id}}`.
* `message_body.text`: The follow-up text the caller requested.
For example, the agent instruction can say:
```text theme={null}
If the caller asks for a written follow-up and confirms consent, use the Wavix SMS tool to send one message to {{system__caller_id}} from SENDER_ID. Keep the message under 160 characters when possible. Do not send sensitive personal, payment, authentication, or health information by SMS.
```
### Security requirements
* Use a Wavix API key scoped only to messaging. Don't use a full-access account key.
* Store API keys in ElevenLabs secrets or protected headers. Don't put keys in prompts, first messages, or public URLs.
* Require caller consent before sending an SMS. The agent should not send follow-ups automatically for every call.
* Keep tool approvals restrictive. Start with approval required for `sms_and_mms_messages_send`, then allow automatic execution only for that tool after testing.
* Don't send one-time passwords, payment details, health information, or other sensitive data in a follow-up SMS.
* Follow destination-country SMS rules, including Sender ID registration, opt-out language, and message content restrictions.
* Monitor Wavix message delivery reports and ElevenLabs tool execution logs during rollout.
## Transfer a call
Wavix supports cold transfers using the `SIP REFER` command. To transfer a call, you need two Wavix numbers, one for an active call and one to receive the transferred call. Make sure inbound call routing is set up on the second number.
To enable call transfers in ElevenLabs:
1. In the ElevenLabs Agents dashboard, open the **Agents** section and select your agent.
2. In the agent configuration, add the **Transfer to number** system tool.
3. Add a transfer rule:
* Select **SIP REFER** as the **Transfer type**.
* Select **Phone** in the **Number type** dropdown menu.
* Enter the destination number to transfer active calls to.
* Specify the condition for the call transfer, for example "A caller wants to speak to a human agent."
4. Select **Save**.
SIP REFER transfers don't support warm transfer messages. The call is transferred without speaking to the new recipient.
To learn more about ElevenLabs call transfers, see the [Transfer to number documentation](https://elevenlabs.io/docs/eleven-agents/customization/tools/system-tools/transfer-to-number).
## Troubleshooting
* **603 Declined** can occur if the destination's per‑minute rate is higher than your account's Max call rate (check the value on the Trunks page). Contact [**support@wavix.com**](mailto:support@wavix.com) to request a change if needed.
* **SIP trunk authentication errors**. In the Wavix portal, go to **Numbers & trunks → Trunks** and verify that the **SIP trunk ID** and **password** match exactly what you entered in ElevenLabs. Credentials are case-sensitive.
* **Wrong number format**. Dial the full international E.164 number, e.g. `19085594899` (US) or `4408001218915` (UK). Do not dial local formats like `9085594899`. Strip prefixes like `0`, `00`, or `011` before the dialed number.
* **Inbound calls not reaching the agent**. Verify that the inbound call destination for your number is set to `[did]@sip.rtc.elevenlabs.io:5060;transport=tcp`, or `[did]@sip.rtc.elevenlabs.io:5061;transport=tls` if media encryption is enabled. The port is required. Also check that an agent is assigned to the imported number in ElevenLabs.
If you face any other issues, contact [support@wavix.com](mailto:support@wavix.com) and provide the origination and destination numbers, and the date and time of the call.
Place an outbound call with the ElevenLabs [Outbound call via SIP trunk](https://elevenlabs.io/docs/api-reference/sip-trunk/outbound-call) endpoint:
```bash theme={null}
curl -X POST "https://api.elevenlabs.io/v1/convai/sip-trunk/outbound-call" \
-H "xi-api-key: YOUR_ELEVENLABS_API_KEY" \
-H "Content-Type: application/json" \
-d '{
"agent_id": "YOUR_AGENT_ID",
"agent_phone_number_id": "YOUR_PHONE_NUMBER_ID",
"to_number": "+DESTINATION_NUMBER"
}'
```
* Replace `YOUR_AGENT_ID` with the ID of your ElevenLabs agent.
* Replace `YOUR_PHONE_NUMBER_ID` with the `phone_number_id` of the imported Wavix number.
* Replace `DESTINATION_NUMBER` with the phone number you want to call in E.164 format.
## Send a call follow-up SMS
You can let an ElevenLabs agent send an SMS after a call when the caller asks for a written follow-up. For example, after a scheduling call, the agent can send an appointment confirmation, reference number, or support link to the same phone number that placed the call.
Before you enable SMS follow-ups:
* Register the SMS Sender ID you want to use. For setup instructions, see [Sender ID registration](/messaging/send-sms#sender-id-registration).
* Create a dedicated Wavix API key with only the scopes required to send SMS.
* Confirm that the caller has agreed to receive the follow-up SMS.
* Keep the SMS content short and include opt-out text when required by your destination country or messaging use case.
### Connect the Wavix MCP server to ElevenLabs
The Wavix MCP server exposes Wavix messaging tools, including `sms_and_mms_messages_send`, to your ElevenLabs agent.
1. In the ElevenLabs dashboard open **Settings** and add a new **Auth Connection**:
* **Auth Type**: `Bearer token`
* **Name**: `Wavix API`
* **Authentication Token**: `YOUR_WAVIX_API_KEY`
2. In the ElevenLabs **Agent's** dashboard, open **Tool**, then open the MCP server integrations page.
3. Select **Add Custom MCP Server**.
4. Enter the following values:
* **Name**: `Wavix`
* **Description**: `Wavix MCP server`
* **Server type**: `Streamable HTTP`
* **Server URL**: `https://mcp.wavix.com/mcp`
* **Authentication**: `Wavix API`
* **Tool Approval Mode**: Leave recommended `Fine-Grained Tool Approval`.
5. Leave custom HTTP headers empty unless your security policy requires additional headers.
6. Select **I trust this server**, test the connection, and save the integration.
7. Attach the Wavix MCP server to the ElevenLabs agent that handles calls.
8. In the MCP tool approval settings, keep only the tools the agent needs. For follow-up SMS, enable `sms_and_mms_messages_send`.
Wavix MCP uses bearer authentication. Send the Wavix API key in the `Authorization` header as `Bearer YOUR_WAVIX_API_KEY`.
Create the MCP server configuration with the ElevenLabs [Create MCP server](https://elevenlabs.io/docs/eleven-agents/api-reference/mcp/create) endpoint:
```bash theme={null}
curl -X POST "https://api.elevenlabs.io/v1/convai/mcp-servers" \
-H "xi-api-key: YOUR_ELEVENLABS_API_KEY" \
-H "Content-Type: application/json" \
-d '{
"config": {
"url": "https://mcp.wavix.com/mcp",
"name": "Wavix MCP server",
"description": "Send Wavix SMS follow-up messages after calls.",
"transport": "STREAMABLE_HTTP",
"approval_policy": "require_approval_per_tool",
"request_headers": {
"Authorization": "Bearer YOUR_WAVIX_API_KEY"
}
}
}'
```
Then attach the MCP server to your agent with the ElevenLabs [Update agent](https://elevenlabs.io/docs/eleven-agents/api-reference/agents/update) endpoint:
```bash theme={null}
curl -X PATCH "https://api.elevenlabs.io/v1/convai/agents/YOUR_AGENT_ID" \
-H "xi-api-key: YOUR_ELEVENLABS_API_KEY" \
-H "Content-Type: application/json" \
-d '{
"conversation_config": {
"agent": {
"prompt": {
"mcp_server_ids": ["YOUR_MCP_SERVER_ID"]
}
}
}
}'
```
* Replace `YOUR_ELEVENLABS_API_KEY` with your ElevenLabs API key.
* Replace `YOUR_WAVIX_API_KEY` with a restricted Wavix API key.
* Replace `YOUR_AGENT_ID` with the ID of your ElevenLabs agent.
* Replace `YOUR_MCP_SERVER_ID` with the `id` returned when you created the MCP server.
If you configure the MCP server through the API, store the Wavix API key as an ElevenLabs secret where possible instead of keeping it as a plain request header value.
### Capture the caller number
ElevenLabs provides `{{system__caller_id}}` as an automatic dynamic variable for voice calls. Use this value as the SMS recipient when the agent calls the Wavix `sms_and_mms_messages_send` tool.
Configure the agent so it sends SMS only after explicit caller consent. In the agent prompt or tool configuration, use:
* `from`: Your registered Sender ID.
* `to`: `{{system__caller_id}}`.
* `message_body.text`: The follow-up text the caller requested.
For example, the agent instruction can say:
```text theme={null}
If the caller asks for a written follow-up and confirms consent, use the Wavix SMS tool to send one message to {{system__caller_id}} from SENDER_ID. Keep the message under 160 characters when possible. Do not send sensitive personal, payment, authentication, or health information by SMS.
```
### Security requirements
* Use a Wavix API key scoped only to messaging. Don't use a full-access account key.
* Store API keys in ElevenLabs secrets or protected headers. Don't put keys in prompts, first messages, or public URLs.
* Require caller consent before sending an SMS. The agent should not send follow-ups automatically for every call.
* Keep tool approvals restrictive. Start with approval required for `sms_and_mms_messages_send`, then allow automatic execution only for that tool after testing.
* Don't send one-time passwords, payment details, health information, or other sensitive data in a follow-up SMS.
* Follow destination-country SMS rules, including Sender ID registration, opt-out language, and message content restrictions.
* Monitor Wavix message delivery reports and ElevenLabs tool execution logs during rollout.
## Transfer a call
Wavix supports cold transfers using the `SIP REFER` command. To transfer a call, you need two Wavix numbers, one for an active call and one to receive the transferred call. Make sure inbound call routing is set up on the second number.
To enable call transfers in ElevenLabs:
1. In the ElevenLabs Agents dashboard, open the **Agents** section and select your agent.
2. In the agent configuration, add the **Transfer to number** system tool.
3. Add a transfer rule:
* Select **SIP REFER** as the **Transfer type**.
* Select **Phone** in the **Number type** dropdown menu.
* Enter the destination number to transfer active calls to.
* Specify the condition for the call transfer, for example "A caller wants to speak to a human agent."
4. Select **Save**.
SIP REFER transfers don't support warm transfer messages. The call is transferred without speaking to the new recipient.
To learn more about ElevenLabs call transfers, see the [Transfer to number documentation](https://elevenlabs.io/docs/eleven-agents/customization/tools/system-tools/transfer-to-number).
## Troubleshooting
* **603 Declined** can occur if the destination's per‑minute rate is higher than your account's Max call rate (check the value on the Trunks page). Contact [**support@wavix.com**](mailto:support@wavix.com) to request a change if needed.
* **SIP trunk authentication errors**. In the Wavix portal, go to **Numbers & trunks → Trunks** and verify that the **SIP trunk ID** and **password** match exactly what you entered in ElevenLabs. Credentials are case-sensitive.
* **Wrong number format**. Dial the full international E.164 number, e.g. `19085594899` (US) or `4408001218915` (UK). Do not dial local formats like `9085594899`. Strip prefixes like `0`, `00`, or `011` before the dialed number.
* **Inbound calls not reaching the agent**. Verify that the inbound call destination for your number is set to `[did]@sip.rtc.elevenlabs.io:5060;transport=tcp`, or `[did]@sip.rtc.elevenlabs.io:5061;transport=tls` if media encryption is enabled. The port is required. Also check that an agent is assigned to the imported number in ElevenLabs.
If you face any other issues, contact [support@wavix.com](mailto:support@wavix.com) and provide the origination and destination numbers, and the date and time of the call.