> ## Documentation Index
> Fetch the complete documentation index at: https://docs.wavix.com/llms.txt
> Use this file to discover all available pages before exploring further.
# How to configure FreePBX using Wavix SIP trunks
> This guide provides a basic configuration of FreePBX to make inbound and outbound calls over the Wavix network
## Prerequisites
Before you begin, ensure you have:
1. An active phone number on your Wavix account. If you need to purchase one, see our guide on [how to buy a phone number](/numbers/buy-number).
2. A SIP trunk ([How to create a SIP trunk](/sip-trunking/create-sip-trunk)).
## Configure a SIP trunk in FreePBX
For this guide, we will use `nl.wavix.net` as the primary SIP gateway.
Choose the primary gateway with the lowest ping from your location. A full list of Wavix regional gateways is available at the bottom of the page: [https://app.wavix.com/trunks](https://app.wavix.com/trunks)
To configure outbound calls on your FreePBX server:
1. **Sign in** to your FreePBX instance.
2. In the top menu, go to **Connectivity → Trunks**.
3. Click **Add trunk** and select **Add SIP (chan\_pjsip) Trunk**.
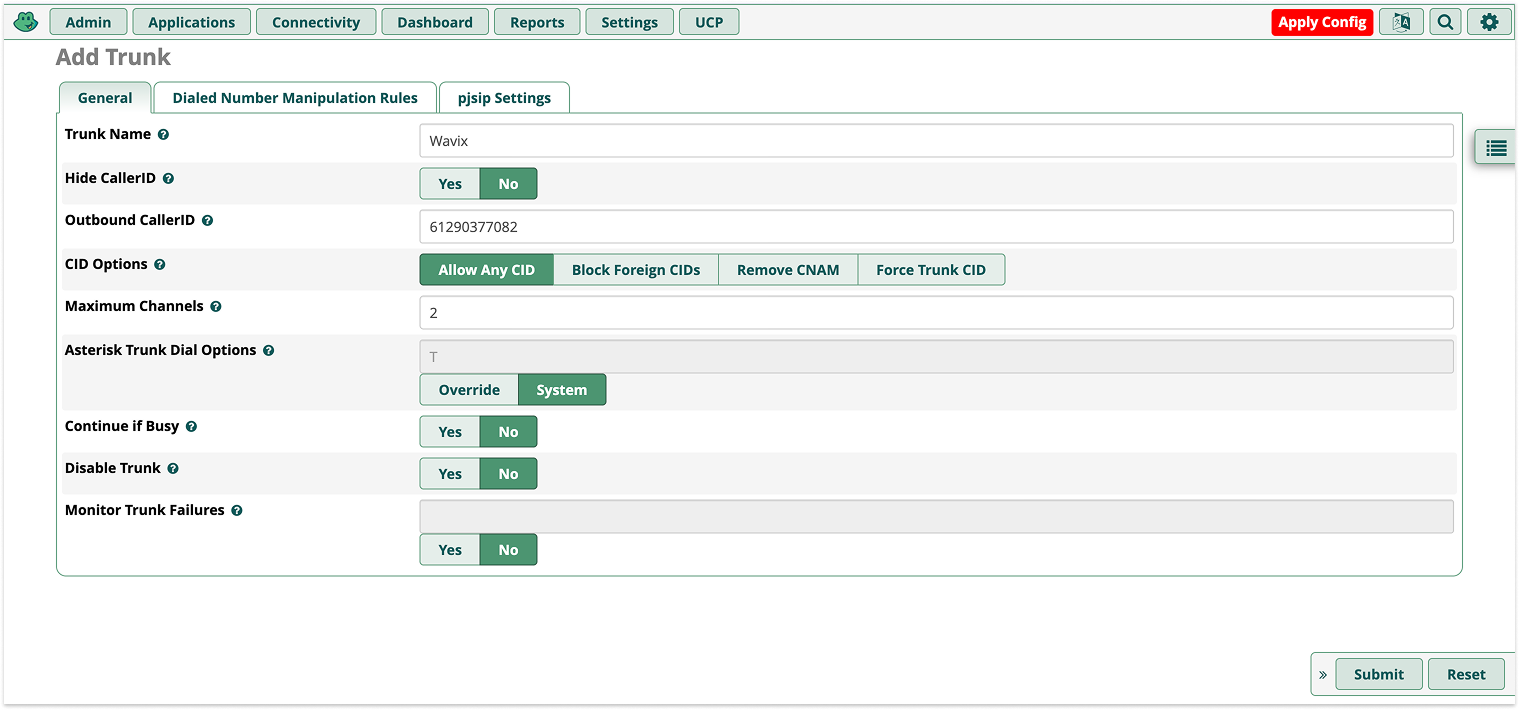
4. Enter a **Trunk Name**, set an **Outbound CallerID**, and specify **Maximum Channels**:
* **Trunk Name** - the name of your FreePBX SIP trunk.
* **Outbound CallerID** should be an active or verified phone number from your Wavix account.
* **Maximum Channels** limit the maximum number of concurrent calls for this trunk.
 5. Navigate to **pjsip Settings** and open the **General** tab:
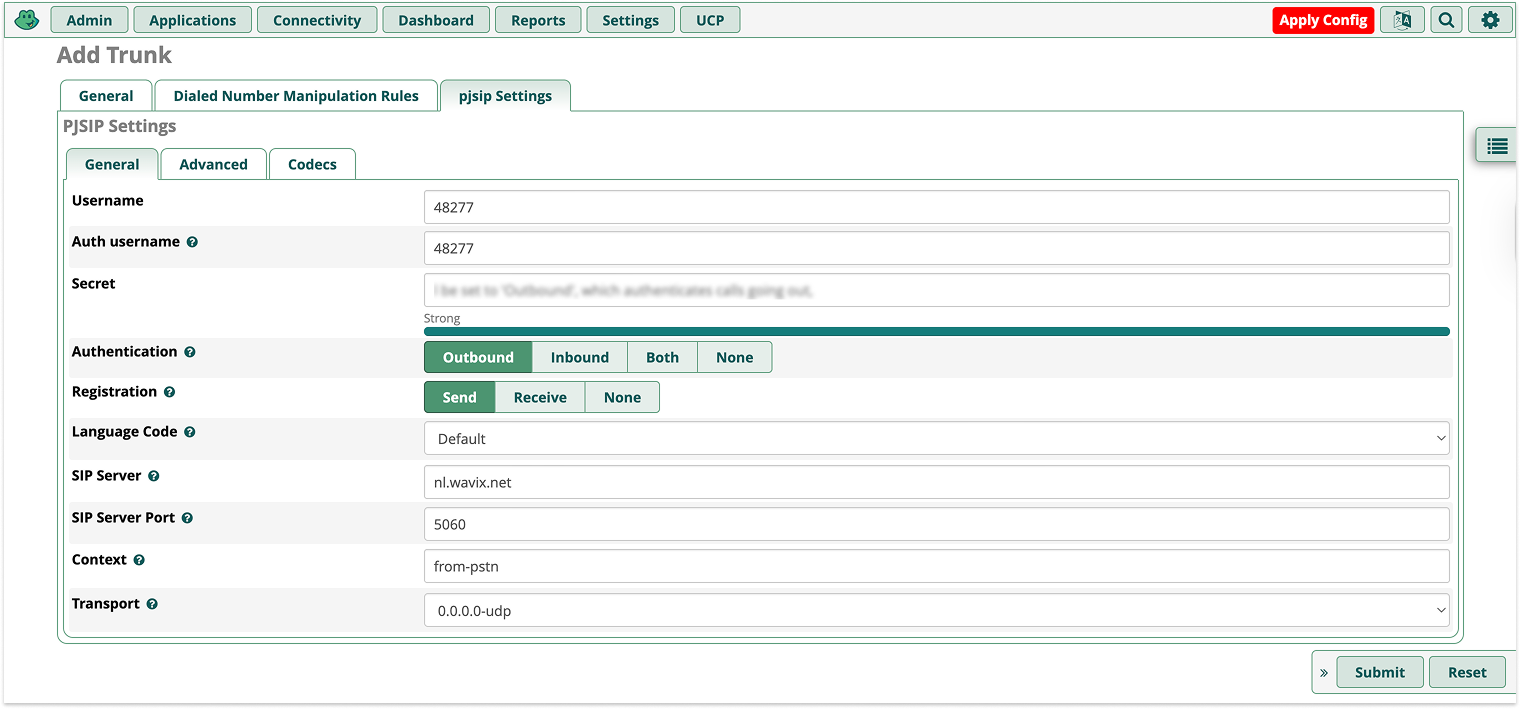
* **Username** and **Auth username** should contain a 5-digit Wavix SIP trunk username.
* **Secret**: Your Wavix SIP trunk password.
* **SIP server**: Wavix regional SIP gateway with the lowest ping from your location.
* **Port**: Set to 5060.
6. Keep the default values for all other parameters.
7. Click **Submit**.
5. Navigate to **pjsip Settings** and open the **General** tab:
* **Username** and **Auth username** should contain a 5-digit Wavix SIP trunk username.
* **Secret**: Your Wavix SIP trunk password.
* **SIP server**: Wavix regional SIP gateway with the lowest ping from your location.
* **Port**: Set to 5060.
6. Keep the default values for all other parameters.
7. Click **Submit**.
 ## Enable IP Authentication
You may wish to enable IP Authentication on Wavix SIP trunks. When IP Authentication is enabled, Wavix will accept all calls originating from a specified IP address without requiring login credentials.
You must have a dedicated IP for this option to work correctly.
### Activate IP Auth on Wavix SIP trunk
To enable IP Authentication on your Wavix SIP trunk:
1. [Create new](/sip-trunking/create-sip-trunk) or open an existing Wavix SIP trunk settings.
2. Under **Authentication Method**, select **IP Authentication**.
3. Enter a public static IP address of your FreePBX and click **Submit**.
4. Click **Save** to apply the changes.
Once submitted, the Wavix Support team will review and enable IP Authentication on the SIP trunk.
After submitting the IP authentication request, you won't be able to update your IP address or change the authentication method.
* When IP Authentication is enabled, the SIP trunk cannot be used as a destination for a DID (phone number). You must use a **SIP URI** instead.
* By default, an IP address can only be mapped to a single SIP trunk. If you need several Wavix SIP trunks sharing the same IP address, please contact [support@wavix.com](mailto:support@wavix.com).
### Activate IP Auth in FreePBX
To enable IP Authentication on your FreePBX SIP trunk:
1. [Create new](/sip-trunking/guides/freepbx#configure-a-sip-trunk-in-freepbx) or open an existing FreePBX SIP trunk settings.
2. Navigate to **pjsip Settings** and open the **General** tab:
* Set **Authentication** to **None**.
* Set **Registration** to **None**.
* Make sure **SIP server** contains a domain name of Wavix's SIP proxy with the lowest ping from your premises.
3. Click **Submit** to apply the changes.
## Configure outbound calls in FreePBX
To configure outbound calls:
1. In the top menu, go to **Connectivity → Outbound Routes**.
2. Select **Add Outbound Route**:
* Specify the **Route Name**.
* Select the Wavix trunk in the **Trunk Sequence for Matched Routes**.
## Enable IP Authentication
You may wish to enable IP Authentication on Wavix SIP trunks. When IP Authentication is enabled, Wavix will accept all calls originating from a specified IP address without requiring login credentials.
You must have a dedicated IP for this option to work correctly.
### Activate IP Auth on Wavix SIP trunk
To enable IP Authentication on your Wavix SIP trunk:
1. [Create new](/sip-trunking/create-sip-trunk) or open an existing Wavix SIP trunk settings.
2. Under **Authentication Method**, select **IP Authentication**.
3. Enter a public static IP address of your FreePBX and click **Submit**.
4. Click **Save** to apply the changes.
Once submitted, the Wavix Support team will review and enable IP Authentication on the SIP trunk.
After submitting the IP authentication request, you won't be able to update your IP address or change the authentication method.
* When IP Authentication is enabled, the SIP trunk cannot be used as a destination for a DID (phone number). You must use a **SIP URI** instead.
* By default, an IP address can only be mapped to a single SIP trunk. If you need several Wavix SIP trunks sharing the same IP address, please contact [support@wavix.com](mailto:support@wavix.com).
### Activate IP Auth in FreePBX
To enable IP Authentication on your FreePBX SIP trunk:
1. [Create new](/sip-trunking/guides/freepbx#configure-a-sip-trunk-in-freepbx) or open an existing FreePBX SIP trunk settings.
2. Navigate to **pjsip Settings** and open the **General** tab:
* Set **Authentication** to **None**.
* Set **Registration** to **None**.
* Make sure **SIP server** contains a domain name of Wavix's SIP proxy with the lowest ping from your premises.
3. Click **Submit** to apply the changes.
## Configure outbound calls in FreePBX
To configure outbound calls:
1. In the top menu, go to **Connectivity → Outbound Routes**.
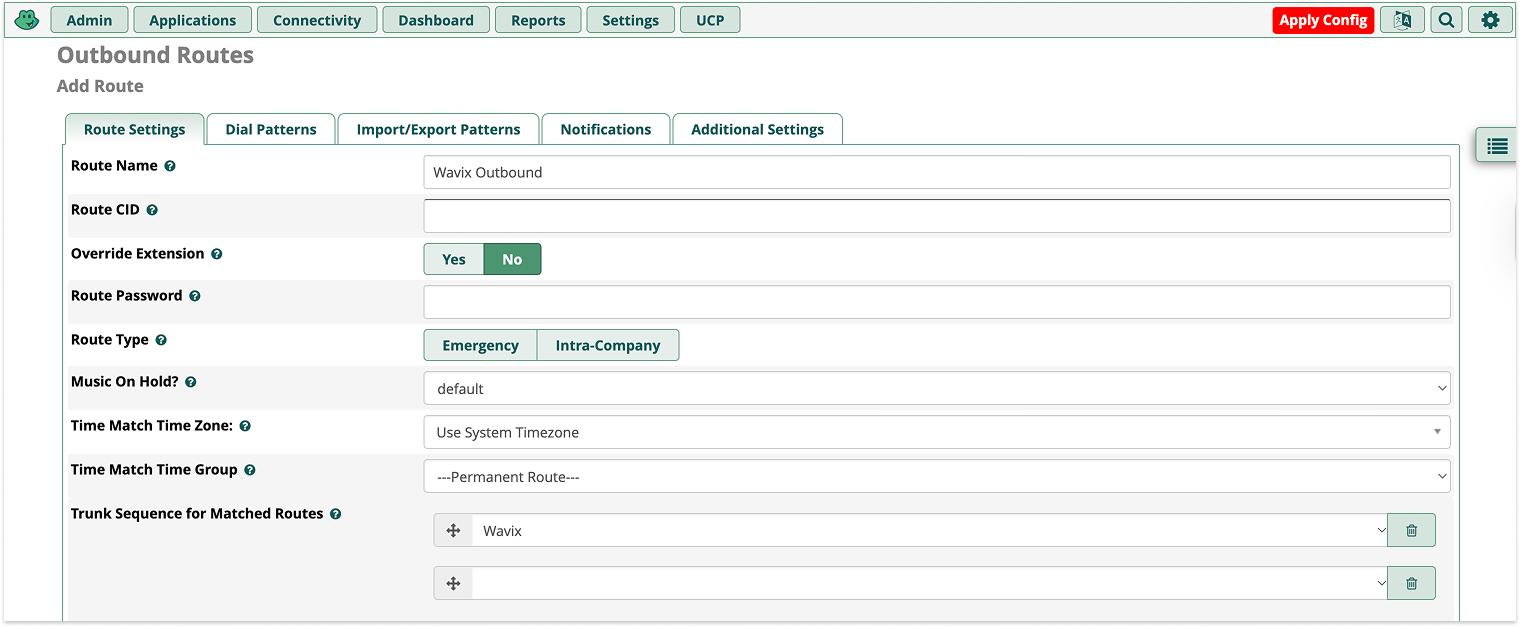
2. Select **Add Outbound Route**:
* Specify the **Route Name**.
* Select the Wavix trunk in the **Trunk Sequence for Matched Routes**.
 3. Select **Dial Patterns** and define the rules for routing calls to the Wavix trunk. If the dialed number matches one of these patterns, no other routes are checked.
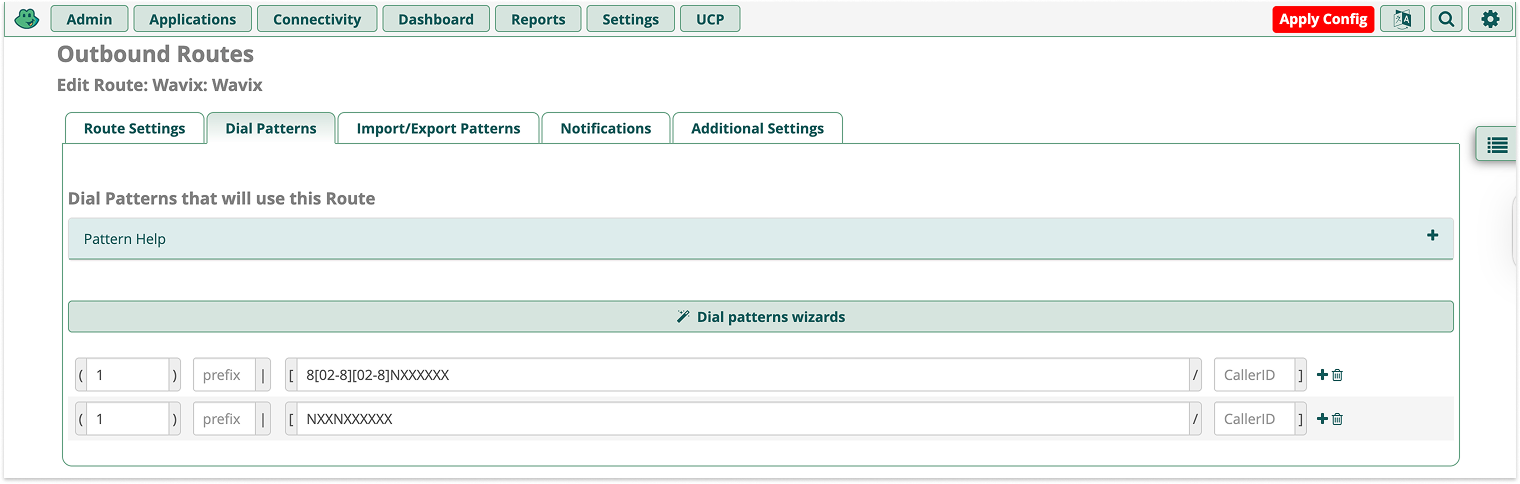 Wavix only allows phone numbers in the E.164 international format. This format can handle numbers with up to 15 digits and is usually written as \[+]\[country code]\[subscriber number including area code]. For example, a US number in E.164 format would be +16561223344. The Wavix platform will reject calls to numbers without a country code or carrying national access codes.
| Country | Number | Reason | Number in E.164 format |
| ----------- | ------------- | ---------------------------------------------------- | ---------------------- |
| US | 6561223344 | No country code | +16561223344 |
| UK | 020 1122 3344 | No country code, national access code with leading 0 | +442011223344 |
| Switzerland | 0041797000777 | Leading 00 international prefix | +41797000777 |
## Configure inbound calls
### Configure inbound calls on Wavix
If you have enabled IP authentication for your SIP trunk, scroll down to the [Configure inbound call routing for trunks with IP authentication](#configure-inbound-call-routing-for-trunks-with-ip-authentication) section.
1. **Sign in** to your Wavix account.
2. In the top menu, go to **Numbers & Trunks → My numbers**.
3. Click on the three dots next to the number you want to edit (right-hand side) and select **Edit number**.
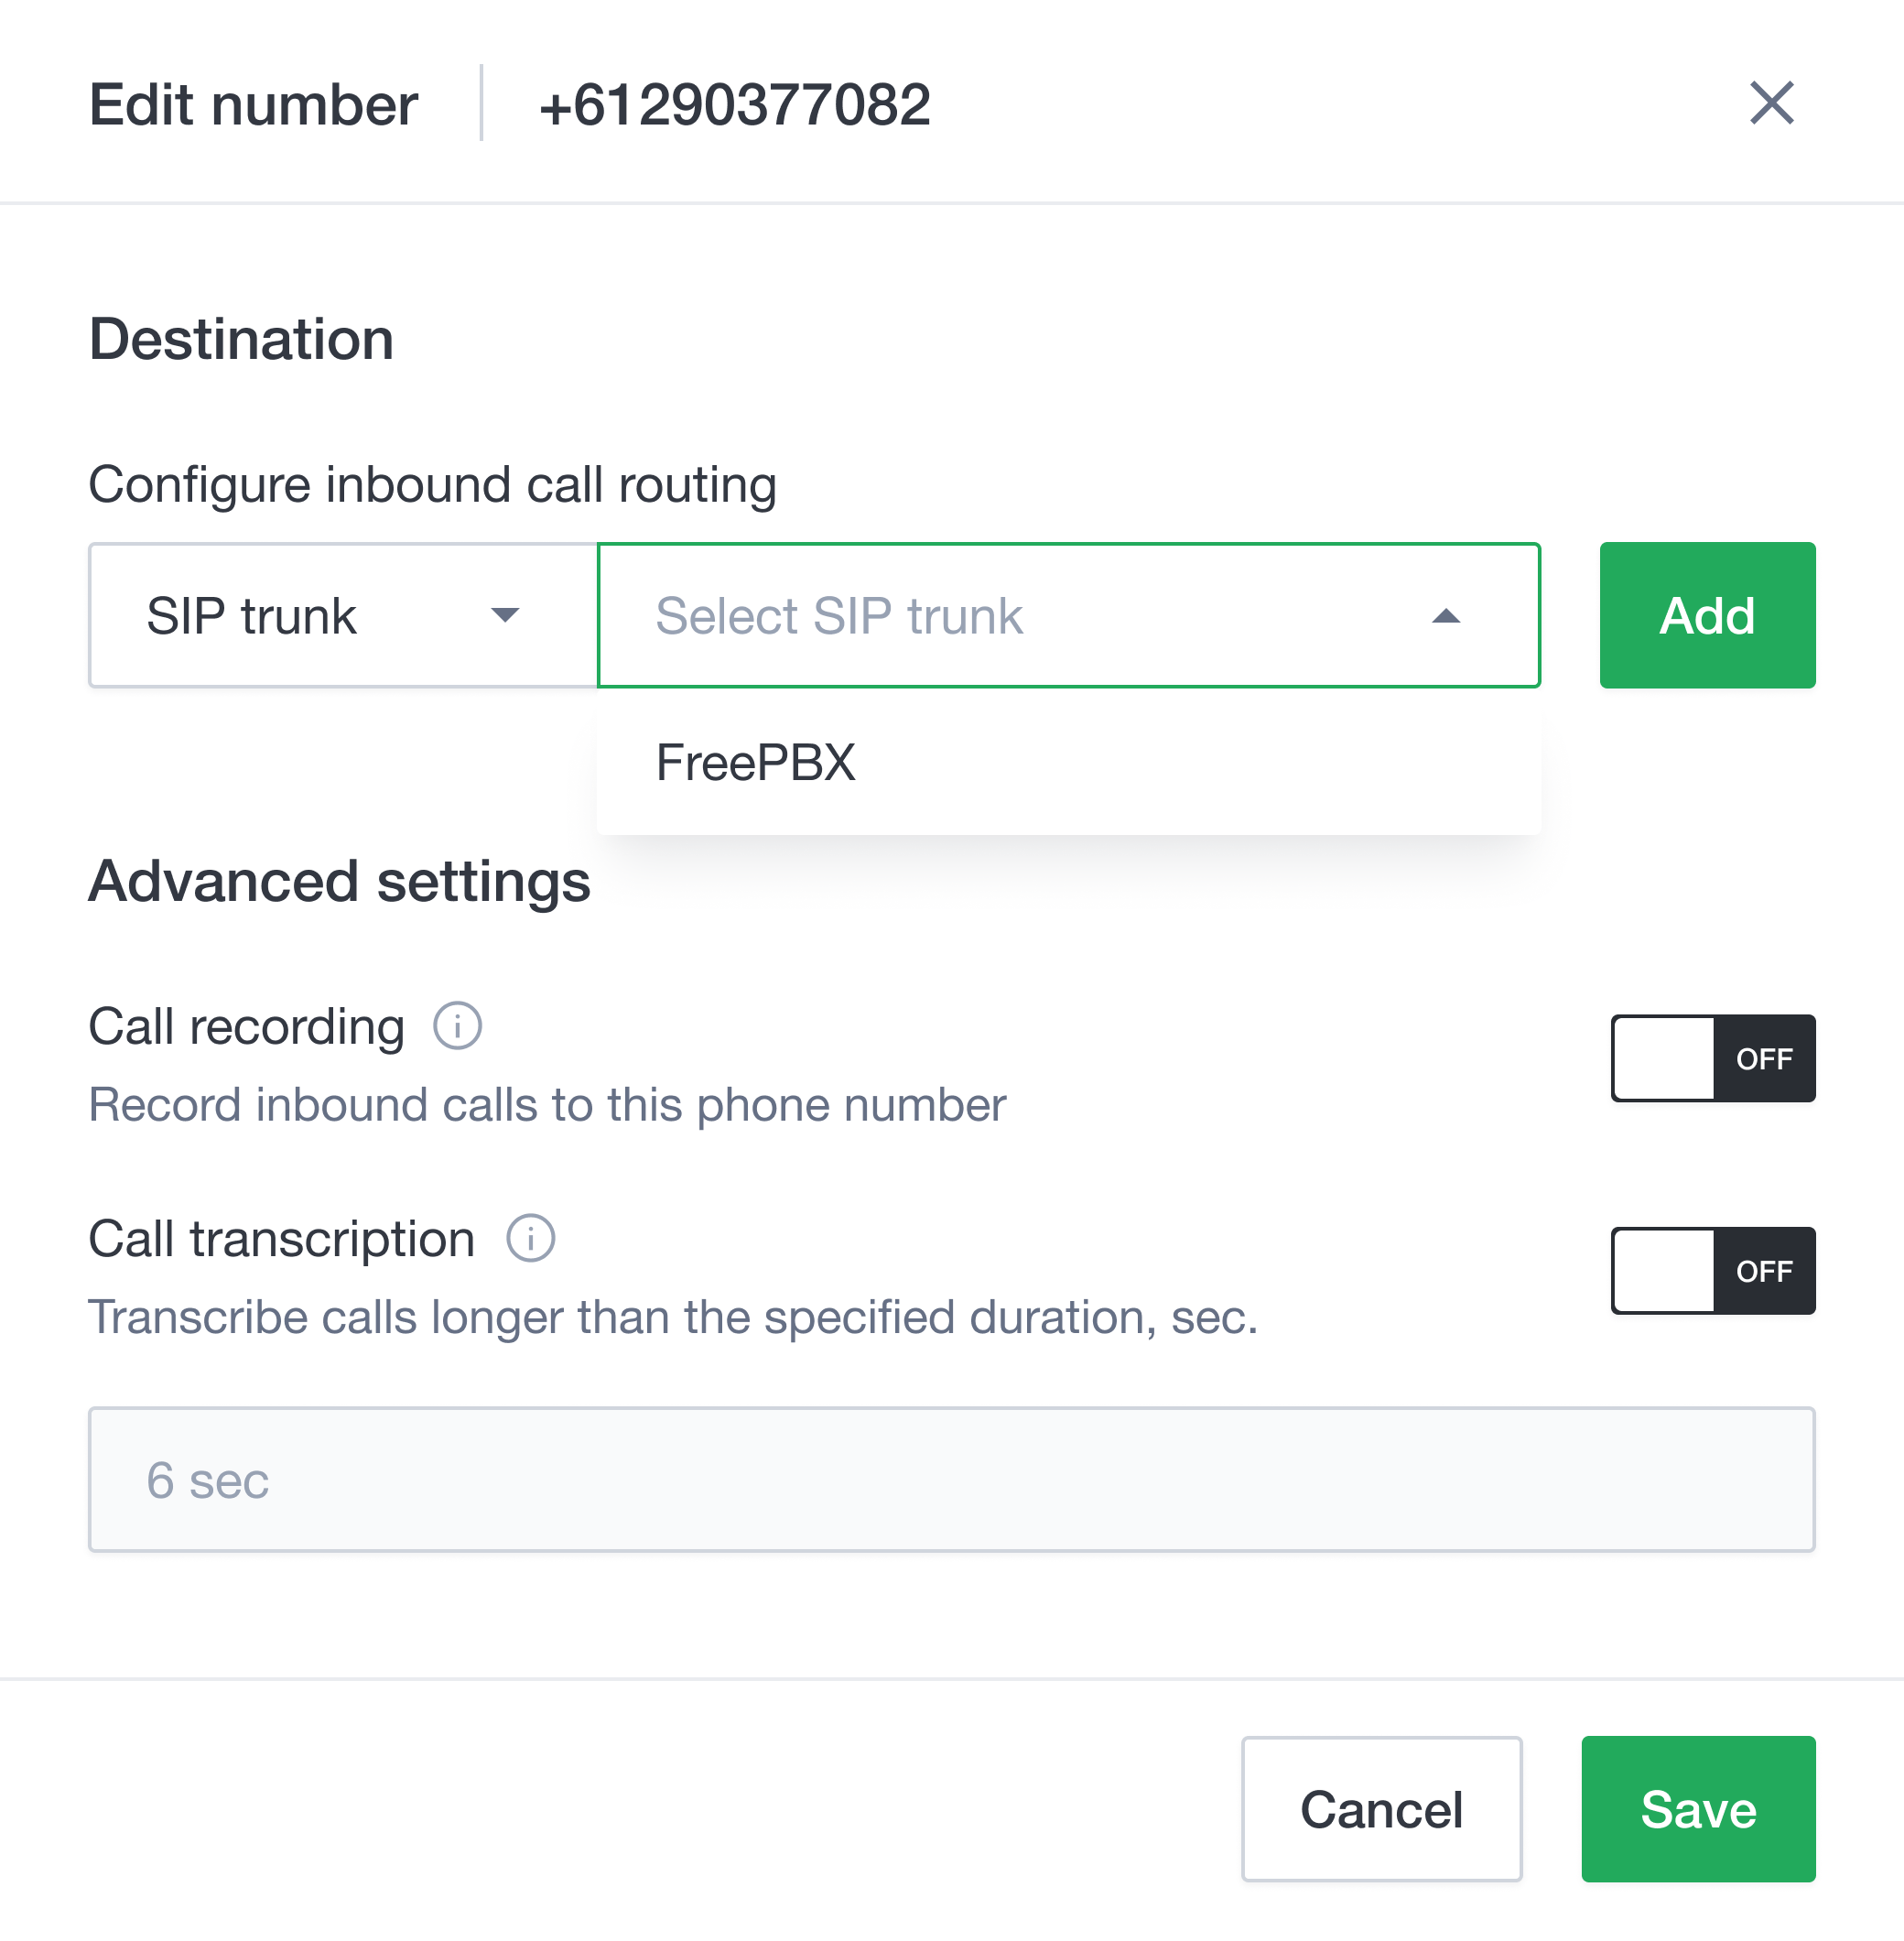
4. Select the destination trunk in the **Destination** section.
5. Click **Add** to add the destination for the phone number.
6. Click **Save** to apply the settings.
Wavix only allows phone numbers in the E.164 international format. This format can handle numbers with up to 15 digits and is usually written as \[+]\[country code]\[subscriber number including area code]. For example, a US number in E.164 format would be +16561223344. The Wavix platform will reject calls to numbers without a country code or carrying national access codes.
| Country | Number | Reason | Number in E.164 format |
| ----------- | ------------- | ---------------------------------------------------- | ---------------------- |
| US | 6561223344 | No country code | +16561223344 |
| UK | 020 1122 3344 | No country code, national access code with leading 0 | +442011223344 |
| Switzerland | 0041797000777 | Leading 00 international prefix | +41797000777 |
## Configure inbound calls
### Configure inbound calls on Wavix
If you have enabled IP authentication for your SIP trunk, scroll down to the [Configure inbound call routing for trunks with IP authentication](#configure-inbound-call-routing-for-trunks-with-ip-authentication) section.
1. **Sign in** to your Wavix account.
2. In the top menu, go to **Numbers & Trunks → My numbers**.
3. Click on the three dots next to the number you want to edit (right-hand side) and select **Edit number**.
4. Select the destination trunk in the **Destination** section.
5. Click **Add** to add the destination for the phone number.
6. Click **Save** to apply the settings.
 You can also edit multiple numbers simultaneously. To do this, select the multiple numbers you want to modify, then click the **Bulk actions** button. The changes will apply to all selected numbers.
### Configure inbound call routing for trunks with IP authentication
Skip this section if your trunks are configured to use digest authentication.
SIP trunks with IP authentication enabled cannot be used for inbound call routing, as they do not maintain registration with Wavix proxies. To set up inbound routing for your numbers, you must use a valid SIP URI address instead.
To configure inbound call routing to a valid SIP URI:
1. **Log in** to your Wavix account
2. Navigate to **My numbers** under the **Numbers & trunks** in the top menu
3. Click on the three dots next to the number you want to edit (right-hand side) and select **Edit number**
4. Select **SIP URI** in the **Transport** drop-down menu
5. **Enter a valid SIP URI** in the following format: `+[did]@FQDN:port;transport=connection`, where:
* a. **FQDN** is the fully qualified domain name or IP address of your Asterisk PBX
* b. **Port** is the SIP port used by the PBX
* c. **A connection** can be udp, tcp, or tls, with udp as the default transport
6. Click **Add** to set the destination for the phone number
7. Click **Save** to apply the settings
The `[did]` parameter will be automatically updated with the actual dialed phone number when routing the call.
### Configure inbound calls in FreePBX
To configure inbound call routing:
1. **Sign in** to your FreePBX instance.
2. In the top menu, go to **Connectivity → Inbound Routes**.
3. Select **Add Inbound Route**:
* Specify the route **Description**
* Set the **DID Number**, if needed
* In **Set Destination**, choose where to route inbound calls from the Wavix trunk. This can be an IVR, extension, agent queue, or another destination.
4. Select **Submit** to apply changes.
You can also edit multiple numbers simultaneously. To do this, select the multiple numbers you want to modify, then click the **Bulk actions** button. The changes will apply to all selected numbers.
### Configure inbound call routing for trunks with IP authentication
Skip this section if your trunks are configured to use digest authentication.
SIP trunks with IP authentication enabled cannot be used for inbound call routing, as they do not maintain registration with Wavix proxies. To set up inbound routing for your numbers, you must use a valid SIP URI address instead.
To configure inbound call routing to a valid SIP URI:
1. **Log in** to your Wavix account
2. Navigate to **My numbers** under the **Numbers & trunks** in the top menu
3. Click on the three dots next to the number you want to edit (right-hand side) and select **Edit number**
4. Select **SIP URI** in the **Transport** drop-down menu
5. **Enter a valid SIP URI** in the following format: `+[did]@FQDN:port;transport=connection`, where:
* a. **FQDN** is the fully qualified domain name or IP address of your Asterisk PBX
* b. **Port** is the SIP port used by the PBX
* c. **A connection** can be udp, tcp, or tls, with udp as the default transport
6. Click **Add** to set the destination for the phone number
7. Click **Save** to apply the settings
The `[did]` parameter will be automatically updated with the actual dialed phone number when routing the call.
### Configure inbound calls in FreePBX
To configure inbound call routing:
1. **Sign in** to your FreePBX instance.
2. In the top menu, go to **Connectivity → Inbound Routes**.
3. Select **Add Inbound Route**:
* Specify the route **Description**
* Set the **DID Number**, if needed
* In **Set Destination**, choose where to route inbound calls from the Wavix trunk. This can be an IVR, extension, agent queue, or another destination.
4. Select **Submit** to apply changes.
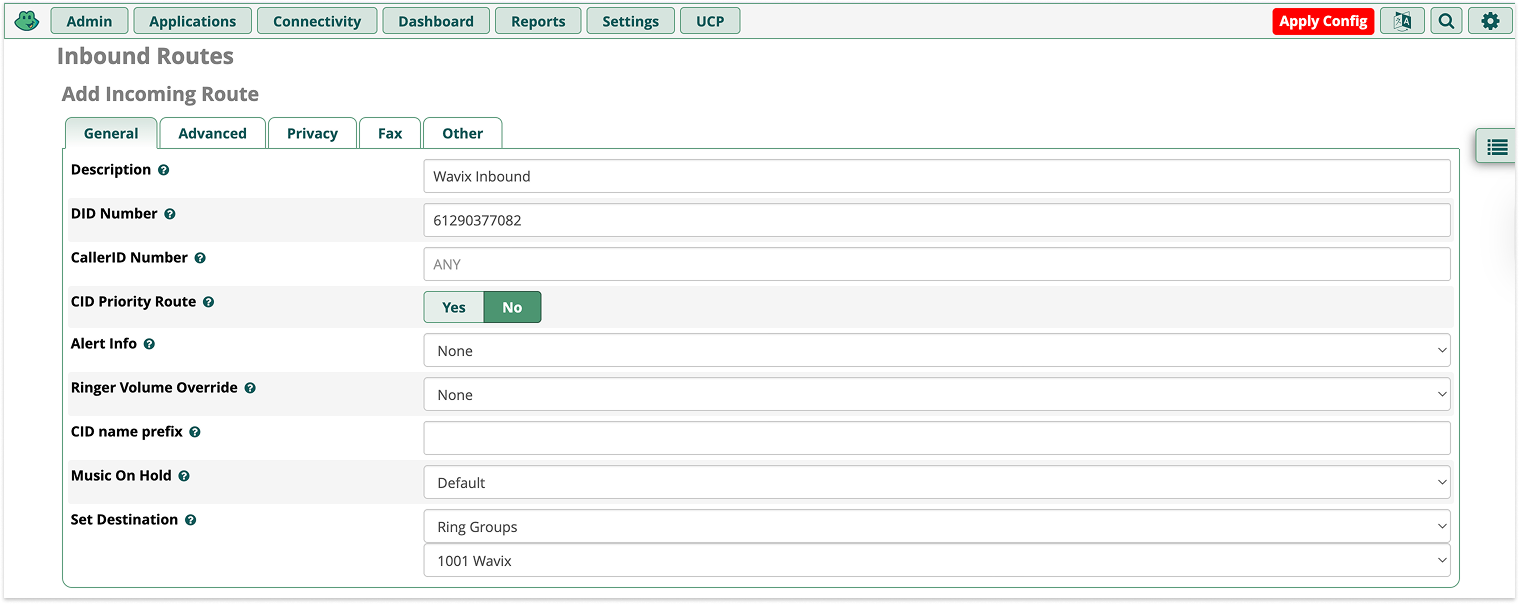 Leave **DID Number** blank to apply this route to any phone number on your Wavix account.
## Troubleshooting outbound calls
* 603 Declined response might be received when calling the destination with the per-minute rate higher than the Max call rate set for your account. You can find your effective Max call rate on the Trunks page. Please contact [support@wavix.com](mailto:support@wavix.com) to request a change to your Max call rate.
* The destination phone number is in an incorrect format. Please make sure the number is dialed in the international E.164 format. Strip prefixes like 0, 00, or 011 before the dialed number if needed.
Leave **DID Number** blank to apply this route to any phone number on your Wavix account.
## Troubleshooting outbound calls
* 603 Declined response might be received when calling the destination with the per-minute rate higher than the Max call rate set for your account. You can find your effective Max call rate on the Trunks page. Please contact [support@wavix.com](mailto:support@wavix.com) to request a change to your Max call rate.
* The destination phone number is in an incorrect format. Please make sure the number is dialed in the international E.164 format. Strip prefixes like 0, 00, or 011 before the dialed number if needed.