> ## Documentation Index
> Fetch the complete documentation index at: https://docs.wavix.com/llms.txt
> Use this file to discover all available pages before exploring further.
# How to configure FreeSWITCH using Wavix SIP trunks
> Step-by-step guide for connecting FreeSWITCH to Wavix SIP trunks, including authentication, dialplan setup, redundancy, and troubleshooting.
## Prerequisites
Before you begin, ensure you have:
1. An active phone number on your Wavix account. If you need to purchase one, see our guide on [how to buy a phone number](/numbers/buy-number).
2. A SIP trunk ([How to create a SIP trunk](/sip-trunking/create-sip-trunk)).
## Basic SIP trunk setup on FreeSWITCH
For this guide, we use the following Wavix gateways:
* Domain name: `us.wavix.net`; IP address: `209.58.144.243` as the primary gateway.
* Domain name: `nl.wavix.net`; IP address: `95.211.82.14` as a secondary gateway.
Choose the primary and backup gateways that offer the lowest ping from your premises. The full list of Wavix regional gateways can be found at the bottom of the page: [https://app.wavix.com/trunks](https://app.wavix.com/trunks).
### Set up outbound calls
To configure outbound calls on your FreeSWITCH server:
1. Navigate to `/usr/local/FreeSwitch/conf/sip_profiles/external`
2. Create a new file `wavix.xml`
```xml theme={null}
```
* The authentication realm must match the domain name of the regional Wavix gateway you would be routing your calls over
* Enter the SIP trunk ID and password you configured for the SIP trunk on the Wavix platform in the **"username"** and **"password"** variables respectively
After you create the file, assign the FreeSWITCH user as the owner so the application can access it:
```bash theme={null}
root@FreeSwitch:/usr/local/FreeSwitch/conf/sip_profiles/external/# chown FreeSwitch:FreeSwitch wavix.xml
```
3. Navigate to `/usr/local/FreeSwitch/conf/dialplan/`
4. Create a new dialplan file `wavix_dialplan.xml`
```xml theme={null}
```
expression={`^(\\d{10,15})$`}- a regular expression matching dialed number. In this example, the rule will work if the dialed phone number contains 10 to 15 digits.
After you create the file, give FreeSWITCH access so it can read it.
All destination phone numbers must be in E.164 international format. E.164 numbers can have up to fifteen digits and are usually formatted as `[+][country code][subscriber number including area code]`. For example, a US number in E.164 format is `+16561223344`. Calls to numbers without a country code or with national access codes will be rejected by Wavix.
Below are typical examples of incorrectly formatted phone numbers:
| Country | Number | Reason | Number in E.164 format |
| ----------- | ------------- | -------------------------------------------- | ---------------------- |
| US | 6561223344 | No country code | +16561223344 |
| UK | 020 1122 3344 | No country code, national access code with 0 | +442011223344 |
| Switzerland | 0041797000777 | Leading 00 international prefix | +41797000777 |
5. Navigate to `/usr/local/FreeSwitch/conf/directory/default/`
6. Modify extension configuration file `1000.xml`
```xml theme={null}
```
The value of the `user_context` variable must match the name of the gateway configuration you created in the external SIP profile directory (without the `.xml` extension).
7. Navigate to `/usr/local/FreeSwitch/conf/autoload_configs/default/`
8. Define RTP port range to 10000-20000 in `switch.conf.xml`:
```xml theme={null}
```
9. To reload the configuration files, run:
```bash theme={null}
fs_cli -x reloadxml
```
### Enable IP authentication
Wavix will accept all calls originating from a particular IP address, without requiring login info, when IP authentication is enabled. You must have a dedicated IP for this option to work correctly.
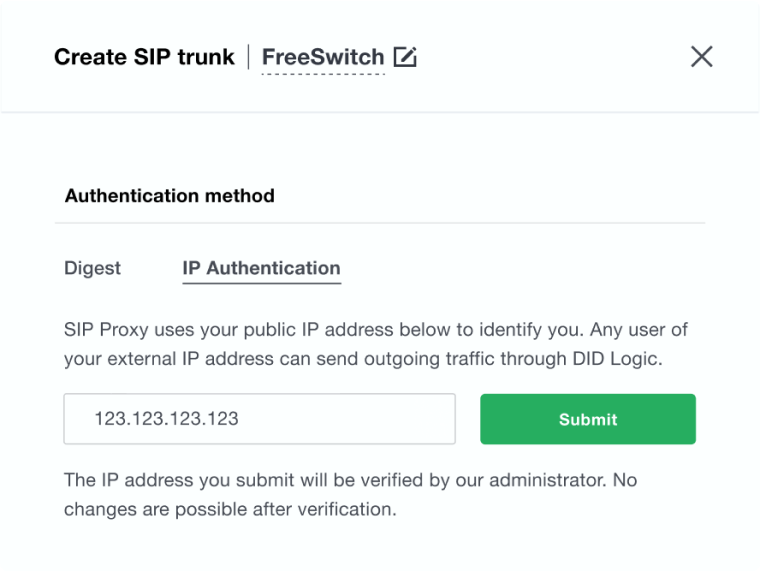 Follow these steps to enable IP authentication on the Wavix platform:
1. Select **Trunks** under **Numbers & trunks** in the top menu
2. Click the **More** icon for the desired SIP trunk and click **Edit**
3. Select **IP Authentication** under the **Authentication method**
4. Put the public IP address of your endpoint
5. Click **Submit**
6. Click **Save** to apply changes
Wavix support team will review your request and enable IP Authentication on the SIP trunk.
* When IP authentication is enabled on a SIP trunk, it cannot be used as a destination for a DID. You must use a SIP URI instead.
* After submitting the IP authentication request, you will not be able to update your IP address or change the authentication method. By default, an IP address can only be mapped to a single SIP trunk. If you need to have several Wavix SIP trunks sharing the same IP address, contact [support@wavix.com](mailto:support@wavix.com).
Once your request is approved, IP authentication will be activated on your Wavix SIP trunk, and you can configure it on FreeSWITCH:
1. Navigate to `/usr/local/FreeSwitch/conf/`
2. Update the `vars.xml` file with the lines below:
```xml theme={null}
```
3. Uncomment the lines for `ext-rtp-ip` and `ext-sip-ip` in the global configuration file `external.xml` and set them to reference the variables from `vars.xml`:
```xml theme={null}
```
4. Navigate to `/usr/local/FreeSwitch/conf/sip_profiles/external/`
5. Create a new SIP profile `wavix_ip.xml`
```xml theme={null}
```
6. Add the following line to the dialplan:
```xml theme={null}
```
```xml theme={null}
```
7. Once you've created the file, assign the FreeSWITCH user as the owner:
```bash theme={null}
root@FreeSwitch:/usr/local/FreeSwitch/conf/sip_profiles/external/# chown FreeSwitch:FreeSwitch wavix_ip.xml
```
Configuration is complete and outbound calls should work now.
### Placing outbound calls with caller ID passthrough
Typically, you use one of the DID numbers you purchased as the caller ID for the SIP trunk.
Follow these steps to enable IP authentication on the Wavix platform:
1. Select **Trunks** under **Numbers & trunks** in the top menu
2. Click the **More** icon for the desired SIP trunk and click **Edit**
3. Select **IP Authentication** under the **Authentication method**
4. Put the public IP address of your endpoint
5. Click **Submit**
6. Click **Save** to apply changes
Wavix support team will review your request and enable IP Authentication on the SIP trunk.
* When IP authentication is enabled on a SIP trunk, it cannot be used as a destination for a DID. You must use a SIP URI instead.
* After submitting the IP authentication request, you will not be able to update your IP address or change the authentication method. By default, an IP address can only be mapped to a single SIP trunk. If you need to have several Wavix SIP trunks sharing the same IP address, contact [support@wavix.com](mailto:support@wavix.com).
Once your request is approved, IP authentication will be activated on your Wavix SIP trunk, and you can configure it on FreeSWITCH:
1. Navigate to `/usr/local/FreeSwitch/conf/`
2. Update the `vars.xml` file with the lines below:
```xml theme={null}
```
3. Uncomment the lines for `ext-rtp-ip` and `ext-sip-ip` in the global configuration file `external.xml` and set them to reference the variables from `vars.xml`:
```xml theme={null}
```
4. Navigate to `/usr/local/FreeSwitch/conf/sip_profiles/external/`
5. Create a new SIP profile `wavix_ip.xml`
```xml theme={null}
```
6. Add the following line to the dialplan:
```xml theme={null}
```
```xml theme={null}
```
7. Once you've created the file, assign the FreeSWITCH user as the owner:
```bash theme={null}
root@FreeSwitch:/usr/local/FreeSwitch/conf/sip_profiles/external/# chown FreeSwitch:FreeSwitch wavix_ip.xml
```
Configuration is complete and outbound calls should work now.
### Placing outbound calls with caller ID passthrough
Typically, you use one of the DID numbers you purchased as the caller ID for the SIP trunk.
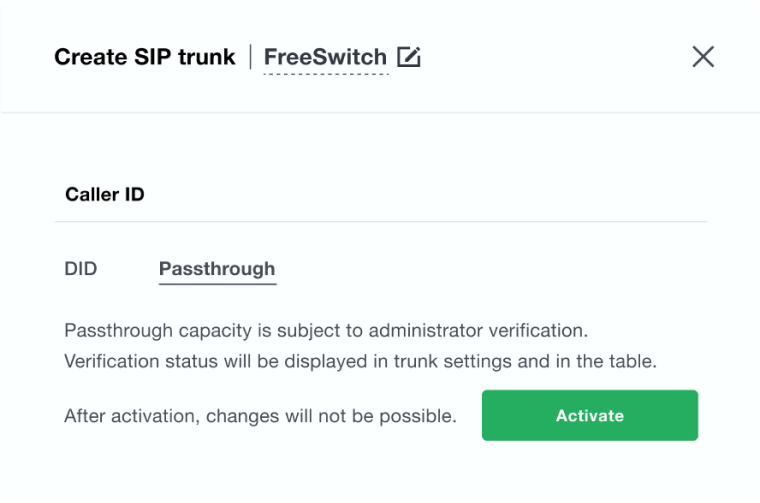 Alternatively, you can enable the caller ID passthrough option on the Wavix platform. This allows you to send your own A-numbers directly from FreeSWITCH:
1. Select **Trunks** under **Numbers & trunks** in the top menu
2. Click on the **three dots** on the right hand side and select the **Edit** option
3. Select **Passthrough** under the **Caller ID**
4. Click **Activate**
5. Click **Save** to apply changes
Wavix support team will review your request and enable Caller ID Passthrough on the SIP trunk.
### Configure custom caller ID on FreeSWITCH
Once your request is approved, the caller ID passthrough option will be activated on your Wavix SIP trunk and you can send your own caller IDs from FreeSWITCH:
1. Navigate to `/usr/local/FreeSwitch/conf/sip_profiles/external/`
2. Update the outbound SIP gateway configuration file `wavix.xml`:
```xml theme={null}
```
3. Assign the caller ID to the variable `effective_caller_id_number` in the extension configuration file:
```xml theme={null}
```
### Set up inbound calls
Registering your SIP trunk with one of the regional Wavix gateways is necessary (for digest authentication only) to receive inbound calls.
Register and send SIP traffic to regional gateways for low latency access.
| Amsterdam, NL | Dallas, USA | Singapore, SG | Australia, AU |
| ------------- | ------------ | ------------- | ------------- |
| nl.wavix.net | us.wavix.net | sg.wavix.net | au.wavix.net |
Select a regional gateway with the lowest latency to your device (in this example, `us.wavix.net`):
1. Navigate to `/usr/local/FreeSWITCH/conf/sip_profiles/external/`
2. Create or update SIP external profile `wavix.xml`:
```xml theme={null}
```
* Each regional gateway has a unique authentication `realm` that corresponds to its domain name.
* Enter the SIP trunk ID and password you configured for the SIP trunk on the Wavix platform in the `username` and `password` parameters.
You can check the status of your SIP trunk registration using the `"fs_cli -x "sofia status gateway wavix" | grep State"` command:
```bash theme={null}
root@freeswitch:~# fs_cli -x "sofia status gateway wavix" | grep State
PingState 0/0/0
State REGED
```
If registration is successful, you will see `REGED` in the "State" column. If the SIP gateway is not registered, incoming calls will not be routed to your FreeSWITCH.
Alternatively, you can enable the caller ID passthrough option on the Wavix platform. This allows you to send your own A-numbers directly from FreeSWITCH:
1. Select **Trunks** under **Numbers & trunks** in the top menu
2. Click on the **three dots** on the right hand side and select the **Edit** option
3. Select **Passthrough** under the **Caller ID**
4. Click **Activate**
5. Click **Save** to apply changes
Wavix support team will review your request and enable Caller ID Passthrough on the SIP trunk.
### Configure custom caller ID on FreeSWITCH
Once your request is approved, the caller ID passthrough option will be activated on your Wavix SIP trunk and you can send your own caller IDs from FreeSWITCH:
1. Navigate to `/usr/local/FreeSwitch/conf/sip_profiles/external/`
2. Update the outbound SIP gateway configuration file `wavix.xml`:
```xml theme={null}
```
3. Assign the caller ID to the variable `effective_caller_id_number` in the extension configuration file:
```xml theme={null}
```
### Set up inbound calls
Registering your SIP trunk with one of the regional Wavix gateways is necessary (for digest authentication only) to receive inbound calls.
Register and send SIP traffic to regional gateways for low latency access.
| Amsterdam, NL | Dallas, USA | Singapore, SG | Australia, AU |
| ------------- | ------------ | ------------- | ------------- |
| nl.wavix.net | us.wavix.net | sg.wavix.net | au.wavix.net |
Select a regional gateway with the lowest latency to your device (in this example, `us.wavix.net`):
1. Navigate to `/usr/local/FreeSWITCH/conf/sip_profiles/external/`
2. Create or update SIP external profile `wavix.xml`:
```xml theme={null}
```
* Each regional gateway has a unique authentication `realm` that corresponds to its domain name.
* Enter the SIP trunk ID and password you configured for the SIP trunk on the Wavix platform in the `username` and `password` parameters.
You can check the status of your SIP trunk registration using the `"fs_cli -x "sofia status gateway wavix" | grep State"` command:
```bash theme={null}
root@freeswitch:~# fs_cli -x "sofia status gateway wavix" | grep State
PingState 0/0/0
State REGED
```
If registration is successful, you will see `REGED` in the "State" column. If the SIP gateway is not registered, incoming calls will not be routed to your FreeSWITCH.
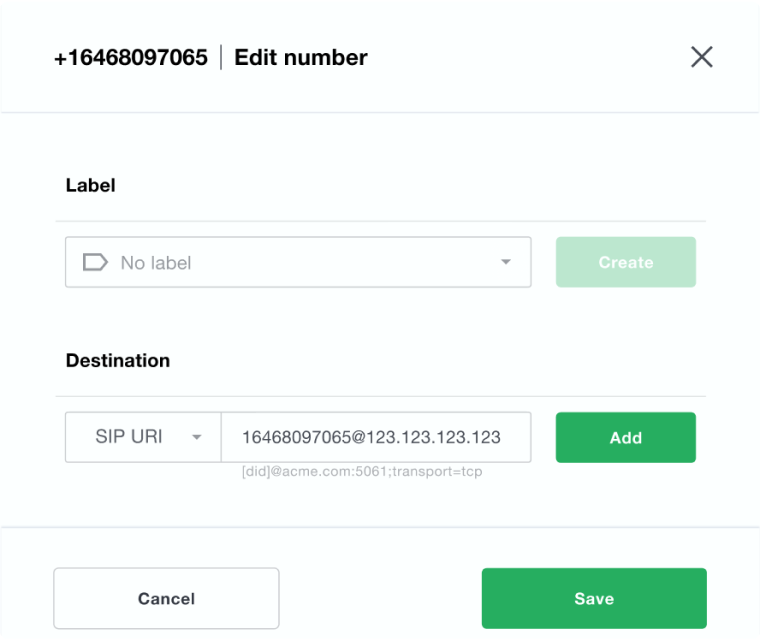 To configure the destination for inbound calls on the Wavix platform:
1. Select **My numbers** under **Numbers & trunks** in the top menu
2. Click on the **three dots** on the right-hand side and select the **Edit number** option.
3. Select the destination trunk in the **Destination** section
4. Click **Add** to add the destination for the DID
5. Click **Save** to apply changes
Configuration is complete and inbound calls should work now.
## SIP trunk redundancy
Considering SIP trunk redundancy is important to ensure business continuity and protect against service interruptions. This guide provides configuration options to ensure redundancy for both incoming and outgoing calls.
### Redundancy options for inbound calls
In case of a regional gateway failure, Wavix may originate inbound calls from any other gateway. You can find the full list of gateways at [https://app.wavix.com/trunks](https://app.wavix.com/trunks). There are two options to prevent disruptions of inbound calls: set up a SIP URI destination for the DID number or enable dual SIP trunk registrations from FreeSWITCH. In this guide, we'll use a SIP URI.
To configure a SIP URI destination on the Wavix platform:
1. Select **My numbers** under **Numbers & trunks** in the top menu
2. Click the **three dots** icon for the desired DID and click Edit number
3. Select **SIP URI** under the **Destination** and enter URI in the format: DID@``
4. Click **Add**
5. Click **Save** to apply changes
6. Navigate to /usr/local/FreeSwitch/conf/dialplan/
7. Specify your DID numbers in dialplan in `` extension
```xml theme={null}
```
### Redundancy options for outbound calls
1. Navigate to `/usr/local/FreeSwitch/conf/sip_profiles/external/`
2. Create a new file `wavix_fo.xml`
```xml theme={null}
```
3. Update the dialplan for outbound calls by adding the following lines:
```xml theme={null}
```
See a dialplan example below:
```xml theme={null}
```
## Troubleshooting
### Inbound call issues
* Make sure you have granted FreeSWITCH access to the XML files you have created.
* Make sure that the context name in the dialplan, internal extension, and SIP profile extension are matching.
### Outbound calls issues
* A `603 Declined` response might be received when calling a destination with a per-minute rate higher than the max call rate set for your account. You can find your effective max call rate on the `Trunks` page. Contact `support@wavix.com` to request a change to your max call rate.
* Another possible reason for `603 Declined` responses is lack of active registration. You can check the registration status of the SIP trunk as outlined above.
* Wrong destination number format. Make sure you dial the full international number (E.164): `19085594899` (US), `4408001218915` (UK). Dialing `9085594899` won't work. Strip prefixes like `0`, `00`, or `011` in front of the dialed number.
### FreeSWITCH diagnostics
* Verify SIP trunk registration with `sofia status gateway ` in the `fs_cli` command prompt. If registration is successful, you will see `REGED` in the "State" column. If the SIP gateway is not registered, incoming calls will not be routed to your FreeSWITCH.
* To analyze SIP traffic, use the `sngrep` tool with appropriate filters.
To configure the destination for inbound calls on the Wavix platform:
1. Select **My numbers** under **Numbers & trunks** in the top menu
2. Click on the **three dots** on the right-hand side and select the **Edit number** option.
3. Select the destination trunk in the **Destination** section
4. Click **Add** to add the destination for the DID
5. Click **Save** to apply changes
Configuration is complete and inbound calls should work now.
## SIP trunk redundancy
Considering SIP trunk redundancy is important to ensure business continuity and protect against service interruptions. This guide provides configuration options to ensure redundancy for both incoming and outgoing calls.
### Redundancy options for inbound calls
In case of a regional gateway failure, Wavix may originate inbound calls from any other gateway. You can find the full list of gateways at [https://app.wavix.com/trunks](https://app.wavix.com/trunks). There are two options to prevent disruptions of inbound calls: set up a SIP URI destination for the DID number or enable dual SIP trunk registrations from FreeSWITCH. In this guide, we'll use a SIP URI.
To configure a SIP URI destination on the Wavix platform:
1. Select **My numbers** under **Numbers & trunks** in the top menu
2. Click the **three dots** icon for the desired DID and click Edit number
3. Select **SIP URI** under the **Destination** and enter URI in the format: DID@``
4. Click **Add**
5. Click **Save** to apply changes
6. Navigate to /usr/local/FreeSwitch/conf/dialplan/
7. Specify your DID numbers in dialplan in `` extension
```xml theme={null}
```
### Redundancy options for outbound calls
1. Navigate to `/usr/local/FreeSwitch/conf/sip_profiles/external/`
2. Create a new file `wavix_fo.xml`
```xml theme={null}
```
3. Update the dialplan for outbound calls by adding the following lines:
```xml theme={null}
```
See a dialplan example below:
```xml theme={null}
```
## Troubleshooting
### Inbound call issues
* Make sure you have granted FreeSWITCH access to the XML files you have created.
* Make sure that the context name in the dialplan, internal extension, and SIP profile extension are matching.
### Outbound calls issues
* A `603 Declined` response might be received when calling a destination with a per-minute rate higher than the max call rate set for your account. You can find your effective max call rate on the `Trunks` page. Contact `support@wavix.com` to request a change to your max call rate.
* Another possible reason for `603 Declined` responses is lack of active registration. You can check the registration status of the SIP trunk as outlined above.
* Wrong destination number format. Make sure you dial the full international number (E.164): `19085594899` (US), `4408001218915` (UK). Dialing `9085594899` won't work. Strip prefixes like `0`, `00`, or `011` in front of the dialed number.
### FreeSWITCH diagnostics
* Verify SIP trunk registration with `sofia status gateway ` in the `fs_cli` command prompt. If registration is successful, you will see `REGED` in the "State" column. If the SIP gateway is not registered, incoming calls will not be routed to your FreeSWITCH.
* To analyze SIP traffic, use the `sngrep` tool with appropriate filters.