> ## Documentation Index
> Fetch the complete documentation index at: https://docs.wavix.com/llms.txt
> Use this file to discover all available pages before exploring further.
# How to connect LiveKit AI voice agents with Wavix
> This guide explains connecting LiveKit AI voice agents with Wavix voice infrastructure to place and receive calls.
## Prerequisites
Before you begin, ensure you have:
1. An active phone number on your Wavix account. If you need to purchase one, see our guide on [how to buy a phone number](/numbers/buy-number).
2. A SIP trunk ([How to create a SIP trunk](/sip-trunking/create-sip-trunk)).
3. To follow the CLI steps, the [LiveKit CLI](https://docs.livekit.io/home/cli/cli-setup) installed and authenticated with your LiveKit Cloud project:
```shell theme={null}
lk cloud auth
```
## Receive calls with Wavix and LiveKit
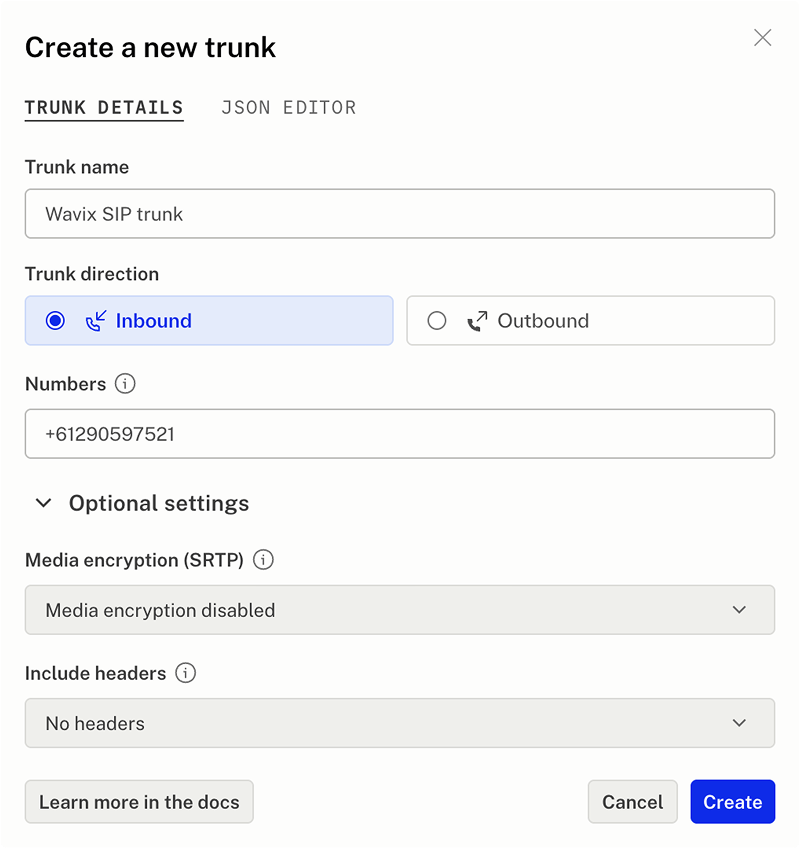
### Create LiveKit inbound trunk
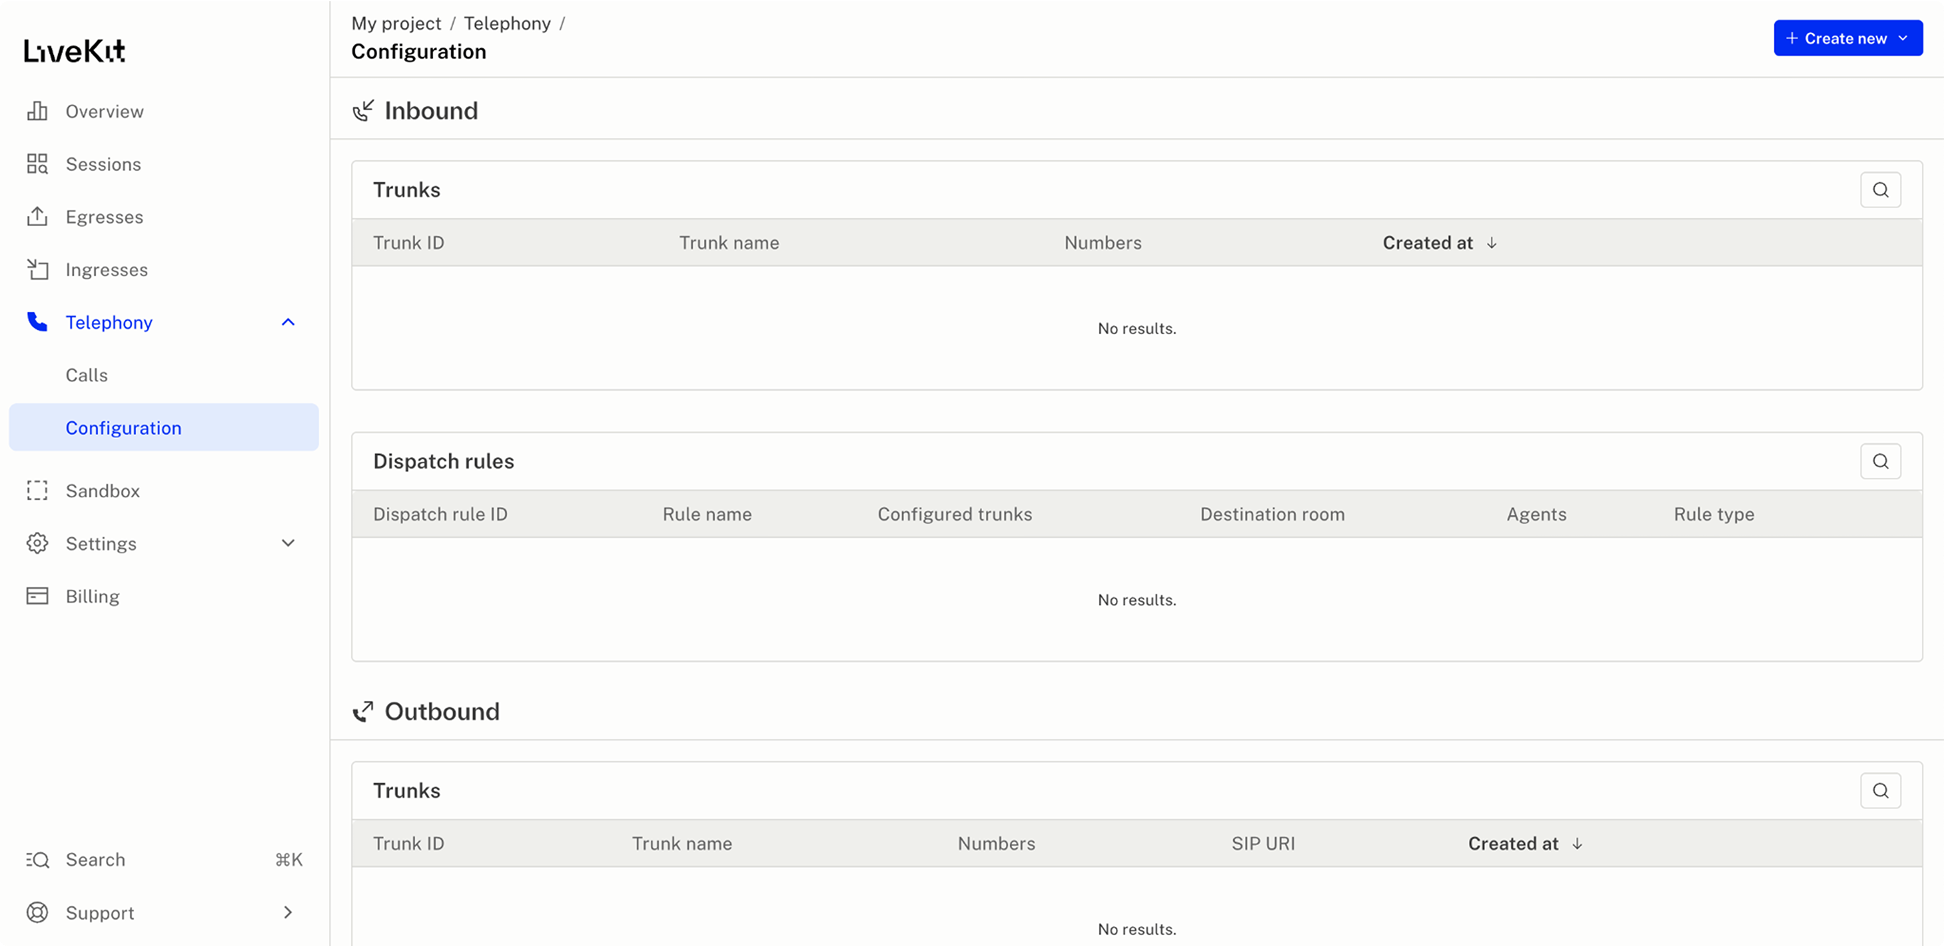
1. **Sign in** to your LiveKit project.
2. In the left-hand side menu, select **Telephony → Configuration**.
3. Select **Create new** and choose **Trunk**.
4. Enter a **comma‑separated list** of Wavix numbers to associate with this trunk.
 Create a JSON file describing the inbound trunk:
```json inbound-trunk.json theme={null}
{
"trunk": {
"name": "Wavix inbound trunk",
"numbers": ["+61290597521"]
}
}
```
Replace the `numbers` array with your Wavix numbers in E.164 format with the leading `+` sign.
Then create the trunk with the LiveKit CLI:
```shell theme={null}
lk sip inbound create inbound-trunk.json
```
The CLI output includes the `trunk_id` of the new trunk. Copy it — you'll use it to connect a dispatch rule to this trunk in the next step.
For more information about creating a LiveKit inbound trunk using the CLI or code, see the [LiveKit documentation](https://docs.livekit.io/telephony/accepting-calls/inbound-trunk).
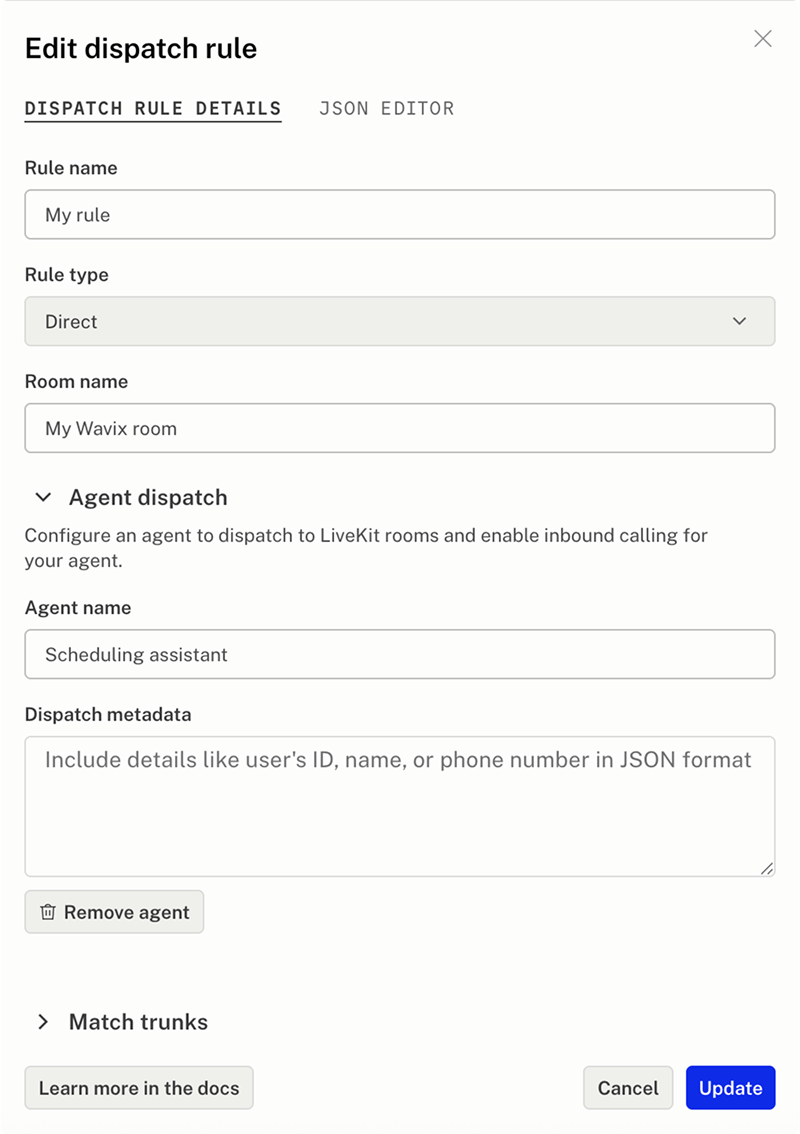
### Create a dispatch rule
Dispatch rules determine how inbound calls are routed to LiveKit rooms.
1. Click **Create new** and select **Dispatch rule**.
2. (Optional) Under **Match trunks**, associate the rule with a specific trunk; otherwise, it applies to all inbound calls in the project.
Create a JSON file describing the inbound trunk:
```json inbound-trunk.json theme={null}
{
"trunk": {
"name": "Wavix inbound trunk",
"numbers": ["+61290597521"]
}
}
```
Replace the `numbers` array with your Wavix numbers in E.164 format with the leading `+` sign.
Then create the trunk with the LiveKit CLI:
```shell theme={null}
lk sip inbound create inbound-trunk.json
```
The CLI output includes the `trunk_id` of the new trunk. Copy it — you'll use it to connect a dispatch rule to this trunk in the next step.
For more information about creating a LiveKit inbound trunk using the CLI or code, see the [LiveKit documentation](https://docs.livekit.io/telephony/accepting-calls/inbound-trunk).
### Create a dispatch rule
Dispatch rules determine how inbound calls are routed to LiveKit rooms.
1. Click **Create new** and select **Dispatch rule**.
2. (Optional) Under **Match trunks**, associate the rule with a specific trunk; otherwise, it applies to all inbound calls in the project.
 Create a JSON file describing the dispatch rule. The rule must be connected to an inbound trunk through the `trunk_ids` field:
```json dispatch-rule.json theme={null}
{
"dispatch_rule": {
"name": "My dispatch rule",
"trunk_ids": ["LIVEKIT_TRUNK_ID"],
"rule": {
"dispatch_rule_individual": {
"room_prefix": "call-"
}
},
"room_config": {
"agents": [
{
"agent_name": "YOUR_AGENT_NAME"
}
]
}
}
}
```
* Replace `LIVEKIT_TRUNK_ID` with the `trunk_id` returned when you created the inbound trunk.
* Replace `YOUR_AGENT_NAME` with the name of the LiveKit agent that should answer the calls.
Then create the rule with the LiveKit CLI:
```shell theme={null}
lk sip dispatch create dispatch-rule.json
```
For more information about dispatch rules and instructions for creating them using the LiveKit CLI or code, see the [LiveKit documentation](https://docs.livekit.io/telephony/accepting-calls/dispatch-rule).
### Set up inbound call routing on Wavix
Wavix can route inbound calls to a SIP trunk on the platform, SIP URI, or forward them to a phone number. LiveKit requires calls to be routed to a **SIP URI**.
1. In your LiveKit project, go to **Settings → Project**.
2. Copy the value from **SIP URI** (e.g., `sip:2mpbww13htk.sip.livekit.cloud`).
Create a JSON file describing the dispatch rule. The rule must be connected to an inbound trunk through the `trunk_ids` field:
```json dispatch-rule.json theme={null}
{
"dispatch_rule": {
"name": "My dispatch rule",
"trunk_ids": ["LIVEKIT_TRUNK_ID"],
"rule": {
"dispatch_rule_individual": {
"room_prefix": "call-"
}
},
"room_config": {
"agents": [
{
"agent_name": "YOUR_AGENT_NAME"
}
]
}
}
}
```
* Replace `LIVEKIT_TRUNK_ID` with the `trunk_id` returned when you created the inbound trunk.
* Replace `YOUR_AGENT_NAME` with the name of the LiveKit agent that should answer the calls.
Then create the rule with the LiveKit CLI:
```shell theme={null}
lk sip dispatch create dispatch-rule.json
```
For more information about dispatch rules and instructions for creating them using the LiveKit CLI or code, see the [LiveKit documentation](https://docs.livekit.io/telephony/accepting-calls/dispatch-rule).
### Set up inbound call routing on Wavix
Wavix can route inbound calls to a SIP trunk on the platform, SIP URI, or forward them to a phone number. LiveKit requires calls to be routed to a **SIP URI**.
1. In your LiveKit project, go to **Settings → Project**.
2. Copy the value from **SIP URI** (e.g., `sip:2mpbww13htk.sip.livekit.cloud`).
 To route calls from your Wavix number to the LiveKit platform:
1. In Wavix, open **Numbers & trunks → My numbers**.
2. Select your number by clicking the **⋯** menu → **Edit number**.
3. Set the **inbound call destination type** to **SIP URI**, and enter the destination in the format of:
```bash theme={null}
[did]@[LIVEKIT_SIP_URI]
```
In the example above, it would be:
```bash theme={null}
[did]@2mpbww13htk.sip.livekit.cloud
```
4. **Save** your changes.
Make sure you entered the correct LiveKit SIP URI.
Now, all calls to your Wavix number are routed to your LiveKit AI project. Deploy a LiveKit agent to answer the calls. Check the [LiveKit recipes](https://docs.livekit.io/recipes/) for voice AI and LiveKit Agent use cases.
You can choose to encrypt call media. To enable encryption on your Wavix numbers, contact [support@wavix.com](mailto:support@wavix.com) and provide a list of numbers.
## Place calls with Wavix and LiveKit
To place outbound calls, you need both a **Wavix SIP trunk** and a **LiveKit outbound trunk**.
### Create an outbound trunk on LiveKit
1. **Sign in** to your LiveKit account.
2. Go to **Telephony** → **Configuration**.
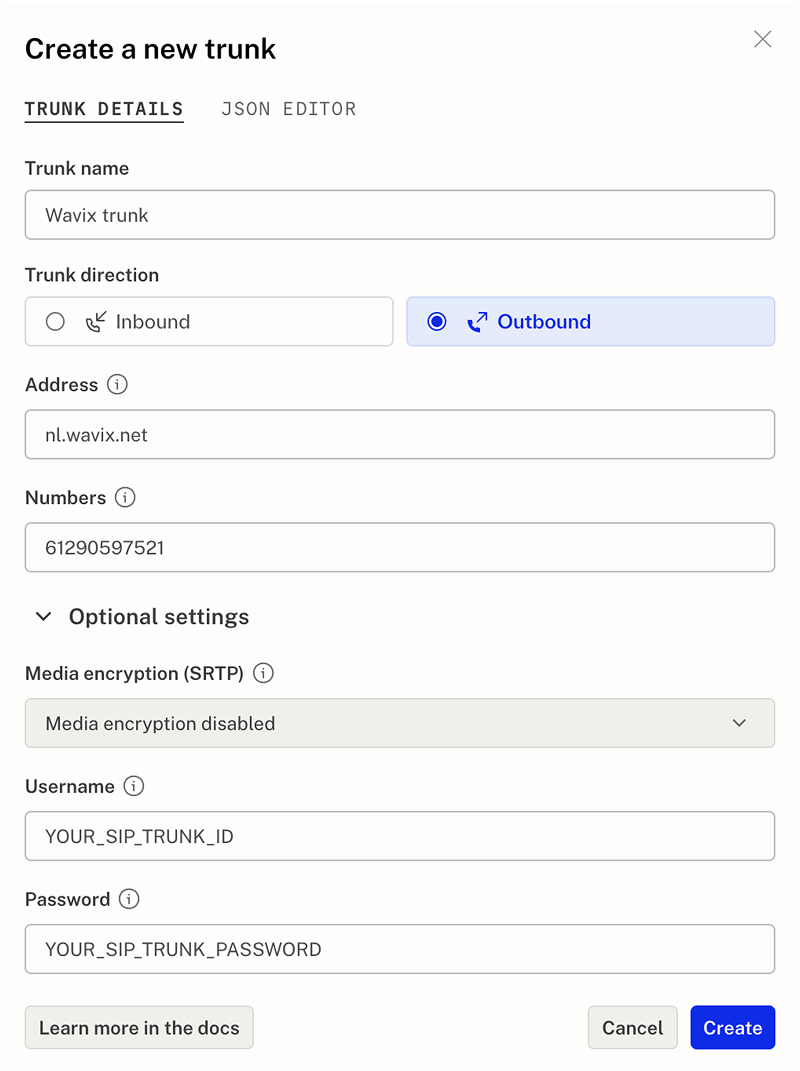
3. Select **Create new** and replace the following variables:
* Replace `YOUR_SIP_TRUNK_ID` and `YOUR_SIP_TRUNK_PASSWORD` with the SIP trunk credentials configured at Wavix.
* Replace `61290597521` with the phone number purchased at Wavix.
To route calls from your Wavix number to the LiveKit platform:
1. In Wavix, open **Numbers & trunks → My numbers**.
2. Select your number by clicking the **⋯** menu → **Edit number**.
3. Set the **inbound call destination type** to **SIP URI**, and enter the destination in the format of:
```bash theme={null}
[did]@[LIVEKIT_SIP_URI]
```
In the example above, it would be:
```bash theme={null}
[did]@2mpbww13htk.sip.livekit.cloud
```
4. **Save** your changes.
Make sure you entered the correct LiveKit SIP URI.
Now, all calls to your Wavix number are routed to your LiveKit AI project. Deploy a LiveKit agent to answer the calls. Check the [LiveKit recipes](https://docs.livekit.io/recipes/) for voice AI and LiveKit Agent use cases.
You can choose to encrypt call media. To enable encryption on your Wavix numbers, contact [support@wavix.com](mailto:support@wavix.com) and provide a list of numbers.
## Place calls with Wavix and LiveKit
To place outbound calls, you need both a **Wavix SIP trunk** and a **LiveKit outbound trunk**.
### Create an outbound trunk on LiveKit
1. **Sign in** to your LiveKit account.
2. Go to **Telephony** → **Configuration**.
3. Select **Create new** and replace the following variables:
* Replace `YOUR_SIP_TRUNK_ID` and `YOUR_SIP_TRUNK_PASSWORD` with the SIP trunk credentials configured at Wavix.
* Replace `61290597521` with the phone number purchased at Wavix.
 Create a JSON file describing the outbound trunk:
```json outbound-trunk.json theme={null}
{
"trunk": {
"name": "Wavix outbound trunk",
"address": "us.wavix.net",
"numbers": ["+61290597521"]
}
}
```
* In the `address` field, enter one of Wavix's regional gateways. A full list is shown at the bottom of the Trunks page in the [Wavix portal](https://app.wavix.com/trunks).
* Replace the `numbers` array with your Wavix numbers in E.164 format with the leading `+` sign.
Then create the trunk with the LiveKit CLI, passing your Wavix SIP trunk credentials:
```shell theme={null}
lk sip outbound create outbound-trunk.json \
--auth-user "YOUR_SIP_TRUNK_ID" \
--auth-pass "YOUR_SIP_TRUNK_PASSWORD"
```
Replace `YOUR_SIP_TRUNK_ID` and `YOUR_SIP_TRUNK_PASSWORD` with the SIP trunk credentials configured at Wavix.
For more information about creating a LiveKit outbound trunk using the CLI or code, see the [LiveKit documentation](https://docs.livekit.io/telephony/making-calls/outbound-trunk).
You can encrypt call media on your Wavix trunk. Contact [support@wavix.com](mailto:support@wavix.com) and provide your SIP trunk ID.
You've connected LiveKit with Wavix and now can place outbound calls. Check the [LiveKit recipes](https://docs.livekit.io/recipes/) for voice AI and LiveKit Agent use cases.
## Transfer a call
Wavix supports cold transfers using the `SIP REFER` command. To transfer a call, you need two Wavix numbers, one for an active call and one to receive the transferred call. Make sure inbound call routing is set up on the second number.
To transfer an active LiveKit call, use the **TransferSIPParticipant** server API:
```ts theme={null}
import { SipClient } from 'livekit-server-sdk';
// ...
async function transferParticipant(participant) {
console.log("transfer participant initiated");
const sipTransferOptions = {
playDialtone: false
};
const sipClient = new SipClient(process.env.LIVEKIT_URL,
process.env.LIVEKIT_API_KEY,
process.env.LIVEKIT_API_SECRET);
const transferTo = "sip:+@"; // e.g., sip:+61290597520@au.wavix.net
await sipClient.transferSipParticipant('open-room', participant.identity,
transferTo, sipTransferOptions);
console.log('transfer participant');
}
```
Replace transfer\_destination with your Wavix number. Use the following format: `sip:+[YOUR_WAVIX_NUMBER]@[WAVIX_SIP_GATEWAY]`. Example: `sip:+61290597520@au.wavix.net`
Choose the primary Wavix gateway with the lowest ping from your location. A list of regional gateways is shown at the bottom of the Trunks page in the [Wavix portal](https://app.wavix.com/trunks).
Learn more about LiveKit call transfer in the [LiveKit documentation](https://docs.livekit.io/sip/transfer-cold/).
## Troubleshooting
* **603 Declined** can occur if the destination's per‑minute rate is higher than your account's Max call rate (check the value on the Trunks page). Contact [**support@wavix.com**](mailto:support@wavix.com) to request a change if needed.
* **603 Declined** can also occur if there is no active registration on your SIP trunk. Verify registration status as described above.
* **Wrong number format**. Dial the full international E.164 number, e.g. `19085594899` (US) or `4408001218915` (UK). Do not dial local formats like `9085594899`. Strip prefixes like `0`, `00`, or `011` before the dialed number.
Create a JSON file describing the outbound trunk:
```json outbound-trunk.json theme={null}
{
"trunk": {
"name": "Wavix outbound trunk",
"address": "us.wavix.net",
"numbers": ["+61290597521"]
}
}
```
* In the `address` field, enter one of Wavix's regional gateways. A full list is shown at the bottom of the Trunks page in the [Wavix portal](https://app.wavix.com/trunks).
* Replace the `numbers` array with your Wavix numbers in E.164 format with the leading `+` sign.
Then create the trunk with the LiveKit CLI, passing your Wavix SIP trunk credentials:
```shell theme={null}
lk sip outbound create outbound-trunk.json \
--auth-user "YOUR_SIP_TRUNK_ID" \
--auth-pass "YOUR_SIP_TRUNK_PASSWORD"
```
Replace `YOUR_SIP_TRUNK_ID` and `YOUR_SIP_TRUNK_PASSWORD` with the SIP trunk credentials configured at Wavix.
For more information about creating a LiveKit outbound trunk using the CLI or code, see the [LiveKit documentation](https://docs.livekit.io/telephony/making-calls/outbound-trunk).
You can encrypt call media on your Wavix trunk. Contact [support@wavix.com](mailto:support@wavix.com) and provide your SIP trunk ID.
You've connected LiveKit with Wavix and now can place outbound calls. Check the [LiveKit recipes](https://docs.livekit.io/recipes/) for voice AI and LiveKit Agent use cases.
## Transfer a call
Wavix supports cold transfers using the `SIP REFER` command. To transfer a call, you need two Wavix numbers, one for an active call and one to receive the transferred call. Make sure inbound call routing is set up on the second number.
To transfer an active LiveKit call, use the **TransferSIPParticipant** server API:
```ts theme={null}
import { SipClient } from 'livekit-server-sdk';
// ...
async function transferParticipant(participant) {
console.log("transfer participant initiated");
const sipTransferOptions = {
playDialtone: false
};
const sipClient = new SipClient(process.env.LIVEKIT_URL,
process.env.LIVEKIT_API_KEY,
process.env.LIVEKIT_API_SECRET);
const transferTo = "sip:+@"; // e.g., sip:+61290597520@au.wavix.net
await sipClient.transferSipParticipant('open-room', participant.identity,
transferTo, sipTransferOptions);
console.log('transfer participant');
}
```
Replace transfer\_destination with your Wavix number. Use the following format: `sip:+[YOUR_WAVIX_NUMBER]@[WAVIX_SIP_GATEWAY]`. Example: `sip:+61290597520@au.wavix.net`
Choose the primary Wavix gateway with the lowest ping from your location. A list of regional gateways is shown at the bottom of the Trunks page in the [Wavix portal](https://app.wavix.com/trunks).
Learn more about LiveKit call transfer in the [LiveKit documentation](https://docs.livekit.io/sip/transfer-cold/).
## Troubleshooting
* **603 Declined** can occur if the destination's per‑minute rate is higher than your account's Max call rate (check the value on the Trunks page). Contact [**support@wavix.com**](mailto:support@wavix.com) to request a change if needed.
* **603 Declined** can also occur if there is no active registration on your SIP trunk. Verify registration status as described above.
* **Wrong number format**. Dial the full international E.164 number, e.g. `19085594899` (US) or `4408001218915` (UK). Do not dial local formats like `9085594899`. Strip prefixes like `0`, `00`, or `011` before the dialed number.