> ## Documentation Index
> Fetch the complete documentation index at: https://docs.wavix.com/llms.txt
> Use this file to discover all available pages before exploring further.
# How to connect Wavix to the OpenAI Realtime API
> Use this guide to route inbound calls to the OpenAI Realtime API.
## Prerequisites
Before you begin, ensure you have an active phone number on your Wavix account. If you need to purchase one, see our guide on [how to buy a phone number](/numbers/buy-number).
## Receive calls with Wavix and OpenAI Realtime API
### Create OpenAI webhook
1. **Sign in** to your OpenAI account at [https://platform.openai.com](https://platform.openai.com).
2. Go to your [Organization settings](https://platform.openai.com/settings).
3. In the left menu, select **Webhooks**, then choose **Create**.
4. Enter the URL where OpenAI should send events, select `realtime.call.incoming` from the **Event types** dropdown, and optionally add a name.
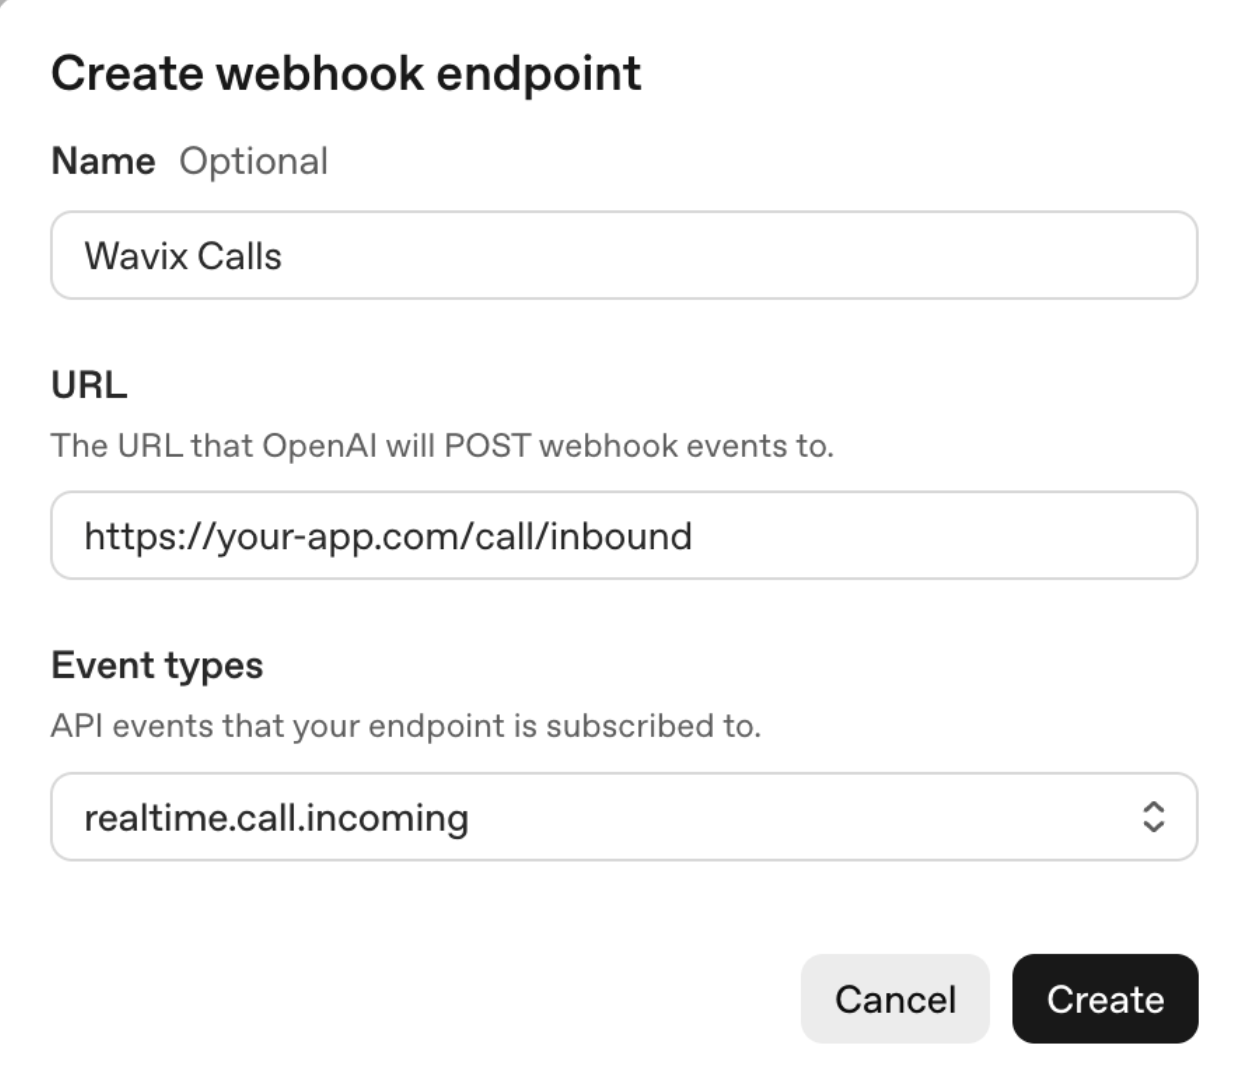 OpenAI automatically generates a **signing secret**. Save this secret in a secure location, because you will not be able to view it again. OpenAI uses the signing secret to sign webhook requests. You can use it to verify that each request is from OpenAI and not from a third party.
### Set up inbound call routing in Wavix
Wavix can route inbound calls to a SIP trunk on the platform, SIP URI, or forward them to a phone number. OpenAI requires calls to be routed to a **SIP URI**.
Before setting up a Wavix number:
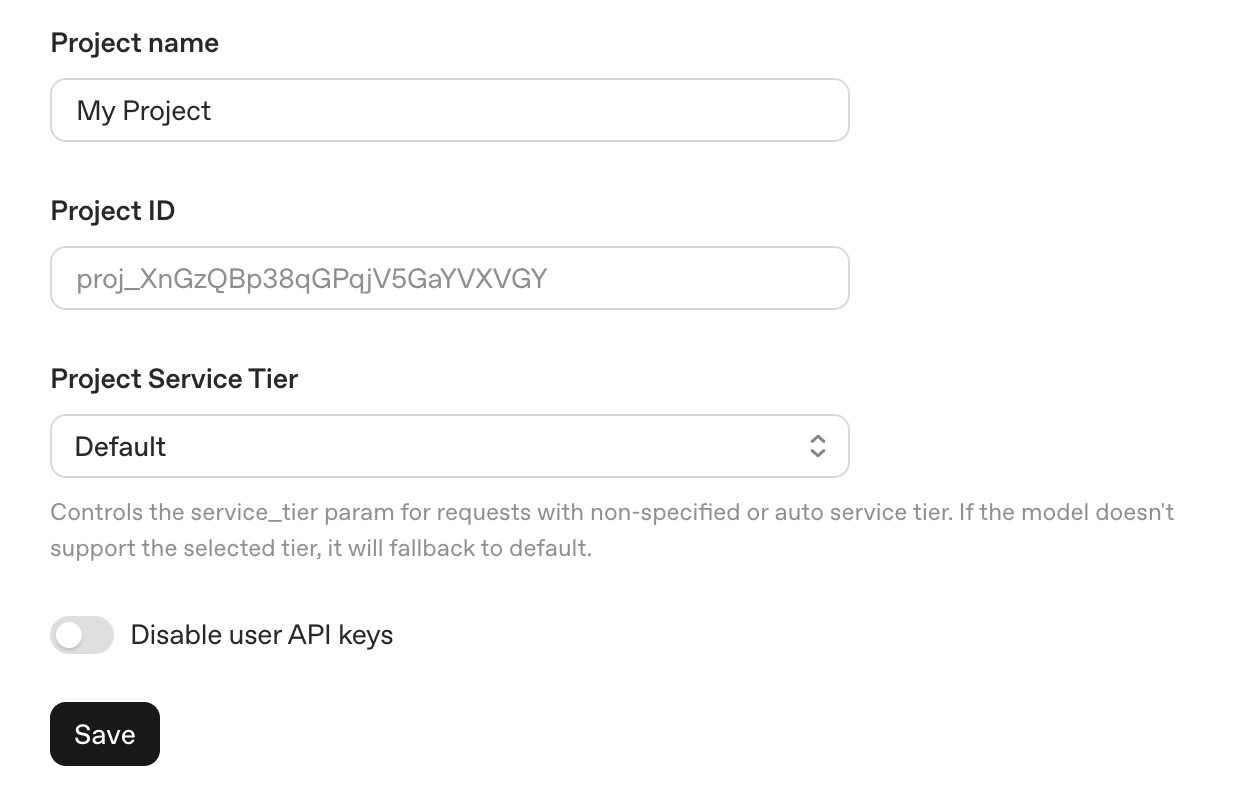
1. In your OpenAI account, go to **General** → **Project**.
2. Copy the value from **Project ID**. You'll need it to configure inbound call routing in Wavix.
OpenAI automatically generates a **signing secret**. Save this secret in a secure location, because you will not be able to view it again. OpenAI uses the signing secret to sign webhook requests. You can use it to verify that each request is from OpenAI and not from a third party.
### Set up inbound call routing in Wavix
Wavix can route inbound calls to a SIP trunk on the platform, SIP URI, or forward them to a phone number. OpenAI requires calls to be routed to a **SIP URI**.
Before setting up a Wavix number:
1. In your OpenAI account, go to **General** → **Project**.
2. Copy the value from **Project ID**. You'll need it to configure inbound call routing in Wavix.
 To route calls from your Wavix number to the OpenAI platform:
1. In Wavix, open **Numbers & trunks → My numbers**.
2. Select your number by clicking the **⋯** menu → **Edit number**.
3. Set the **inbound call destination type** to **SIP URI**, and enter the destination in the format of:
```bash theme={null}
[OpenAI_PROJECT_ID]@sip.api.openai.com;transport=tls
```
In the example above, it would be:
```bash theme={null}
proj_XnGzQBp38qGPqjV5GaYVXVGY@sip.api.openai.com;transport=tls
```
4. **Save** your changes.
Now, all calls to your Wavix number are routed to your OpenAI project.
## Managing calls using OpenAI Realtime API
You can answer, decline, monitor, refer, and hang up calls using the OpenAI API.
To learn more, see the [OpenAI Realtime SIP API documentation](https://platform.openai.com/docs/guides/realtime-sip).
### Answer a call
When OpenAI receives SIP traffic linked to your project, it triggers your webhook. The event type is `realtime.call.incoming`, as shown in the example below:
```http theme={null}
POST https://your-app.com/call/inbound
user-agent: OpenAI/1.0 (+https://platform.openai.com/docs/webhooks)
content-type: application/json
webhook-id: wh_68df8a55937881909c0db29329f4df96 # unique id for idempotency
webhook-timestamp: 1759480406 # timestamp of delivery attempt
webhook-signature: v1,K5oZfzN95Z9UVu1EsfQmfVNQhnkZ2pj9o9NDN/H/pI4= # signature to verify authenticity from OpenAI
{
"object": "event",
"id": "evt_68df8a5585808190968c8d1243ab3f9f",
"type": "realtime.call.incoming",
"created_at": 1759480405,
"data": {
"call_id": "rtc_5bfabb18c4574e30a75f4bfaad13f878",
"sip_headers": [
{"name": "From", "value": "\"+14067704205\" ;tag=as6442942c"},
{ "name": "To", "value": "sip:proj_XnGzQBp38qGPqjV5GaYVXVGY@sip.api.openai.com;transport=tls" },
{ "name": "Call-ID", "value": "03782086-4ce9-44bf-8b0d-4e303d2cc590"},
{"name": "x-number", "value": "17134810111"}
]
}
}
```
The `call_id` parameter is a unique identifier of the call in the OpenAI platform. Use it when answering the call.
To answer the call, use the OpenAI [Accept call](https://platform.openai.com/docs/api-reference/realtime-calls/accept-call) endpoint.
When answering the call, you should provide the required configuration, including instructions, voice, and other settings, for the Realtime API session.
```bash theme={null}
curl -X POST "https://api.openai.com/v1/realtime/calls/$call_id/accept" \
-H "Authorization: Bearer $OPENAI_API_KEY" \
-H "Content-Type: application/json" \
-d '{
"type": "realtime",
"model": "gpt-realtime",
"instructions": "You are Alex, a friendly support agent for Wavix."
}'
```
* `$call_id`: unique identifier of the call in OpenAI.
* `$OPENAI_API_KEY`: your OpenAI API Key.
The SIP INVITE request from Wavix includes the `x-number` header, which contains the dialed number from your Wavix account. You can use this value to provide different instructions based on the number that was called.
### Decline the call
To decline the call, use the OpenAI [Reject call](https://platform.openai.com/docs/api-reference/realtime-calls/reject-call) endpoint. You can optionally include a SIP response code to return to the caller.
### Transfer the call
Wavix supports cold transfers using the `SIP REFER` command. To transfer a call, you need two Wavix numbers, one for an active call and one to receive the transferred call. Make sure inbound call routing is set up on the second number.
To transfer an active call, use the OpenAI [Refer call](https://platform.openai.com/docs/api-reference/realtime-calls/refer-call) endpoint. In the request, the `target_uri` parameter should contain the Wavix number.
### Hang up the call
To hang up the call, use the OpenAI [Hang up call](https://platform.openai.com/docs/api-reference/realtime-calls/hangup-call) endpoint. In the request, the `call_id` parameter should contain the OpenAI unique call identifier.
### Monitor call events
After you answer a call, open a WebSocket connection to the session to stream events and send realtime commands.
```http theme={null}
GET wss://api.openai.com/v1/realtime?call_id={call_id}
```
* `call_id` - unique identifier of the call in OpenAI.
See OpenAI [Webhooks and server-side controls](https://platform.openai.com/docs/guides/realtime-server-controls) for more information.
## Troubleshooting
* If inbound calls aren't reaching your OpenAI project, make sure [Inbound call routing](/sip-trunking/guides/openai#set-up-inbound-call-routing-in-wavix) is set up correctly in Wavix.
* Make sure all phone numbers are in international E.164 format, e.g. `19085594899` (US) or `4408001218915` (UK). Do not dial local formats like `9085594899`. Strip prefixes like `0`, `00`, or `011` if needed.
To route calls from your Wavix number to the OpenAI platform:
1. In Wavix, open **Numbers & trunks → My numbers**.
2. Select your number by clicking the **⋯** menu → **Edit number**.
3. Set the **inbound call destination type** to **SIP URI**, and enter the destination in the format of:
```bash theme={null}
[OpenAI_PROJECT_ID]@sip.api.openai.com;transport=tls
```
In the example above, it would be:
```bash theme={null}
proj_XnGzQBp38qGPqjV5GaYVXVGY@sip.api.openai.com;transport=tls
```
4. **Save** your changes.
Now, all calls to your Wavix number are routed to your OpenAI project.
## Managing calls using OpenAI Realtime API
You can answer, decline, monitor, refer, and hang up calls using the OpenAI API.
To learn more, see the [OpenAI Realtime SIP API documentation](https://platform.openai.com/docs/guides/realtime-sip).
### Answer a call
When OpenAI receives SIP traffic linked to your project, it triggers your webhook. The event type is `realtime.call.incoming`, as shown in the example below:
```http theme={null}
POST https://your-app.com/call/inbound
user-agent: OpenAI/1.0 (+https://platform.openai.com/docs/webhooks)
content-type: application/json
webhook-id: wh_68df8a55937881909c0db29329f4df96 # unique id for idempotency
webhook-timestamp: 1759480406 # timestamp of delivery attempt
webhook-signature: v1,K5oZfzN95Z9UVu1EsfQmfVNQhnkZ2pj9o9NDN/H/pI4= # signature to verify authenticity from OpenAI
{
"object": "event",
"id": "evt_68df8a5585808190968c8d1243ab3f9f",
"type": "realtime.call.incoming",
"created_at": 1759480405,
"data": {
"call_id": "rtc_5bfabb18c4574e30a75f4bfaad13f878",
"sip_headers": [
{"name": "From", "value": "\"+14067704205\" ;tag=as6442942c"},
{ "name": "To", "value": "sip:proj_XnGzQBp38qGPqjV5GaYVXVGY@sip.api.openai.com;transport=tls" },
{ "name": "Call-ID", "value": "03782086-4ce9-44bf-8b0d-4e303d2cc590"},
{"name": "x-number", "value": "17134810111"}
]
}
}
```
The `call_id` parameter is a unique identifier of the call in the OpenAI platform. Use it when answering the call.
To answer the call, use the OpenAI [Accept call](https://platform.openai.com/docs/api-reference/realtime-calls/accept-call) endpoint.
When answering the call, you should provide the required configuration, including instructions, voice, and other settings, for the Realtime API session.
```bash theme={null}
curl -X POST "https://api.openai.com/v1/realtime/calls/$call_id/accept" \
-H "Authorization: Bearer $OPENAI_API_KEY" \
-H "Content-Type: application/json" \
-d '{
"type": "realtime",
"model": "gpt-realtime",
"instructions": "You are Alex, a friendly support agent for Wavix."
}'
```
* `$call_id`: unique identifier of the call in OpenAI.
* `$OPENAI_API_KEY`: your OpenAI API Key.
The SIP INVITE request from Wavix includes the `x-number` header, which contains the dialed number from your Wavix account. You can use this value to provide different instructions based on the number that was called.
### Decline the call
To decline the call, use the OpenAI [Reject call](https://platform.openai.com/docs/api-reference/realtime-calls/reject-call) endpoint. You can optionally include a SIP response code to return to the caller.
### Transfer the call
Wavix supports cold transfers using the `SIP REFER` command. To transfer a call, you need two Wavix numbers, one for an active call and one to receive the transferred call. Make sure inbound call routing is set up on the second number.
To transfer an active call, use the OpenAI [Refer call](https://platform.openai.com/docs/api-reference/realtime-calls/refer-call) endpoint. In the request, the `target_uri` parameter should contain the Wavix number.
### Hang up the call
To hang up the call, use the OpenAI [Hang up call](https://platform.openai.com/docs/api-reference/realtime-calls/hangup-call) endpoint. In the request, the `call_id` parameter should contain the OpenAI unique call identifier.
### Monitor call events
After you answer a call, open a WebSocket connection to the session to stream events and send realtime commands.
```http theme={null}
GET wss://api.openai.com/v1/realtime?call_id={call_id}
```
* `call_id` - unique identifier of the call in OpenAI.
See OpenAI [Webhooks and server-side controls](https://platform.openai.com/docs/guides/realtime-server-controls) for more information.
## Troubleshooting
* If inbound calls aren't reaching your OpenAI project, make sure [Inbound call routing](/sip-trunking/guides/openai#set-up-inbound-call-routing-in-wavix) is set up correctly in Wavix.
* Make sure all phone numbers are in international E.164 format, e.g. `19085594899` (US) or `4408001218915` (UK). Do not dial local formats like `9085594899`. Strip prefixes like `0`, `00`, or `011` if needed.