> ## Documentation Index
> Fetch the complete documentation index at: https://docs.wavix.com/llms.txt
> Use this file to discover all available pages before exploring further.
# How to connect Retell AI voice agents with Wavix
> This guide explains how to connect Retell AI agents with Wavix voice infrastructure, import phone numbers, and make and receive calls.
## Prerequisites
Before you begin, ensure you have:
1. An active phone number in your Wavix account. If you need to purchase one, see our guide on [how to buy a phone number](/numbers/buy-number).
2. A Wavix [SIP trunk](https://wavix.com/sip-trunk) ([How to create a SIP trunk](/sip-trunking/create-sip-trunk)).
3. An active [Retell AI account](https://www.retellai.com/).
## How it works
### Inbound calls
1. A customer calls your Wavix phone number.
2. Wavix routes the call via SIP to your Retell AI voice agent.
3. Retell AI voice agent processes the audio and generates responses.
4. Responses are streamed back into the call through Wavix.
```mermaid actions={false} theme={null}
sequenceDiagram
participant Caller as Caller
participant Wavix as Wavix platform
participant Retell as Retell AI
Caller->>Wavix: Telephony network
Wavix->>Retell: SIP and SRTP
Retell->>Retell: Voice AI orchestration (LLM, TTS, conversation logic)
Retell->>Wavix: SIP and SRTP
Wavix->>Caller: Telephony network
```
### Outbound calls
1. Your application or Retell AI dashboard triggers a call.
2. Retell AI connects to Wavix via SIP.
3. Wavix connects the call to your customer via the telephony network.
4. The customer answers the call.
5. Retell AI voice agent processes the audio and generates responses.
6. Responses are streamed back into the call.
```mermaid actions={false} theme={null}
sequenceDiagram
participant App as Your app / Retell AI dashboard
participant Retell as Retell AI
participant Wavix as Wavix platform
participant Callee as Callee
App->>Retell: Triggers a call
Retell->>Wavix: SIP and SRTP
Wavix->>Callee: Telephony network
Callee->>Wavix: Telephony network
Retell->>Retell: Voice AI orchestration (LLM, TTS, conversation logic)
Wavix->>Retell: SIP and SRTP
```
## Receive calls with Wavix and Retell AI
### Import a number into Retell AI
1. **Sign in** to your Retell AI account.
2. In the left-hand menu, select **Phone Numbers**.
3. Select the **+** button and choose **Connect to your number via SIP trunking**.
 4. Enter the imported Wavix number details:
* **Phone Number**: A Wavix phone number in your account.
* **Termination URI**: Use `us.wavix.net` to ensure the lowest audio latency.
* **SIP Trunk User Name**: Enter the **SIP trunk ID** from your Wavix account.
* **SIP Trunk Password**: Your Wavix SIP trunk password.
* **Outbound Transport**: Use **TCP**.
5. Select **Save**.
Import a number with the Retell AI [Import phone number](https://docs.retellai.com/api-references/import-phone-number) endpoint. Run the POST request below using your favorite tool, such as Postman or terminal.
```bash theme={null}
curl -X POST "https://api.retellai.com/import-phone-number" \
-H "Authorization: Bearer YOUR_RETELLAI_KEY" \
-H "Content-Type: application/json" \
-d '{
"phone_number": "+YOUR_WAVIX_NUMBER",
"termination_uri": "us.wavix.net",
"sip_trunk_auth_username": "YOUR_SIP_TRUNK_ID",
"sip_trunk_auth_password": "YOUR_SIP_TRUNK_PASSWORD",
"transport": "TCP",
"nickname": "Wavix number"
}'
```
* Replace `YOUR_WAVIX_NUMBER` with a number on your Wavix account in E.164 format with the leading `+` sign, i.e., `+61290597521`.
* Replace `YOUR_SIP_TRUNK_ID` and `YOUR_SIP_TRUNK_PASSWORD` with the SIP trunk credentials configured in the Wavix portal.
* Replace `YOUR_RETELLAI_KEY` with your Retell AI API key.
### Create a Retell AI voice agent
1. In your Retell AI dashboard, open the left-hand menu and select **Agents**.
2. In the top-right corner, select **Create an Agent** and choose **Voice Agent**.
3. Select an **Agent Type** and use one of Retell AI's templates or build a new agent from scratch.
4. Once finished, publish your agent:
* Give your agent a descriptive name.
* (Optionally) Provide information about what your agent does.
* Associate it with an imported phone number.
4. Enter the imported Wavix number details:
* **Phone Number**: A Wavix phone number in your account.
* **Termination URI**: Use `us.wavix.net` to ensure the lowest audio latency.
* **SIP Trunk User Name**: Enter the **SIP trunk ID** from your Wavix account.
* **SIP Trunk Password**: Your Wavix SIP trunk password.
* **Outbound Transport**: Use **TCP**.
5. Select **Save**.
Import a number with the Retell AI [Import phone number](https://docs.retellai.com/api-references/import-phone-number) endpoint. Run the POST request below using your favorite tool, such as Postman or terminal.
```bash theme={null}
curl -X POST "https://api.retellai.com/import-phone-number" \
-H "Authorization: Bearer YOUR_RETELLAI_KEY" \
-H "Content-Type: application/json" \
-d '{
"phone_number": "+YOUR_WAVIX_NUMBER",
"termination_uri": "us.wavix.net",
"sip_trunk_auth_username": "YOUR_SIP_TRUNK_ID",
"sip_trunk_auth_password": "YOUR_SIP_TRUNK_PASSWORD",
"transport": "TCP",
"nickname": "Wavix number"
}'
```
* Replace `YOUR_WAVIX_NUMBER` with a number on your Wavix account in E.164 format with the leading `+` sign, i.e., `+61290597521`.
* Replace `YOUR_SIP_TRUNK_ID` and `YOUR_SIP_TRUNK_PASSWORD` with the SIP trunk credentials configured in the Wavix portal.
* Replace `YOUR_RETELLAI_KEY` with your Retell AI API key.
### Create a Retell AI voice agent
1. In your Retell AI dashboard, open the left-hand menu and select **Agents**.
2. In the top-right corner, select **Create an Agent** and choose **Voice Agent**.
3. Select an **Agent Type** and use one of Retell AI's templates or build a new agent from scratch.
4. Once finished, publish your agent:
* Give your agent a descriptive name.
* (Optionally) Provide information about what your agent does.
* Associate it with an imported phone number.
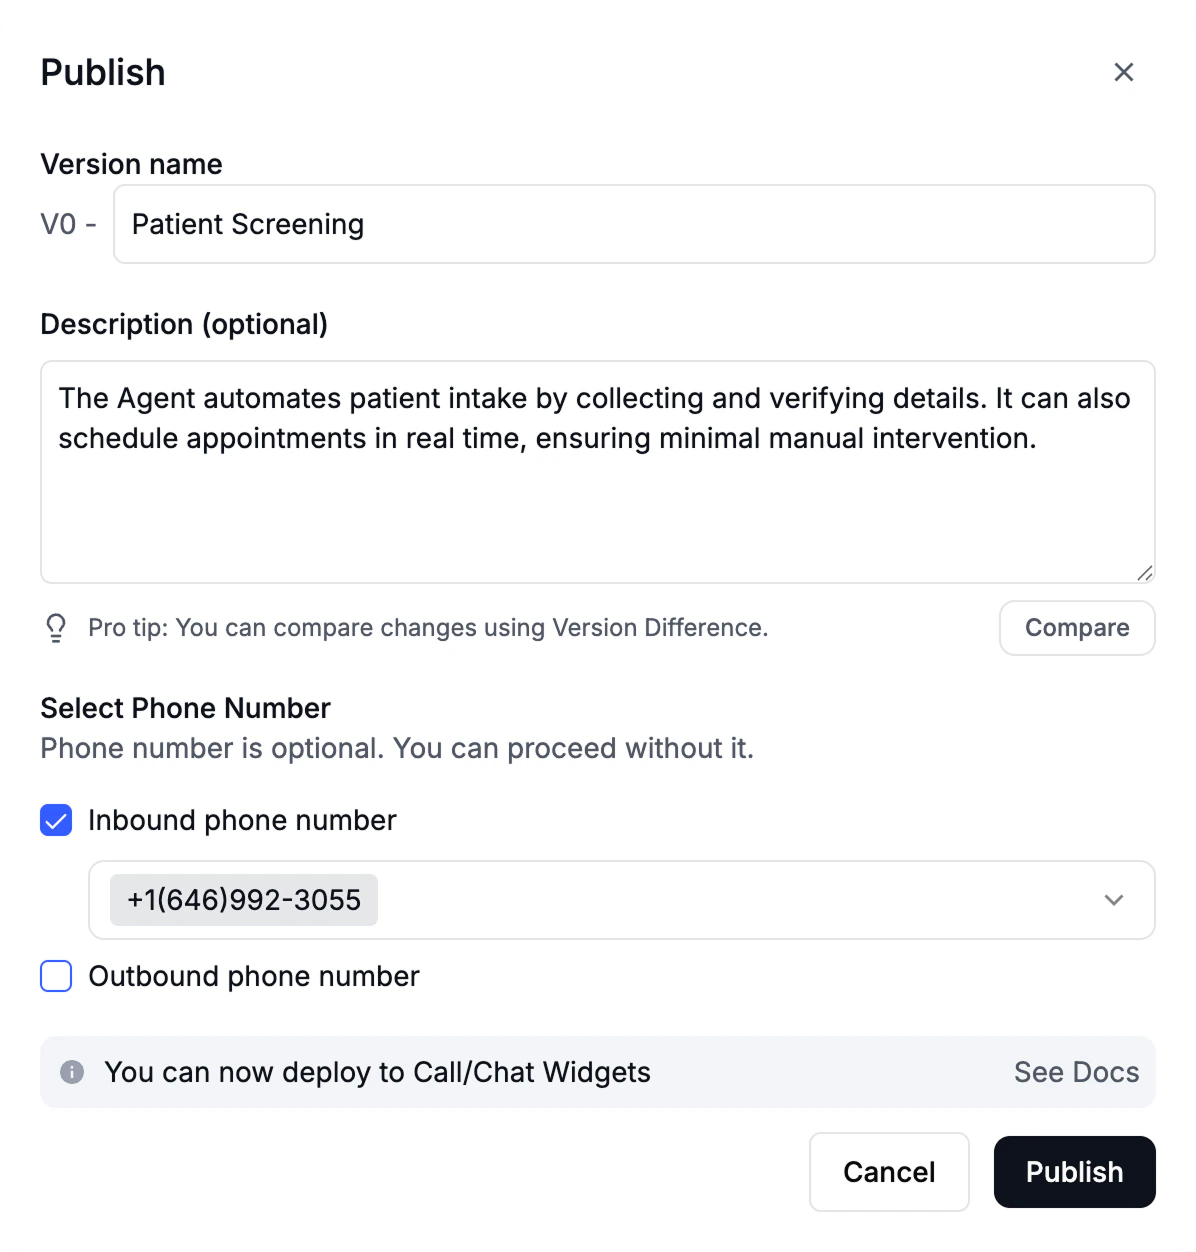 5. Select **Publish**.
You can assign an agent to a number when configuring the number itself.
### Configure your Wavix number
To route inbound calls to your Retell AI agent:
1. In the Wavix portal, open **Numbers & trunks → My numbers**.
2. Select your number by clicking the **⋯** menu → **Edit number**.
3. Set the **inbound call destination type** to **SIP URI**, and enter the destination:
```bash theme={null}
[did]@sip.retellai.com;transport=tcp
```
4. Select **Save** to apply changes. Wavix will automatically replace `[did]` with your actual number.
Now, all calls to your Wavix number are routed to your Retell AI voice assistant.
### Verify the configuration
Place a test call to the Wavix number. You'll be connected to your agent shortly.
## Place calls with Wavix and Retell AI
Before placing an outbound call, make sure:
* An **Outbound Call Agent** is assigned to the number.
* The country you plan to call is listed in **Allowed Outbound Countries** or all countries are allowed.
5. Select **Publish**.
You can assign an agent to a number when configuring the number itself.
### Configure your Wavix number
To route inbound calls to your Retell AI agent:
1. In the Wavix portal, open **Numbers & trunks → My numbers**.
2. Select your number by clicking the **⋯** menu → **Edit number**.
3. Set the **inbound call destination type** to **SIP URI**, and enter the destination:
```bash theme={null}
[did]@sip.retellai.com;transport=tcp
```
4. Select **Save** to apply changes. Wavix will automatically replace `[did]` with your actual number.
Now, all calls to your Wavix number are routed to your Retell AI voice assistant.
### Verify the configuration
Place a test call to the Wavix number. You'll be connected to your agent shortly.
## Place calls with Wavix and Retell AI
Before placing an outbound call, make sure:
* An **Outbound Call Agent** is assigned to the number.
* The country you plan to call is listed in **Allowed Outbound Countries** or all countries are allowed.
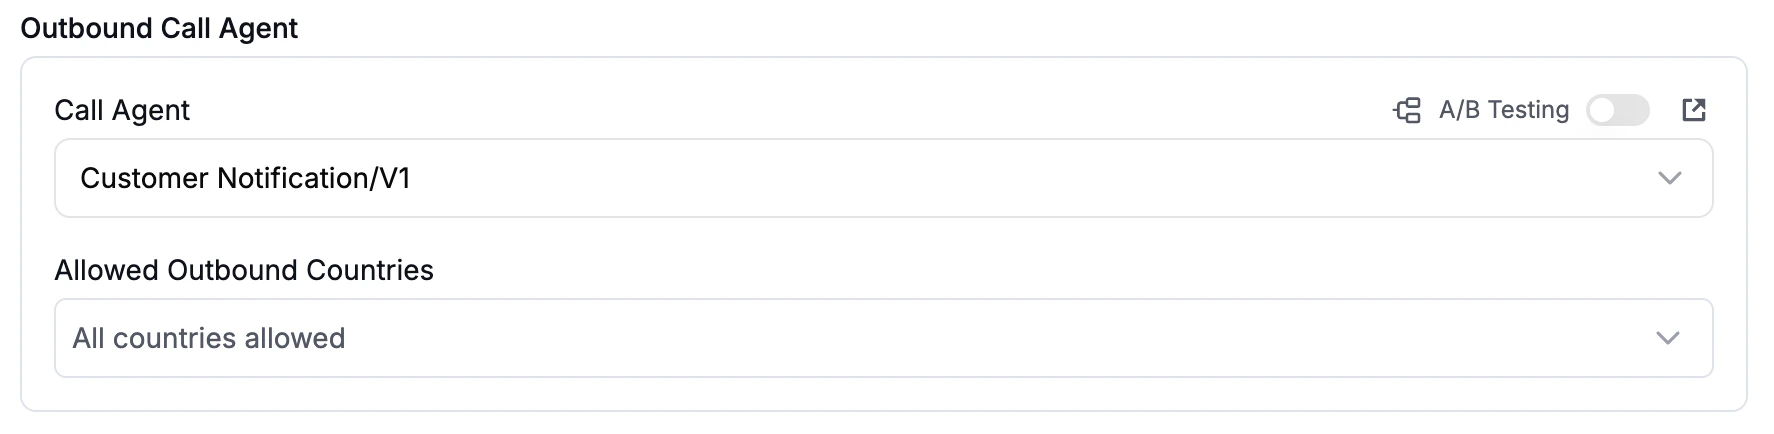 To place an outbound call with Retell AI, you can use:
* Dashboard
* API
* Batch Call tool
### Place a call using the dashboard
In the Retell AI dashboard:
1. In the left-hand menu, select **Phone Numbers**.
2. Choose the imported Wavix number.
3. In the top-right corner, select **Make an outbound call**:
* **Phone Number**: Enter the number you want to call.
* **Dynamic Variables**: Provide dynamic variables to prepopulate in your assistant.
To place an outbound call with Retell AI, you can use:
* Dashboard
* API
* Batch Call tool
### Place a call using the dashboard
In the Retell AI dashboard:
1. In the left-hand menu, select **Phone Numbers**.
2. Choose the imported Wavix number.
3. In the top-right corner, select **Make an outbound call**:
* **Phone Number**: Enter the number you want to call.
* **Dynamic Variables**: Provide dynamic variables to prepopulate in your assistant.
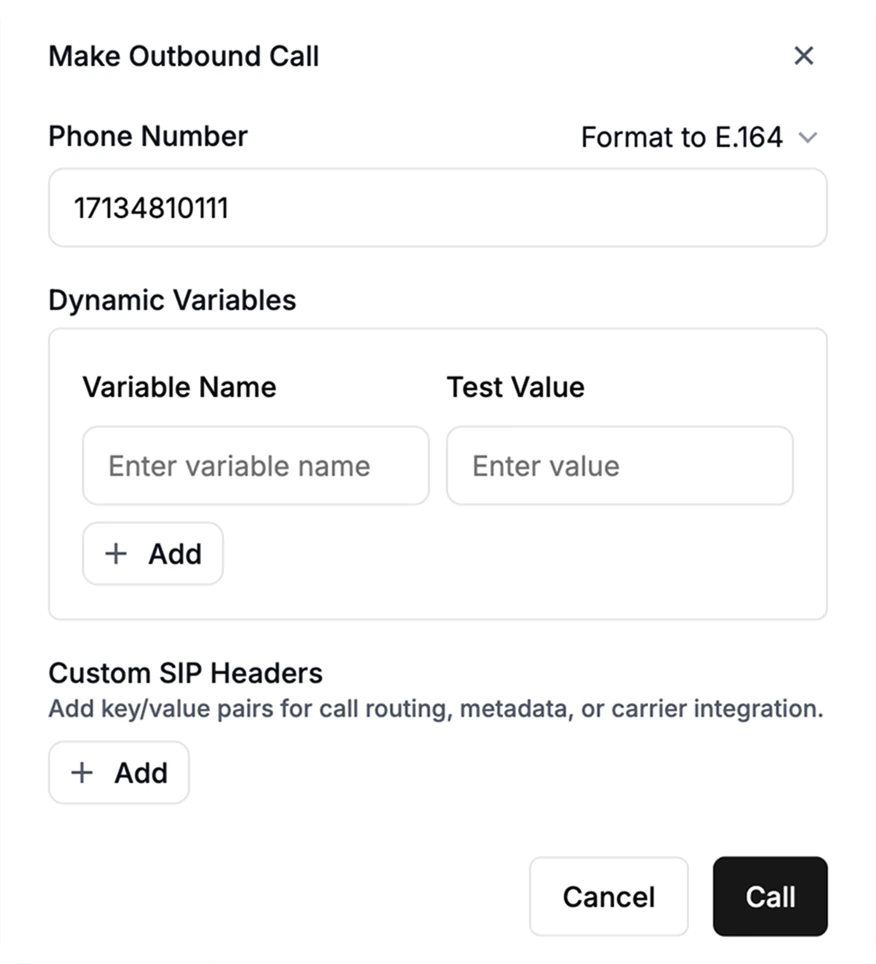 4. Select **Call**.
### Place a call using API
To make a call using the API, you'll need a Retell AI API key:
1. Navigate to **Settings** and select **API Keys**.
2. Copy your API key.
You may need to create a new API Key first.
3. Run the POST request below using your favorite tool, such as Postman or terminal.
```bash theme={null}
curl -L 'https://api.retellai.com/v2/create-phone-call' \
-H 'Authorization: Bearer YOUR_RETELLAI_KEY' \
-H 'Content-Type: application/json' \
-d '{
"from_number": "+YOUR_WAVIX_NUMBER",
"to_number": "+DESTINATION_NUMBER",
"ignore_e164_validation": false
}'
```
* `from_number`: Originating number, the Wavix number imported to Retell AI.
* `to_number`: Destination number you want to call.
Retell AI lets you override the default agent bound to the originating number and pass optional dynamic variables to the Response Engine.
Check the Retell AI [API documentation](https://docs.retellai.com/api-references/create-phone-call) for more details.
If successful, the Retell AI places a call to the destination number.
### Batch Call tool
Batch calls let you create, schedule, and monitor calls in bulk.
To place calls using Retell AI Batch Call:
1. In the Retell AI dashboard, navigate to **Batch call** and select **Create a batch call**.
2. Give your campaign a name and select an imported Wavix number.
3. Upload a list of contacts.
4. (Optionally) Schedule your campaign.
5. Select **Send** to launch the campaign.
Make sure your Retell AI allowed CPS (calls per second) does not exceed your Wavix account limit:
* Find your Retell AI CPS (calls per second) in the [account settings](https://dashboard.retellai.com/settings/limits)
* Wavix allows 3 CPS by default. To increase this limit, contact [support@wavix.com](mailto:support@wavix.com)
## Send a call follow-up SMS
You can let a Retell AI voice agent send an SMS after a call when the caller asks for a written follow-up. For example, after a scheduling call, the agent can send an appointment confirmation, reference number, or support link to the same phone number that joined the call.
Before you enable SMS follow-ups:
* Register the SMS Sender ID you want to use. For setup instructions, see [Sender ID registration](/messaging/send-sms#sender-id-registration).
* Create a dedicated Wavix API key with only the scopes required to send SMS.
* Confirm that the caller has agreed to receive the follow-up SMS.
* Keep the SMS content short and include opt-out text when required by your destination country or messaging use case.
### Connect the Wavix MCP server to Retell AI
The Wavix MCP server exposes Wavix messaging tools, including `sms_and_mms_messages_send`, to your Retell AI agent. Retell AI supports MCP through an MCP node in a conversation flow.
1. In the Retell AI dashboard, open the conversation flow used by your voice agent.
2. Add an **MCP** node to the point in the flow where the agent should send the follow-up SMS.
3. Add an MCP server with the Wavix MCP server URL:
```bash theme={null}
https://mcp.wavix.com/mcp
```
4. Add a custom request header for Wavix MCP authentication:
* **Header name**: `Authorization`
* **Header value**: `Bearer YOUR_WAVIX_API_KEY`
5. Select the `sms_and_mms_messages_send` MCP tool.
6. Configure the tool input:
* `from`: Your registered Sender ID.
* `to`: `{{follow_up_number}}`.
* `message_body.text`: The follow-up text the caller requested.
7. Save the MCP node and publish the updated agent version.
Retell AI documents MCP setup through conversation flow MCP nodes. After you add the Wavix MCP server to your flow, you can verify the available tools with the Retell AI [Get MCP Tools](https://docs.retellai.com/api-references/get-mcp-tools) endpoint:
```bash theme={null}
curl -X GET "https://api.retellai.com/get-mcp-tools/YOUR_AGENT_ID?mcp_id=YOUR_WAVIX_MCP_ID" \
-H "Authorization: Bearer YOUR_RETELLAI_KEY"
```
* Replace `YOUR_AGENT_ID` with your Retell AI agent ID.
* Replace `YOUR_WAVIX_MCP_ID` with the MCP server ID from the conversation flow.
* Replace `YOUR_RETELLAI_KEY` with your Retell AI API key.
The response should include `sms_and_mms_messages_send`. Use the dashboard flow editor to map the tool inputs and publish the agent version.
### Capture the caller number
Retell AI stores the customer phone number differently depending on call direction:
* For inbound calls, the caller number is `from_number`.
* For outbound calls, the customer number is `to_number`.
Use a single dynamic variable, such as `follow_up_number`, for the SMS recipient:
* For inbound calls, set `follow_up_number` to the inbound `from_number`.
* For outbound calls, set `follow_up_number` to the outbound `to_number`.
You can set dynamic variables from an inbound call webhook, an outbound call request, or earlier nodes in the conversation flow. Then use `{{follow_up_number}}` as the `to` value in the Wavix MCP tool.
For example, update the agent prompt or flow instructions:
```text theme={null}
If the caller asks for a written follow-up and confirms consent, use the Wavix SMS tool to send one message to {{follow_up_number}} from SENDER_ID. Keep the message under 160 characters when possible. Do not send sensitive personal, payment, authentication, or health information by SMS.
```
### Security requirements
* Use a Wavix API key scoped only to messaging. Don't use a full-access account key.
* Store API keys only in Retell AI MCP server headers or another protected secret store. Don't put keys in prompts, dynamic variables, or public URLs.
* Require caller consent before sending an SMS. The agent should not send follow-ups automatically for every call.
* Use API key scopes to limit the Wavix MCP tools available to the agent.
* Don't send one-time passwords, payment details, health information, or other sensitive data in a follow-up SMS.
* Follow destination-country SMS rules, including Sender ID registration, opt-out language, and message content restrictions.
* Review Retell AI data storage settings if you redact Caller IDs or dynamic variables. If `phone_number` is redacted, Retell AI removes the customer number from the call record.
* Monitor Wavix message delivery reports and Retell AI function or MCP node logs during rollout.
## Call transfer
Wavix supports cold transfers using the `SIP REFER` command.
To transfer a call, you need two Wavix numbers, one for an active call and one to receive the transferred call. Make sure inbound call routing is set up on the second number.
To enable call transfers with Retell AI:
1. In your Retell AI dashboard, select the agent you want to enable this functionality for.
2. Under **Functions**, click **Add** and choose **Call Transfer**.
3. Set the **Transfer to** to **Static Destination** and enter a SIP URI to transfer the call to in the following format: `sip:[YOUR_WAVIX_NUMBER]@us.wavix.net`. Example: `sip:14062260605@us.wavix.net`.
4. Make sure to select **Keep raw input**.
5. Select **Cold Transfer** under **How should the AI handle the transfer?**.
6. Select **SIP REFER** as the **SIP Transfer Method**.
7. Select **Save**.
If you need to use **Dynamic Routing** for call transfer, make sure the transfer destination(s) are provided in the `sip:[YOUR_WAVIX_NUMBER]@us.wavix.net` format .
4. Select **Call**.
### Place a call using API
To make a call using the API, you'll need a Retell AI API key:
1. Navigate to **Settings** and select **API Keys**.
2. Copy your API key.
You may need to create a new API Key first.
3. Run the POST request below using your favorite tool, such as Postman or terminal.
```bash theme={null}
curl -L 'https://api.retellai.com/v2/create-phone-call' \
-H 'Authorization: Bearer YOUR_RETELLAI_KEY' \
-H 'Content-Type: application/json' \
-d '{
"from_number": "+YOUR_WAVIX_NUMBER",
"to_number": "+DESTINATION_NUMBER",
"ignore_e164_validation": false
}'
```
* `from_number`: Originating number, the Wavix number imported to Retell AI.
* `to_number`: Destination number you want to call.
Retell AI lets you override the default agent bound to the originating number and pass optional dynamic variables to the Response Engine.
Check the Retell AI [API documentation](https://docs.retellai.com/api-references/create-phone-call) for more details.
If successful, the Retell AI places a call to the destination number.
### Batch Call tool
Batch calls let you create, schedule, and monitor calls in bulk.
To place calls using Retell AI Batch Call:
1. In the Retell AI dashboard, navigate to **Batch call** and select **Create a batch call**.
2. Give your campaign a name and select an imported Wavix number.
3. Upload a list of contacts.
4. (Optionally) Schedule your campaign.
5. Select **Send** to launch the campaign.
Make sure your Retell AI allowed CPS (calls per second) does not exceed your Wavix account limit:
* Find your Retell AI CPS (calls per second) in the [account settings](https://dashboard.retellai.com/settings/limits)
* Wavix allows 3 CPS by default. To increase this limit, contact [support@wavix.com](mailto:support@wavix.com)
## Send a call follow-up SMS
You can let a Retell AI voice agent send an SMS after a call when the caller asks for a written follow-up. For example, after a scheduling call, the agent can send an appointment confirmation, reference number, or support link to the same phone number that joined the call.
Before you enable SMS follow-ups:
* Register the SMS Sender ID you want to use. For setup instructions, see [Sender ID registration](/messaging/send-sms#sender-id-registration).
* Create a dedicated Wavix API key with only the scopes required to send SMS.
* Confirm that the caller has agreed to receive the follow-up SMS.
* Keep the SMS content short and include opt-out text when required by your destination country or messaging use case.
### Connect the Wavix MCP server to Retell AI
The Wavix MCP server exposes Wavix messaging tools, including `sms_and_mms_messages_send`, to your Retell AI agent. Retell AI supports MCP through an MCP node in a conversation flow.
1. In the Retell AI dashboard, open the conversation flow used by your voice agent.
2. Add an **MCP** node to the point in the flow where the agent should send the follow-up SMS.
3. Add an MCP server with the Wavix MCP server URL:
```bash theme={null}
https://mcp.wavix.com/mcp
```
4. Add a custom request header for Wavix MCP authentication:
* **Header name**: `Authorization`
* **Header value**: `Bearer YOUR_WAVIX_API_KEY`
5. Select the `sms_and_mms_messages_send` MCP tool.
6. Configure the tool input:
* `from`: Your registered Sender ID.
* `to`: `{{follow_up_number}}`.
* `message_body.text`: The follow-up text the caller requested.
7. Save the MCP node and publish the updated agent version.
Retell AI documents MCP setup through conversation flow MCP nodes. After you add the Wavix MCP server to your flow, you can verify the available tools with the Retell AI [Get MCP Tools](https://docs.retellai.com/api-references/get-mcp-tools) endpoint:
```bash theme={null}
curl -X GET "https://api.retellai.com/get-mcp-tools/YOUR_AGENT_ID?mcp_id=YOUR_WAVIX_MCP_ID" \
-H "Authorization: Bearer YOUR_RETELLAI_KEY"
```
* Replace `YOUR_AGENT_ID` with your Retell AI agent ID.
* Replace `YOUR_WAVIX_MCP_ID` with the MCP server ID from the conversation flow.
* Replace `YOUR_RETELLAI_KEY` with your Retell AI API key.
The response should include `sms_and_mms_messages_send`. Use the dashboard flow editor to map the tool inputs and publish the agent version.
### Capture the caller number
Retell AI stores the customer phone number differently depending on call direction:
* For inbound calls, the caller number is `from_number`.
* For outbound calls, the customer number is `to_number`.
Use a single dynamic variable, such as `follow_up_number`, for the SMS recipient:
* For inbound calls, set `follow_up_number` to the inbound `from_number`.
* For outbound calls, set `follow_up_number` to the outbound `to_number`.
You can set dynamic variables from an inbound call webhook, an outbound call request, or earlier nodes in the conversation flow. Then use `{{follow_up_number}}` as the `to` value in the Wavix MCP tool.
For example, update the agent prompt or flow instructions:
```text theme={null}
If the caller asks for a written follow-up and confirms consent, use the Wavix SMS tool to send one message to {{follow_up_number}} from SENDER_ID. Keep the message under 160 characters when possible. Do not send sensitive personal, payment, authentication, or health information by SMS.
```
### Security requirements
* Use a Wavix API key scoped only to messaging. Don't use a full-access account key.
* Store API keys only in Retell AI MCP server headers or another protected secret store. Don't put keys in prompts, dynamic variables, or public URLs.
* Require caller consent before sending an SMS. The agent should not send follow-ups automatically for every call.
* Use API key scopes to limit the Wavix MCP tools available to the agent.
* Don't send one-time passwords, payment details, health information, or other sensitive data in a follow-up SMS.
* Follow destination-country SMS rules, including Sender ID registration, opt-out language, and message content restrictions.
* Review Retell AI data storage settings if you redact Caller IDs or dynamic variables. If `phone_number` is redacted, Retell AI removes the customer number from the call record.
* Monitor Wavix message delivery reports and Retell AI function or MCP node logs during rollout.
## Call transfer
Wavix supports cold transfers using the `SIP REFER` command.
To transfer a call, you need two Wavix numbers, one for an active call and one to receive the transferred call. Make sure inbound call routing is set up on the second number.
To enable call transfers with Retell AI:
1. In your Retell AI dashboard, select the agent you want to enable this functionality for.
2. Under **Functions**, click **Add** and choose **Call Transfer**.
3. Set the **Transfer to** to **Static Destination** and enter a SIP URI to transfer the call to in the following format: `sip:[YOUR_WAVIX_NUMBER]@us.wavix.net`. Example: `sip:14062260605@us.wavix.net`.
4. Make sure to select **Keep raw input**.
5. Select **Cold Transfer** under **How should the AI handle the transfer?**.
6. Select **SIP REFER** as the **SIP Transfer Method**.
7. Select **Save**.
If you need to use **Dynamic Routing** for call transfer, make sure the transfer destination(s) are provided in the `sip:[YOUR_WAVIX_NUMBER]@us.wavix.net` format .
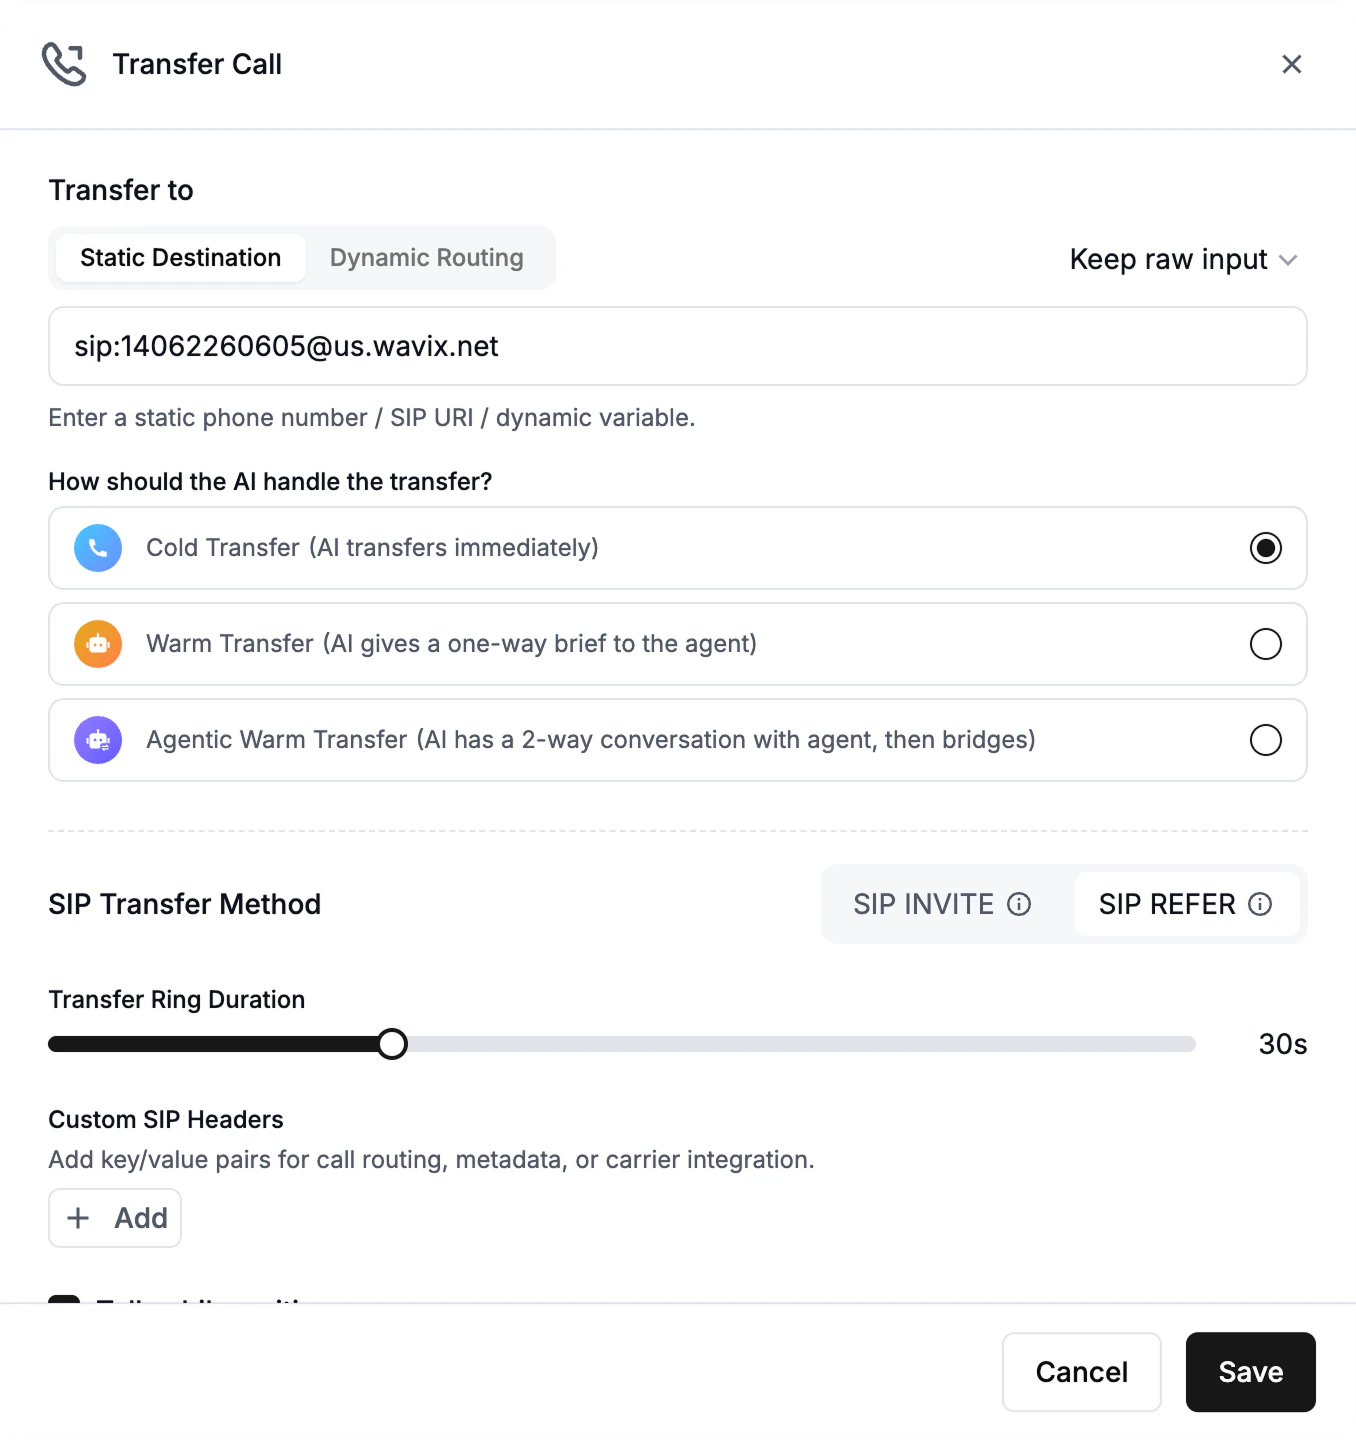 Update the agent's prompt to include the transfer call conditions.
## Troubleshooting
If your call doesn't go through, check the following:
**Outbound calls fail to connect**
1. Validate that the destination number is in E.164 format (e.g., `+14155552671`).
2. Confirm the destination country is listed under **Allowed Outbound Countries** in Retell AI's phone number settings.
3. Verify your Wavix account has sufficient balance for the outbound call.
4. Check that your Wavix CPS (calls per second) limit is not exceeded. By default, Wavix allows 3 CPS. Contact [support@wavix.com](mailto:support@wavix.com) to increase this limit.
**Inbound calls not reaching the Retell AI agent**
1. In the Wavix portal, verify that the inbound call destination for your number is correctly set to `[did]@sip.retellai.com;transport=tcp`.
2. Confirm that an **Inbound Call Agent** is assigned to the number in Retell AI's phone number settings.
3. Check that your Retell AI agent is in **Published** status, not in draft mode.
**SIP trunk authentication errors**
1. In the Wavix portal, navigate to **Numbers & trunks → Trunks** and verify the SIP trunk credentials.
2. Confirm the **SIP trunk ID** and **password** match exactly what you entered in Retell AI's phone number configuration. Credentials are case-sensitive.
**Agent not responding to calls**
1. In your Retell AI dashboard, verify the agent is assigned to the imported phone number.
2. Check that your agent's **LLM** (language model) is properly configured and has the correct prompt.
3. Test your agent directly from the Retell AI dashboard to ensure it responds correctly.
4. Review Retell AI logs for any errors related to the agent's LLM or TTS service.
**Unable to import a Wavix number into Retell AI**
1. Verify the **SIP Trunk User Name** is your actual **SIP trunk ID** (not your Wavix account ID).
2. Double-check the **SIP Trunk Password** has no extra spaces or special characters that might have been mistyped.
For additional support, email [support@wavix.com](mailto:support@wavix.com).
Update the agent's prompt to include the transfer call conditions.
## Troubleshooting
If your call doesn't go through, check the following:
**Outbound calls fail to connect**
1. Validate that the destination number is in E.164 format (e.g., `+14155552671`).
2. Confirm the destination country is listed under **Allowed Outbound Countries** in Retell AI's phone number settings.
3. Verify your Wavix account has sufficient balance for the outbound call.
4. Check that your Wavix CPS (calls per second) limit is not exceeded. By default, Wavix allows 3 CPS. Contact [support@wavix.com](mailto:support@wavix.com) to increase this limit.
**Inbound calls not reaching the Retell AI agent**
1. In the Wavix portal, verify that the inbound call destination for your number is correctly set to `[did]@sip.retellai.com;transport=tcp`.
2. Confirm that an **Inbound Call Agent** is assigned to the number in Retell AI's phone number settings.
3. Check that your Retell AI agent is in **Published** status, not in draft mode.
**SIP trunk authentication errors**
1. In the Wavix portal, navigate to **Numbers & trunks → Trunks** and verify the SIP trunk credentials.
2. Confirm the **SIP trunk ID** and **password** match exactly what you entered in Retell AI's phone number configuration. Credentials are case-sensitive.
**Agent not responding to calls**
1. In your Retell AI dashboard, verify the agent is assigned to the imported phone number.
2. Check that your agent's **LLM** (language model) is properly configured and has the correct prompt.
3. Test your agent directly from the Retell AI dashboard to ensure it responds correctly.
4. Review Retell AI logs for any errors related to the agent's LLM or TTS service.
**Unable to import a Wavix number into Retell AI**
1. Verify the **SIP Trunk User Name** is your actual **SIP trunk ID** (not your Wavix account ID).
2. Double-check the **SIP Trunk Password** has no extra spaces or special characters that might have been mistyped.
For additional support, email [support@wavix.com](mailto:support@wavix.com).