> ## Documentation Index
> Fetch the complete documentation index at: https://docs.wavix.com/llms.txt
> Use this file to discover all available pages before exploring further.
# How to connect Vapi voice AI agents with Wavix
> This guide explains how to connect Vapi AI agents with Wavix voice infrastructure to place and receive calls.
## Prerequisites
Before you begin, ensure you have:
1. An active phone number on your Wavix account. If you need to purchase one, see our guide on [how to buy a phone number](/numbers/buy-number).
2. A SIP trunk ([How to create a SIP trunk](/sip-trunking/create-sip-trunk)).
## Receive calls with Wavix and Vapi
### Create SIP trunk credentials in Vapi
1. **Sign in** to your Vapi account.
2. Go to **API Keys**.
3. Copy your **Private Key**.
4. Run the POST request below using your favorite tool, such as Postman or terminal.
```bash theme={null}
curl -L 'https://api.vapi.ai/credential' \
-H 'Content-Type: application/json' \
-H 'Authorization: Bearer YOUR_VAPI_PRIVATE_KEY' \
-d '{
"provider": "byo-sip-trunk",
"name": "Wavix",
"gateways": [
{
"ip": "95.211.82.14"
},
{
"ip": "209.58.144.243"
},
{
"ip": "173.234.106.26"
},
{
"ip": "23.108.101.90"
}
],
"outboundLeadingPlusEnabled": true,
"outboundAuthenticationPlan": {
"authUsername": "YOUR_SIP_TRUNK_ID",
"authPassword": "YOUR_SIP_TRUNK_PASSWORD"
}
}'
```
* Replace `YOUR_SIP_TRUNK_ID` and `YOUR_SIP_TRUNK_PASSWORD` with the SIP trunk credentials configured in the Wavix portal.
* Replace `YOUR_VAPI_PRIVATE_KEY` with your Vapi Private Key.
Make sure you list all Wavix regional gateway IP addresses in the 'gateways' array. Failing to do so may result in your calls being rejected with 401 Unauthorized error. A full list of regional gateways is shown at the bottom of the Trunks page in the [Wavix portal](https://app.wavix.com/trunks).
If successful, the response will contain the SIP trunk credentials `id`. Copy it for later use.
```bash highlight={2} theme={null}
{
"id": "00000000-c5c6-4f68-bb6d-000000000000",
"orgId": "00000000-b275-4b33-9dd2-000000000000",
"provider": "byo-sip-trunk",
"createdAt": "2025-10-13T10:56:17.439Z",
"updatedAt": "2025-10-13T10:56:17.439Z",
"gateways": [
],
"name": "Wavix",
"outboundLeadingPlusEnabled": true
}
```
Learn more about Vapi SIP trunks in the [Vapi SIP trunk documentation](https://docs.vapi.ai/advanced/sip/sip-trunk).
### Associate a phone number with the SIP trunk
To link your Wavix phone number to the SIP trunk credential in Vapi, you need to create a Phone Number resource. Run the POST request below using your favorite tool, such as Postman or terminal.
```bash theme={null}
curl -X POST "https://api.vapi.ai/phone-number" \
-H "Content-Type: application/json" \
-H "Authorization: Bearer YOUR_VAPI_PRIVATE_KEY" \
-d '{
"provider": "byo-phone-number",
"name": "Wavix Number",
"number": "YOUR_WAVIX_PHONE_NUMBER",
"numberE164CheckEnabled": false,
"credentialId": "YOUR_VAPI_CREDENTIAL_ID"
}'
```
* Replace `YOUR_WAVIX_PHONE_NUMBER` with a number on your Wavix account and `YOUR_VAPI_CREDENTIAL_ID` with your Vapi SIP trunk credentials created earlier.
* Replace `YOUR_VAPI_PRIVATE_KEY` with your Vapi Private Key.
Make sure `YOUR_WAVIX_PHONE_NUMBER` contains the leading '+' sign, i.e., `+61290597521`.
If successful, the phone number will appear in your Vapi account.
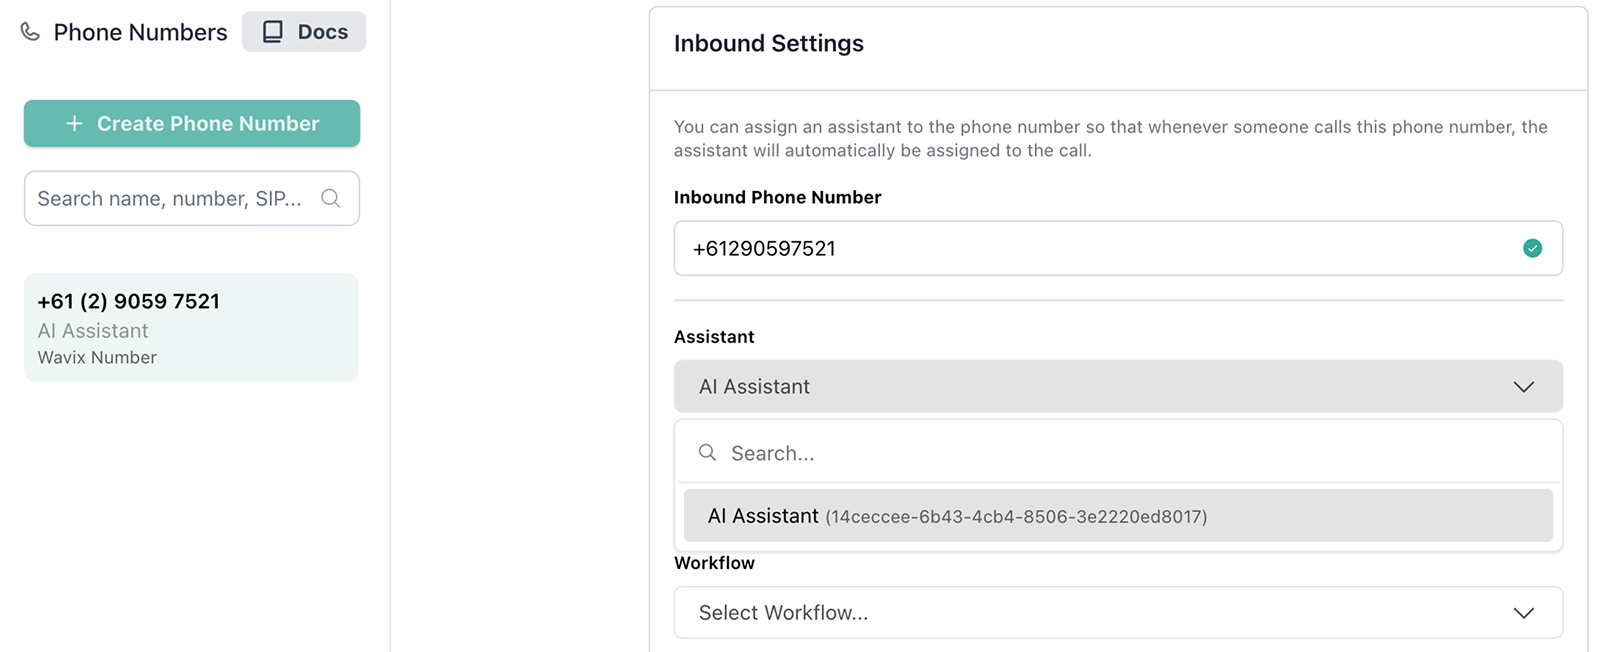 To assign an AI assistant to the phone number:
1. **Sign in** to your Vapi account.
2. Go to **Phone Numbers**.
3. Scroll down to **Inbound Settings** and associate an assistant with the number.
### Setup inbound call routing on Wavix
Wavix can route inbound calls to a SIP trunk on the platform, SIP URI, or forward them to a phone number. Vapi requires calls to be routed to a SIP URI.
To route calls to your Wavix number to the Vapi SIP URI:
1. In Wavix, open **Numbers & trunks → My numbers**.
2. Select your number by clicking the **⋯** menu → **Edit number**.
3. Set the **inbound call destination type** to **SIP URI**, and enter the destination in the format of:
```bash theme={null}
[did]@YOUR_VAPI_CREDENTIAL_ID.sip.vapi.ai
```
In the example above, it would be:
```bash theme={null}
[did]@00000000-c5c6-4f68-bb6d-000000000000.sip.vapi.ai
```
4. **Save** your changes.
Now, all calls to your Wavix number are routed to your Vapi AI assistant.
## Place calls with Wavix and Vapi
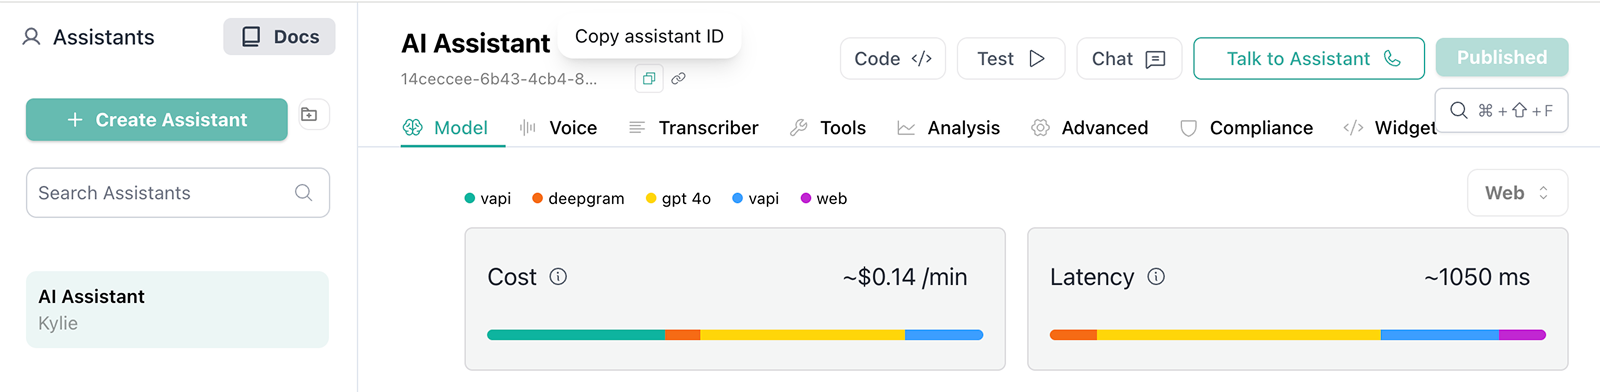
To place an outbound call, you'll need a Vapi **Assistant ID** and Vapi **Phone Number ID**.
1. In Vapi, open **Assistants**.
2. Select an assistant you want to use and copy the assistant ID.
To assign an AI assistant to the phone number:
1. **Sign in** to your Vapi account.
2. Go to **Phone Numbers**.
3. Scroll down to **Inbound Settings** and associate an assistant with the number.
### Setup inbound call routing on Wavix
Wavix can route inbound calls to a SIP trunk on the platform, SIP URI, or forward them to a phone number. Vapi requires calls to be routed to a SIP URI.
To route calls to your Wavix number to the Vapi SIP URI:
1. In Wavix, open **Numbers & trunks → My numbers**.
2. Select your number by clicking the **⋯** menu → **Edit number**.
3. Set the **inbound call destination type** to **SIP URI**, and enter the destination in the format of:
```bash theme={null}
[did]@YOUR_VAPI_CREDENTIAL_ID.sip.vapi.ai
```
In the example above, it would be:
```bash theme={null}
[did]@00000000-c5c6-4f68-bb6d-000000000000.sip.vapi.ai
```
4. **Save** your changes.
Now, all calls to your Wavix number are routed to your Vapi AI assistant.
## Place calls with Wavix and Vapi
To place an outbound call, you'll need a Vapi **Assistant ID** and Vapi **Phone Number ID**.
1. In Vapi, open **Assistants**.
2. Select an assistant you want to use and copy the assistant ID.
 1. In Vapi, open **Phone Numbers**.
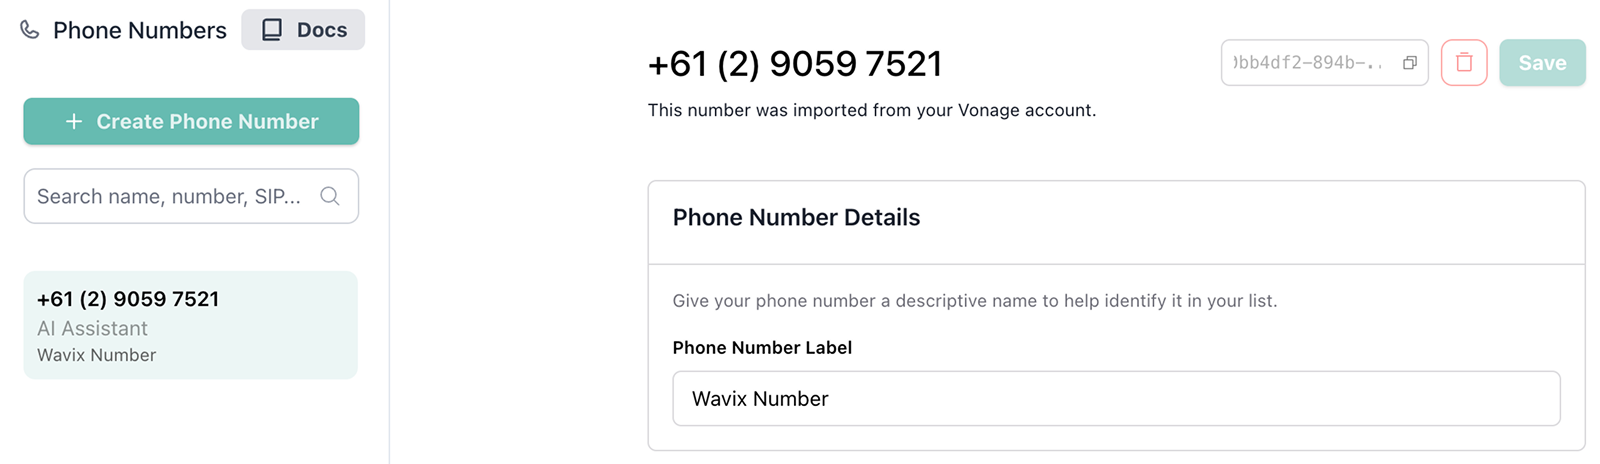
2. Select a number you want to use as Caller ID and copy the number ID.
1. In Vapi, open **Phone Numbers**.
2. Select a number you want to use as Caller ID and copy the number ID.
 You can place outbound calls with Vapi using the API. Run the POST request below using your favorite tool, such as Postman or terminal.
```bash theme={null}
curl -L 'https://api.vapi.ai/call/phone' \
-H 'Content-Type: application/json' \
-H 'Authorization: Bearer YOUR_VAPI_PRIVATE_KEY' \
-d '{
"assistantId": "YOUR_VAPI_ASSISTANT_ID",
"customer": {
"number": "DESTINATION_NUMBER",
"numberE164CheckEnabled": true
},
"phoneNumberId": "YOUR_VAPI_NUMBER_ID"
}
'
```
* Replace `YOUR_VAPI_ASSISTANT_ID` with your **Vapi Assistant ID** and `YOUR_VAPI_NUMBER_ID` with your Vapi **Phone Number ID**.
* Replace `YOUR_VAPI_PRIVATE_KEY` with your Vapi **Private Key**.
* Replace the `DESTINATION_NUMBER` with a phone number you want to call. Make sure the phone number is provided in the international E.164 format with or without the leading `+` sign.
If successful, the Vapi places a call to the destination number.
Learn more about Vapi outbound calls in the [Vapi outbound calling documentation](https://docs.vapi.ai/calls/outbound-calling).
## Send a call follow-up SMS
You can let a Vapi assistant send an SMS after or during a call when the caller asks for a written follow-up. For example, after an appointment scheduling call, the assistant can send the appointment time, location, or support reference number to the same phone number that joined the call.
Before you enable SMS follow-ups:
* Register the SMS Sender ID you want to use. For setup instructions, see [Sender ID registration](/messaging/send-sms#sender-id-registration).
* Create a dedicated Wavix API key with only the scopes required to send SMS.
* Confirm that the caller has agreed to receive the follow-up SMS.
* Keep the SMS content short and include opt-out text when required by your destination country or messaging use case.
### Connect the Wavix MCP server to Vapi
The Wavix MCP server exposes Wavix messaging tools, including `sms_and_mms_messages_send`, to your Vapi assistant.
1. In your Vapi account, select **Tools**.
2. Select **+ Create Tool** and choose **MCP**.
3. Enter the tool name and description:
* **Name**: `Wavix`
* **Description**: `Wavix MCP server`
4. In the MCP server configuration, enter the server URL:
```bash theme={null}
https://mcp.wavix.com/mcp
```
5. Add new **Custom credentials**:
* Choose **Server Configuration** under Integrations.
* **Authentication Type**: `Bearer Token`
* **Credential Name**: `Wavix API`
* **Token**: `YOUR_WAVIX_API_KEY`
* **Header Name**: `Authorization`
* **Include Bearer Prefix**: Set to `Yes`
* Select **Save**
6. Use the default Streamable HTTP protocol.
7. Save the tool.
8. Open **Assistants**, select the assistant that handles calls, and add the Wavix MCP tool to the assistant.
9. Publish the assistant.
Vapi supports MCP tools in the assistant model configuration. Add the Wavix MCP server as a tool and pass the Wavix API key in the `Authorization` header:
```bash theme={null}
curl -X PATCH "https://api.vapi.ai/assistant/YOUR_VAPI_ASSISTANT_ID" \
-H "Authorization: Bearer YOUR_VAPI_PRIVATE_KEY" \
-H "Content-Type: application/json" \
-d '{
"model": {
"provider": "openai",
"model": "gpt-4o",
"messages": [
{
"role": "system",
"content": "You are a voice assistant. If the caller asks for a written follow-up and confirms consent, use the Wavix SMS tool to send one message to {{customer.number}} from SENDER_ID. Keep the message under 160 characters when possible. Do not send sensitive personal, payment, authentication, or health information by SMS."
}
],
"tools": [
{
"type": "mcp",
"function": {
"name": "wavixMcp"
},
"server": {
"url": "https://mcp.wavix.com/mcp",
"headers": {
"Authorization": "Bearer YOUR_WAVIX_API_KEY"
}
},
"metadata": {
"protocol": "shttp"
}
}
]
}
}'
```
* Replace `YOUR_VAPI_ASSISTANT_ID` with your Vapi assistant ID.
* Replace `YOUR_VAPI_PRIVATE_KEY` with your Vapi Private Key.
* Replace `YOUR_WAVIX_API_KEY` with a restricted Wavix API key.
* Replace `SENDER_ID` with a registered Sender ID on your Wavix account.
If your assistant already has a model configuration or other tools, merge the Wavix MCP tool into the existing `model.tools` array instead of replacing the full model configuration.
### Capture the caller number
Vapi provides `{{customer.number}}` as a default dynamic variable. For inbound calls, it contains the caller ID. For outbound calls, it contains the destination number.
Use `{{customer.number}}` as the SMS recipient when the assistant calls the Wavix `sms_and_mms_messages_send` tool:
* `from`: Your registered Sender ID.
* `to`: `{{customer.number}}`.
* `message_body.text`: The follow-up text the caller requested.
### Security requirements
* Use a Wavix API key scoped only to messaging. Don't use a full-access account key.
* Store API keys only in Vapi tool headers or another protected secret store. Don't put keys in assistant prompts, first messages, or public URLs.
* Require caller consent before sending an SMS. The assistant should not send follow-ups automatically for every call.
* Use API key scopes to limit the Wavix MCP tools available to the assistant.
* Don't send payment details, health information, or other sensitive data in a follow-up SMS.
* Follow destination-country SMS rules, including Sender ID registration, opt-out language, and message content restrictions.
* Monitor Wavix message delivery reports and Vapi tool-call logs during rollout.
## Transfer calls between Vapi and Wavix
Wavix supports cold transfers using the `SIP REFER` command. To transfer a call, you need two Wavix numbers, one for an active call and one to receive the transferred call. Make sure inbound call routing is set up on the second number.
To enable call transfers with Vapi, you'll need:
1. Create and configure a **Transfer Call** tool.
2. Associate the tool with your Vapi assistant.
### Configure Transfer Call
To configure the Transfer Call tool:
1. In your Vapi account, select **Tools**.
2. Select **+ Create Tool**, choose **Transfer Call**, and enter a name for the tool.
3. Under **Destinations**, select **+ Add Destination**, then choose **SIP**.
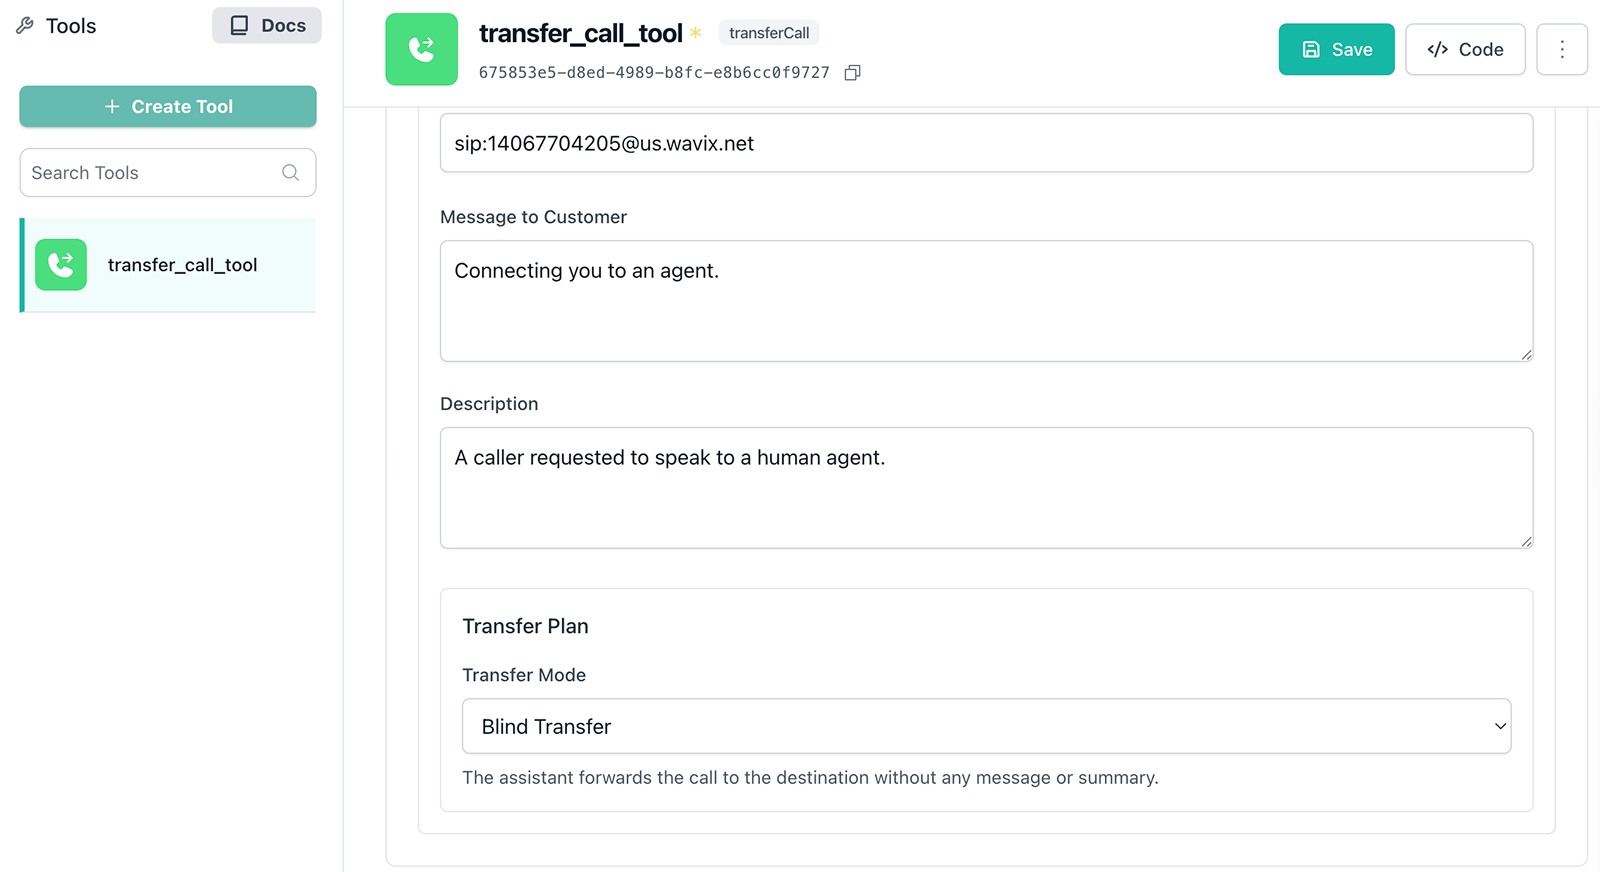
4. In the SIP URI field, enter the address in this format:`[YOUR_WAVIX_NUMBER]@[WAVIX_SIP_GATEWAY]`. Example: `sip:14067704205@us.wavix.net`.
5. In the **Message to Customer** field, enter the message to speak to the customer before the transfer.
6. Provide additional details to help the AI decide when to use this destination.
7. In **Transfer Mode**, make sure **Blind Transfer** is selected.
8. Select **Save**.
Replace `YOUR_WAVIX_NUMBER` with your Wavix number and `WAVIX_SIP_GATEWAY` with one of Wavix's SIP gateways.
Choose the primary Wavix gateway with the lowest ping from your location. A full list of regional gateways is shown at the bottom of the Trunks page in the [Wavix Customer portal](https://app.wavix.com/trunks).
You can place outbound calls with Vapi using the API. Run the POST request below using your favorite tool, such as Postman or terminal.
```bash theme={null}
curl -L 'https://api.vapi.ai/call/phone' \
-H 'Content-Type: application/json' \
-H 'Authorization: Bearer YOUR_VAPI_PRIVATE_KEY' \
-d '{
"assistantId": "YOUR_VAPI_ASSISTANT_ID",
"customer": {
"number": "DESTINATION_NUMBER",
"numberE164CheckEnabled": true
},
"phoneNumberId": "YOUR_VAPI_NUMBER_ID"
}
'
```
* Replace `YOUR_VAPI_ASSISTANT_ID` with your **Vapi Assistant ID** and `YOUR_VAPI_NUMBER_ID` with your Vapi **Phone Number ID**.
* Replace `YOUR_VAPI_PRIVATE_KEY` with your Vapi **Private Key**.
* Replace the `DESTINATION_NUMBER` with a phone number you want to call. Make sure the phone number is provided in the international E.164 format with or without the leading `+` sign.
If successful, the Vapi places a call to the destination number.
Learn more about Vapi outbound calls in the [Vapi outbound calling documentation](https://docs.vapi.ai/calls/outbound-calling).
## Send a call follow-up SMS
You can let a Vapi assistant send an SMS after or during a call when the caller asks for a written follow-up. For example, after an appointment scheduling call, the assistant can send the appointment time, location, or support reference number to the same phone number that joined the call.
Before you enable SMS follow-ups:
* Register the SMS Sender ID you want to use. For setup instructions, see [Sender ID registration](/messaging/send-sms#sender-id-registration).
* Create a dedicated Wavix API key with only the scopes required to send SMS.
* Confirm that the caller has agreed to receive the follow-up SMS.
* Keep the SMS content short and include opt-out text when required by your destination country or messaging use case.
### Connect the Wavix MCP server to Vapi
The Wavix MCP server exposes Wavix messaging tools, including `sms_and_mms_messages_send`, to your Vapi assistant.
1. In your Vapi account, select **Tools**.
2. Select **+ Create Tool** and choose **MCP**.
3. Enter the tool name and description:
* **Name**: `Wavix`
* **Description**: `Wavix MCP server`
4. In the MCP server configuration, enter the server URL:
```bash theme={null}
https://mcp.wavix.com/mcp
```
5. Add new **Custom credentials**:
* Choose **Server Configuration** under Integrations.
* **Authentication Type**: `Bearer Token`
* **Credential Name**: `Wavix API`
* **Token**: `YOUR_WAVIX_API_KEY`
* **Header Name**: `Authorization`
* **Include Bearer Prefix**: Set to `Yes`
* Select **Save**
6. Use the default Streamable HTTP protocol.
7. Save the tool.
8. Open **Assistants**, select the assistant that handles calls, and add the Wavix MCP tool to the assistant.
9. Publish the assistant.
Vapi supports MCP tools in the assistant model configuration. Add the Wavix MCP server as a tool and pass the Wavix API key in the `Authorization` header:
```bash theme={null}
curl -X PATCH "https://api.vapi.ai/assistant/YOUR_VAPI_ASSISTANT_ID" \
-H "Authorization: Bearer YOUR_VAPI_PRIVATE_KEY" \
-H "Content-Type: application/json" \
-d '{
"model": {
"provider": "openai",
"model": "gpt-4o",
"messages": [
{
"role": "system",
"content": "You are a voice assistant. If the caller asks for a written follow-up and confirms consent, use the Wavix SMS tool to send one message to {{customer.number}} from SENDER_ID. Keep the message under 160 characters when possible. Do not send sensitive personal, payment, authentication, or health information by SMS."
}
],
"tools": [
{
"type": "mcp",
"function": {
"name": "wavixMcp"
},
"server": {
"url": "https://mcp.wavix.com/mcp",
"headers": {
"Authorization": "Bearer YOUR_WAVIX_API_KEY"
}
},
"metadata": {
"protocol": "shttp"
}
}
]
}
}'
```
* Replace `YOUR_VAPI_ASSISTANT_ID` with your Vapi assistant ID.
* Replace `YOUR_VAPI_PRIVATE_KEY` with your Vapi Private Key.
* Replace `YOUR_WAVIX_API_KEY` with a restricted Wavix API key.
* Replace `SENDER_ID` with a registered Sender ID on your Wavix account.
If your assistant already has a model configuration or other tools, merge the Wavix MCP tool into the existing `model.tools` array instead of replacing the full model configuration.
### Capture the caller number
Vapi provides `{{customer.number}}` as a default dynamic variable. For inbound calls, it contains the caller ID. For outbound calls, it contains the destination number.
Use `{{customer.number}}` as the SMS recipient when the assistant calls the Wavix `sms_and_mms_messages_send` tool:
* `from`: Your registered Sender ID.
* `to`: `{{customer.number}}`.
* `message_body.text`: The follow-up text the caller requested.
### Security requirements
* Use a Wavix API key scoped only to messaging. Don't use a full-access account key.
* Store API keys only in Vapi tool headers or another protected secret store. Don't put keys in assistant prompts, first messages, or public URLs.
* Require caller consent before sending an SMS. The assistant should not send follow-ups automatically for every call.
* Use API key scopes to limit the Wavix MCP tools available to the assistant.
* Don't send payment details, health information, or other sensitive data in a follow-up SMS.
* Follow destination-country SMS rules, including Sender ID registration, opt-out language, and message content restrictions.
* Monitor Wavix message delivery reports and Vapi tool-call logs during rollout.
## Transfer calls between Vapi and Wavix
Wavix supports cold transfers using the `SIP REFER` command. To transfer a call, you need two Wavix numbers, one for an active call and one to receive the transferred call. Make sure inbound call routing is set up on the second number.
To enable call transfers with Vapi, you'll need:
1. Create and configure a **Transfer Call** tool.
2. Associate the tool with your Vapi assistant.
### Configure Transfer Call
To configure the Transfer Call tool:
1. In your Vapi account, select **Tools**.
2. Select **+ Create Tool**, choose **Transfer Call**, and enter a name for the tool.
3. Under **Destinations**, select **+ Add Destination**, then choose **SIP**.
4. In the SIP URI field, enter the address in this format:`[YOUR_WAVIX_NUMBER]@[WAVIX_SIP_GATEWAY]`. Example: `sip:14067704205@us.wavix.net`.
5. In the **Message to Customer** field, enter the message to speak to the customer before the transfer.
6. Provide additional details to help the AI decide when to use this destination.
7. In **Transfer Mode**, make sure **Blind Transfer** is selected.
8. Select **Save**.
Replace `YOUR_WAVIX_NUMBER` with your Wavix number and `WAVIX_SIP_GATEWAY` with one of Wavix's SIP gateways.
Choose the primary Wavix gateway with the lowest ping from your location. A full list of regional gateways is shown at the bottom of the Trunks page in the [Wavix Customer portal](https://app.wavix.com/trunks).
 Learn more about Vapi call transfer in the [Vapi call forwarding documentation](https://docs.vapi.ai/call-forwarding).
## Troubleshooting
* **603 Declined** can occur if the destination's per‑minute rate is higher than your account's Max call rate (check the value on the Trunks page). Contact [**support@wavix.com**](mailto:support@wavix.com) to request a change if needed.
* **Wrong number format**. Dial the full international E.164 number, e.g. `19085594899` (US) or `4408001218915` (UK). Do not dial local formats like `9085594899`. Strip prefixes like `0`, `00`, or `011` before the dialed number.
Learn more about Vapi call transfer in the [Vapi call forwarding documentation](https://docs.vapi.ai/call-forwarding).
## Troubleshooting
* **603 Declined** can occur if the destination's per‑minute rate is higher than your account's Max call rate (check the value on the Trunks page). Contact [**support@wavix.com**](mailto:support@wavix.com) to request a change if needed.
* **Wrong number format**. Dial the full international E.164 number, e.g. `19085594899` (US) or `4408001218915` (UK). Do not dial local formats like `9085594899`. Strip prefixes like `0`, `00`, or `011` before the dialed number.