> ## Documentation Index
> Fetch the complete documentation index at: https://docs.wavix.com/llms.txt
> Use this file to discover all available pages before exploring further.
# Send an SMS broadcast
> Create a template, upload contacts, and send a personalized bulk SMS campaign with analytics.
## Overview
Wavix SMS Broadcast is a no-code tool for running bulk SMS campaigns at scale with personalization, scheduling, and engagement tracking (for example, link clicks).
In this tutorial, you will:
* Create an approved SMS template with variables (personalization).
* Upload a CSV contact list and map variables to columns.
* Launch a broadcast and monitor delivery and click performance.
## Prerequisites
To get started, you'll need:
* An active [Wavix account](/getting-started/create-account)
* A Sender ID activated for a destination country
* Recipient phone numbers in E.164 format (e.g., +12345678900)
## Step 1: Create an SMS template
Templates help you save time and stay consistent. Here's how to create one:
1. In the top menu, go to **Solutions** → [**SMS broadcast**](https://app.wavix.com/sms-broadcast/campaigns)
2. Select the [Templates](https://app.wavix.com/sms-broadcast/templates) tab.
3. Select **Create new**, and follow the guided wizard.
Enter the template name and choose the country where you plan to send messages.
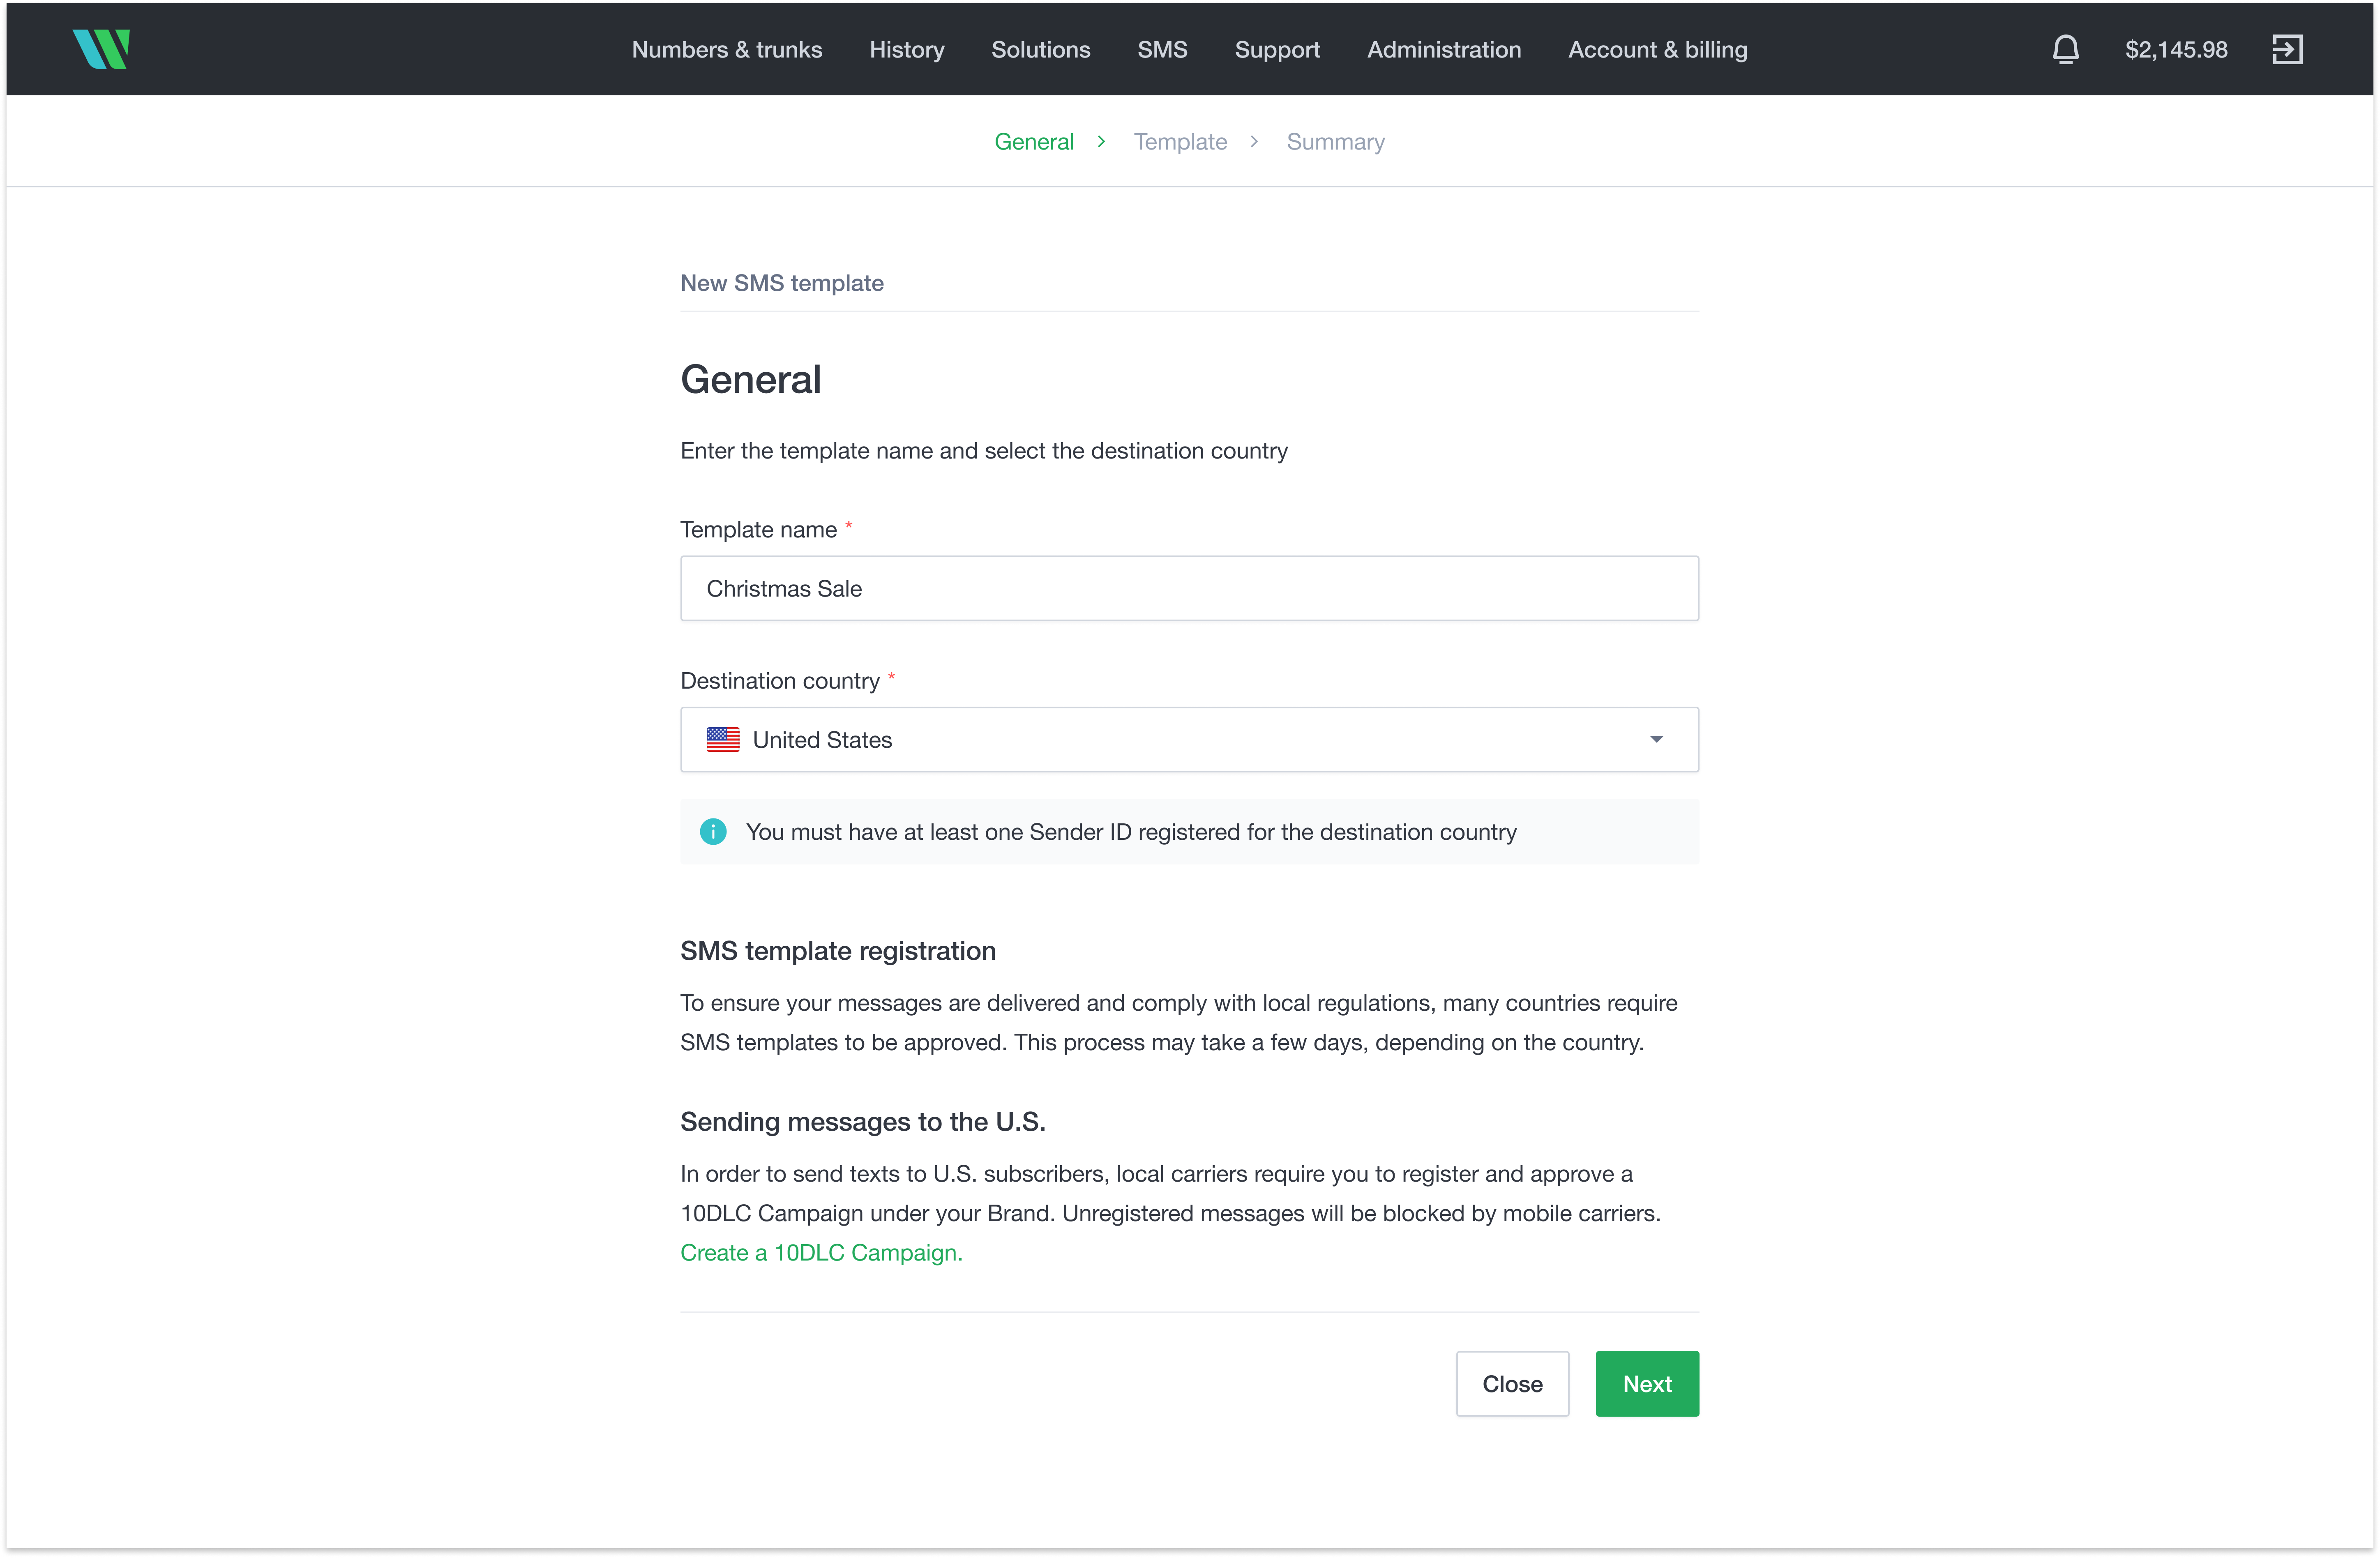 Select **Next**.
To create your message:
1. Enter the message text. Use double curly brackets (for example, `{{name}}`) to insert dynamic fields. These fields are personalized automatically when the message is sent.
2. If your message includes links, turn the URL shortener on or off. The Wavix URL shortener helps save characters and lets you track link clicks.
3. Choose the Sender ID that will be used when sending this template.
Select **Next**.
To create your message:
1. Enter the message text. Use double curly brackets (for example, `{{name}}`) to insert dynamic fields. These fields are personalized automatically when the message is sent.
2. If your message includes links, turn the URL shortener on or off. The Wavix URL shortener helps save characters and lets you track link clicks.
3. Choose the Sender ID that will be used when sending this template.
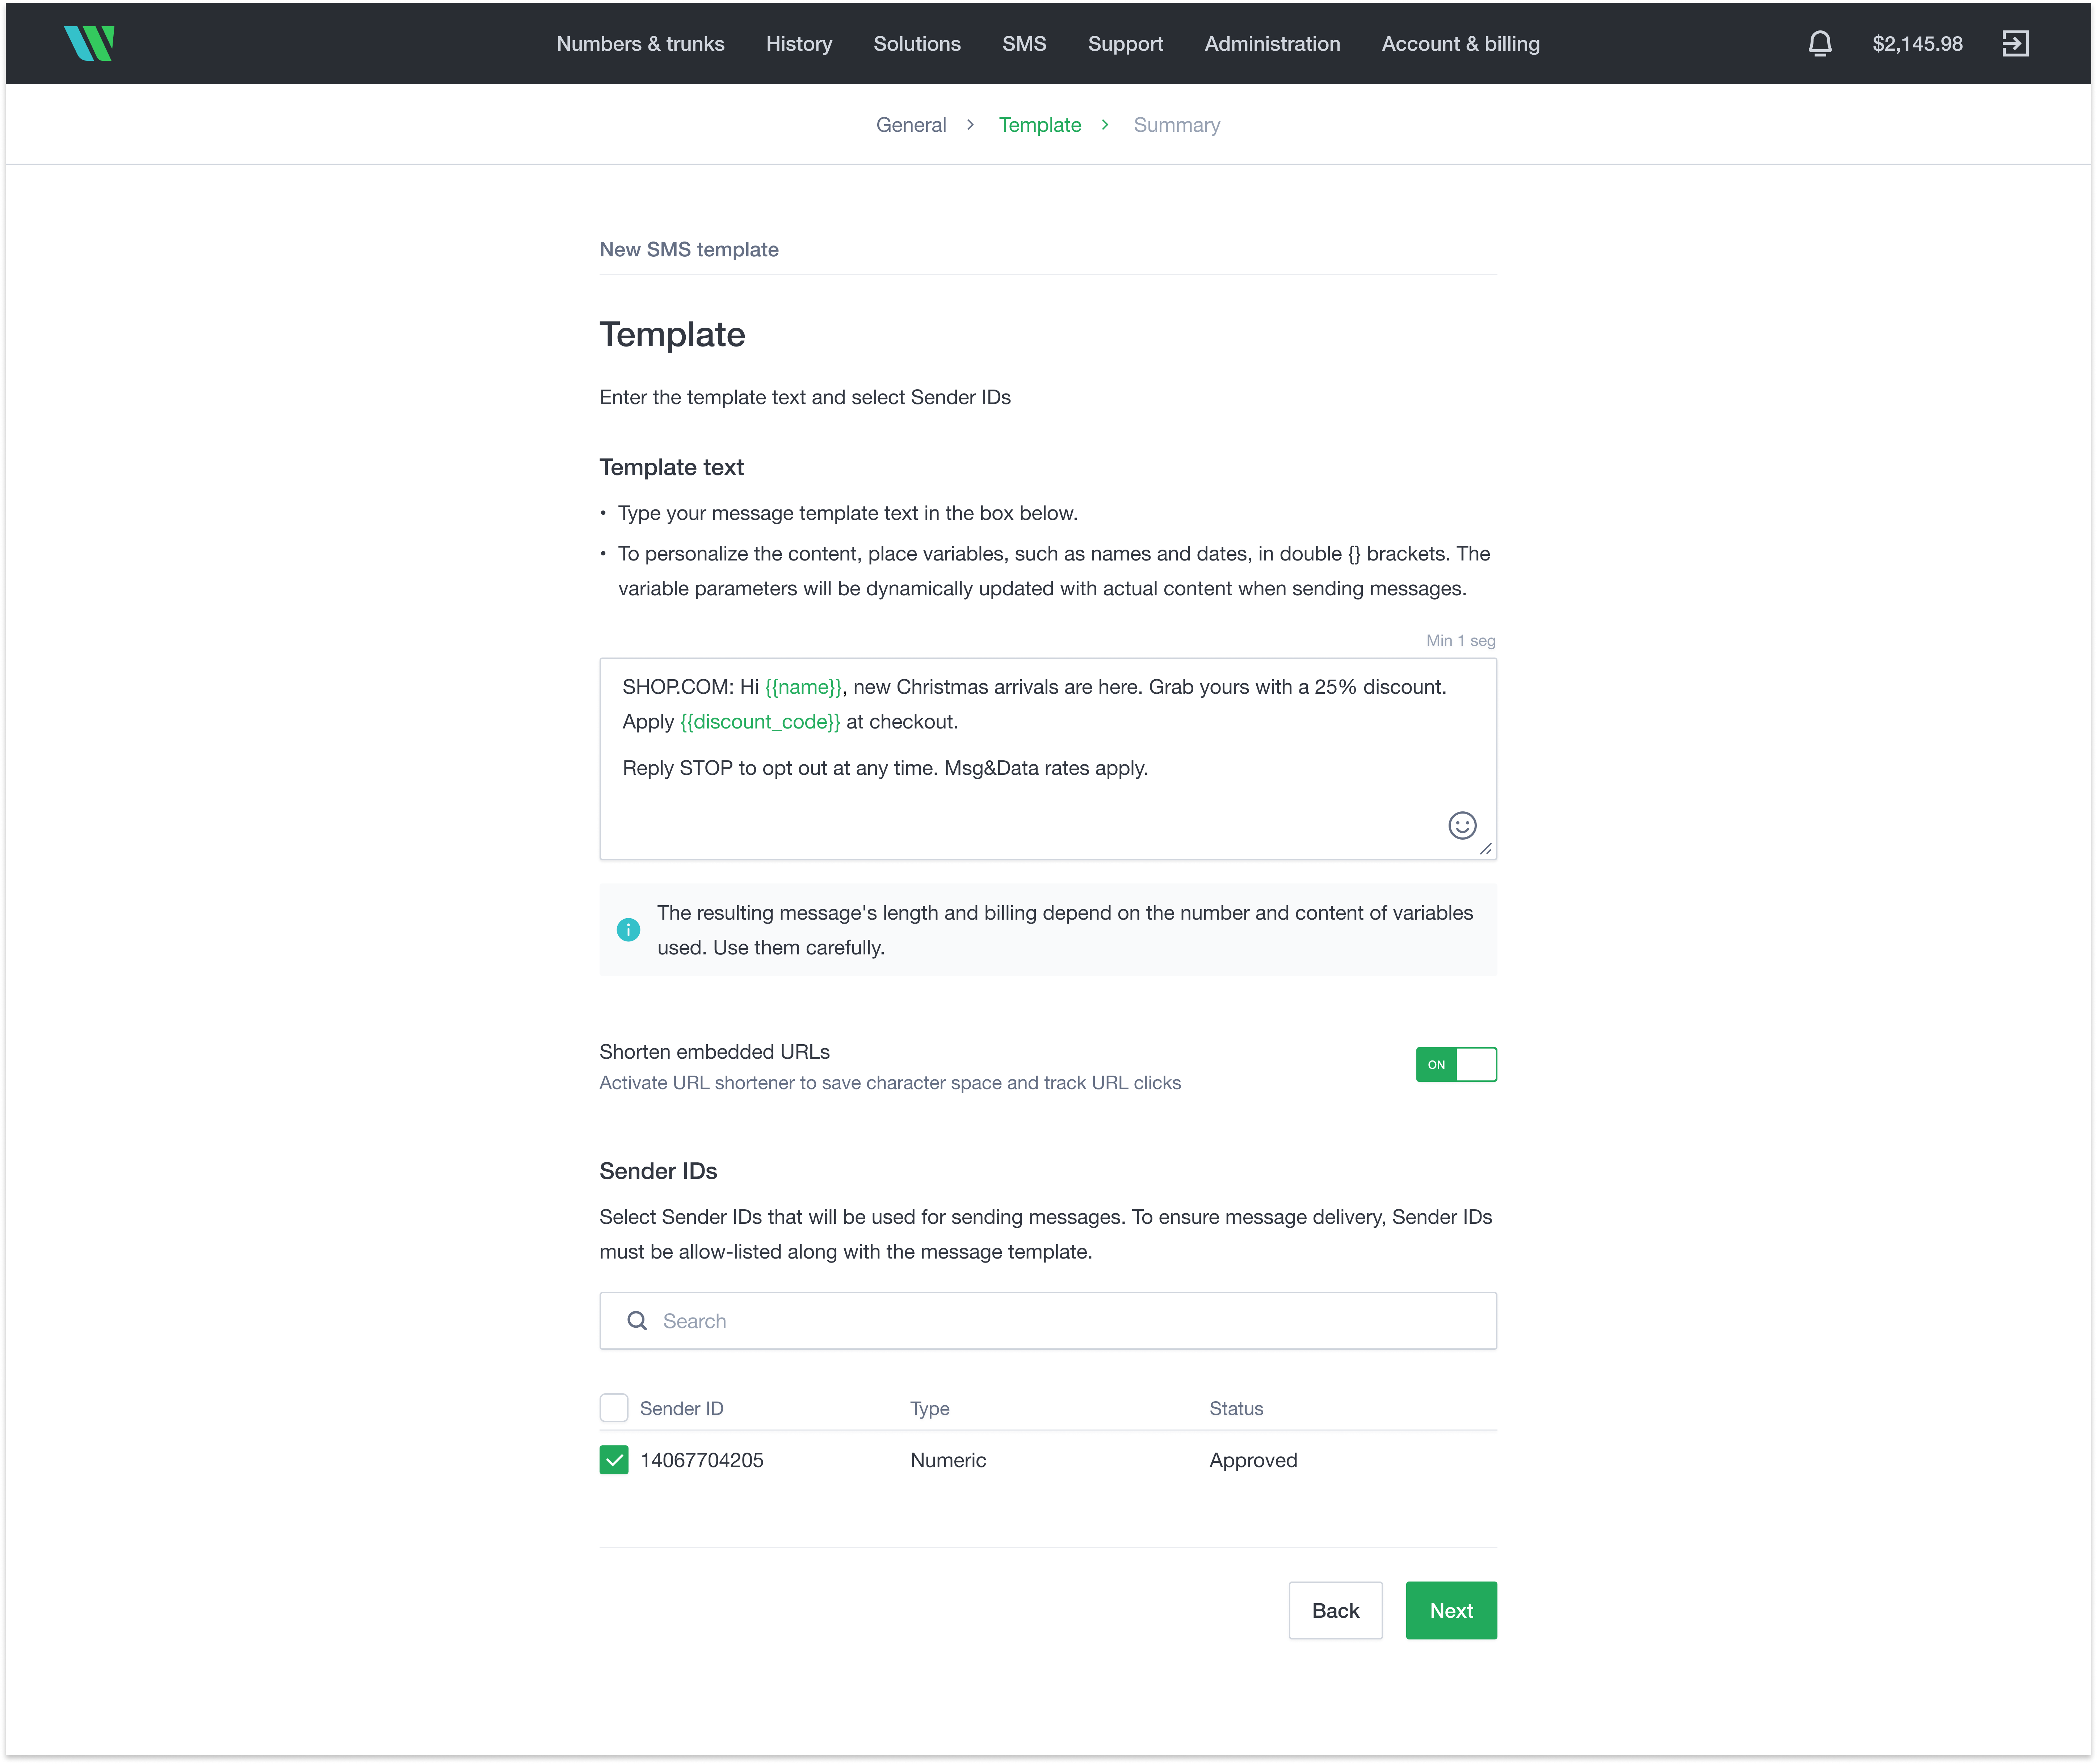 Select **Next**.
Check the estimated number of SMS segments in the top-right corner, above the message field.
Review your template details. To make changes, select **Back**. To finish, select **Create**.
Select **Next**.
Check the estimated number of SMS segments in the top-right corner, above the message field.
Review your template details. To make changes, select **Back**. To finish, select **Create**.
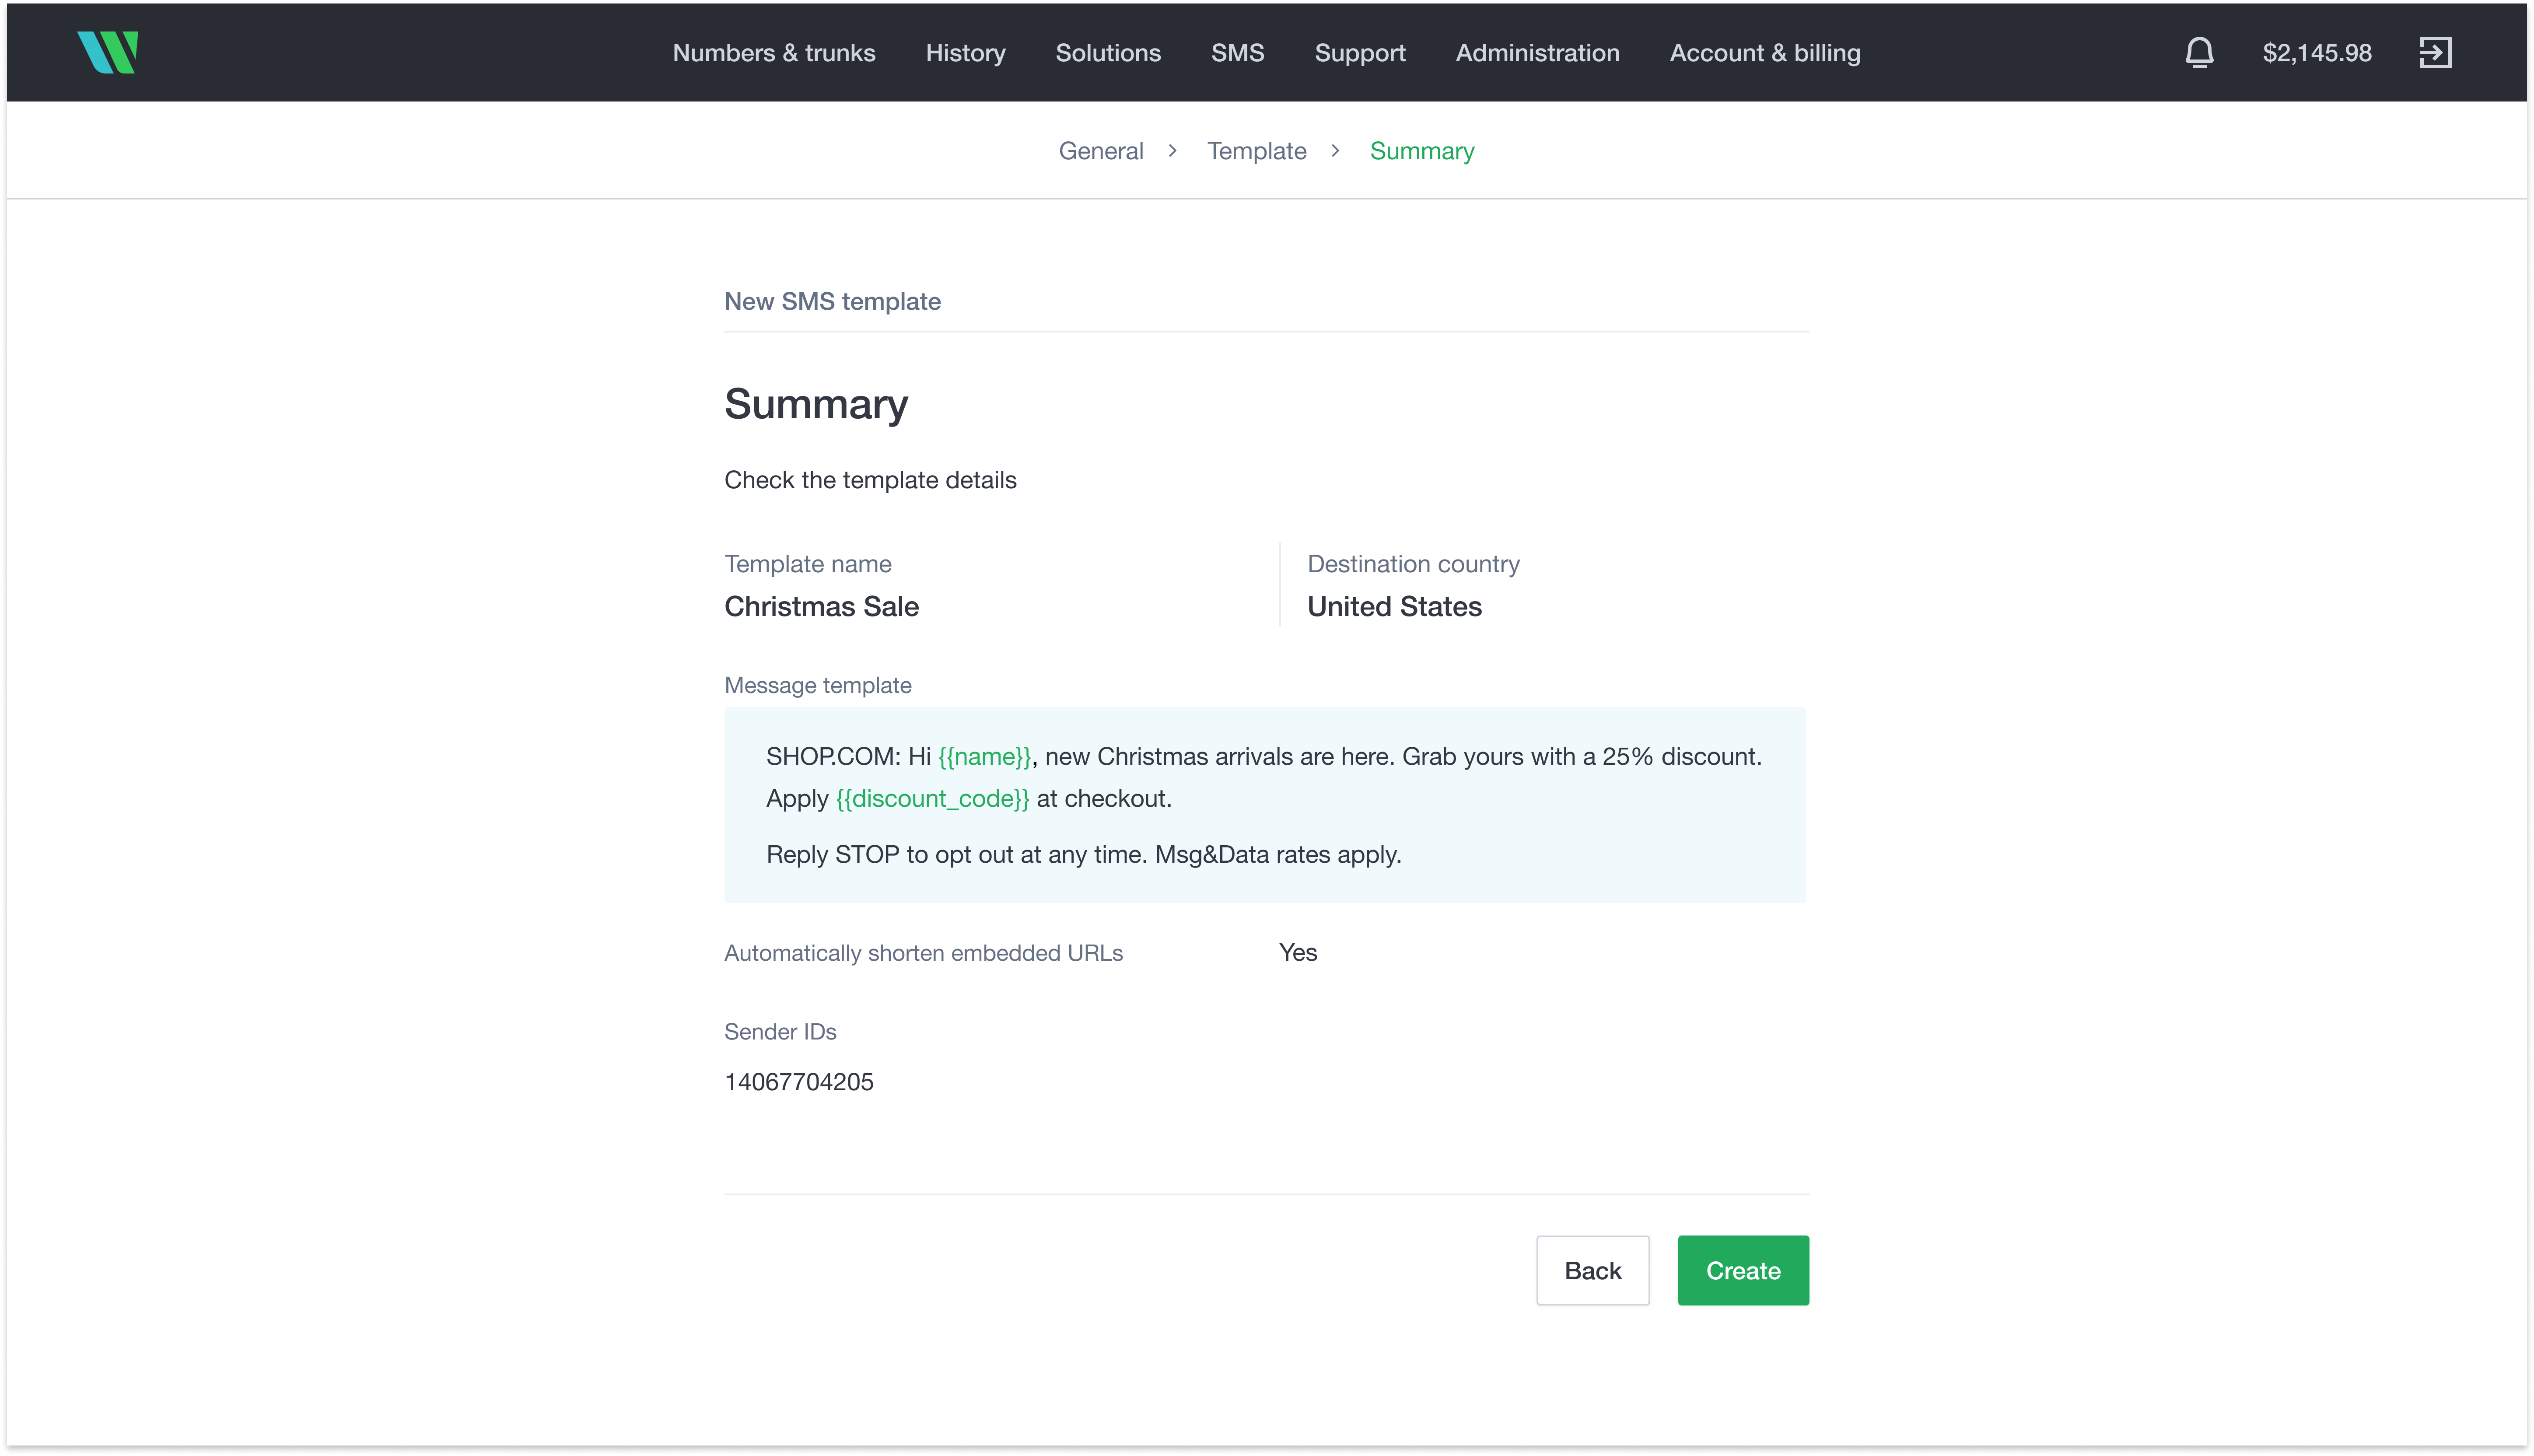 Your template will be reviewed by Wavix. You'll get an email once it's approved.
## Step 2: Prepare your recipient list
Use a CSV file to upload your recipients. Make sure the file:
* Is smaller than 10 MB
* Contains no more than 100,000 rows
* Lists phone numbers in the first column, formatted in E.164 (for example, +12345678900)
Include a header row and any columns you want to use as template variables (for example, `name` for `{{name}}`).
```csv theme={null}
phone,name,offerCode
+12345678900,John,2026CHR25
+12345678911,Jane,2026CHR25
+12345678922,Bob,2026CHR25
+12345678933,Marie,2026CHR25
+12345678944,Sarah,2026CHR25
```
## Step 3: Launch your broadcast
To send an SMS broadcast:
1. In the top menu, go to **Solutions** → [**SMS broadcast**](https://app.wavix.com/sms-broadcast/campaigns)
2. Select the [Campaigns](https://app.wavix.com/sms-broadcast/campaigns) tab.
3. Select **Create new**, and follow the guided wizard.
Enter a broadcast name and upload your contact list. Wavix uses built-in validation to make sure all numbers are correctly formatted and belong to the same country. You can download any invalid or duplicate numbers, fix them in your original file, and upload it again.
Your template will be reviewed by Wavix. You'll get an email once it's approved.
## Step 2: Prepare your recipient list
Use a CSV file to upload your recipients. Make sure the file:
* Is smaller than 10 MB
* Contains no more than 100,000 rows
* Lists phone numbers in the first column, formatted in E.164 (for example, +12345678900)
Include a header row and any columns you want to use as template variables (for example, `name` for `{{name}}`).
```csv theme={null}
phone,name,offerCode
+12345678900,John,2026CHR25
+12345678911,Jane,2026CHR25
+12345678922,Bob,2026CHR25
+12345678933,Marie,2026CHR25
+12345678944,Sarah,2026CHR25
```
## Step 3: Launch your broadcast
To send an SMS broadcast:
1. In the top menu, go to **Solutions** → [**SMS broadcast**](https://app.wavix.com/sms-broadcast/campaigns)
2. Select the [Campaigns](https://app.wavix.com/sms-broadcast/campaigns) tab.
3. Select **Create new**, and follow the guided wizard.
Enter a broadcast name and upload your contact list. Wavix uses built-in validation to make sure all numbers are correctly formatted and belong to the same country. You can download any invalid or duplicate numbers, fix them in your original file, and upload it again.
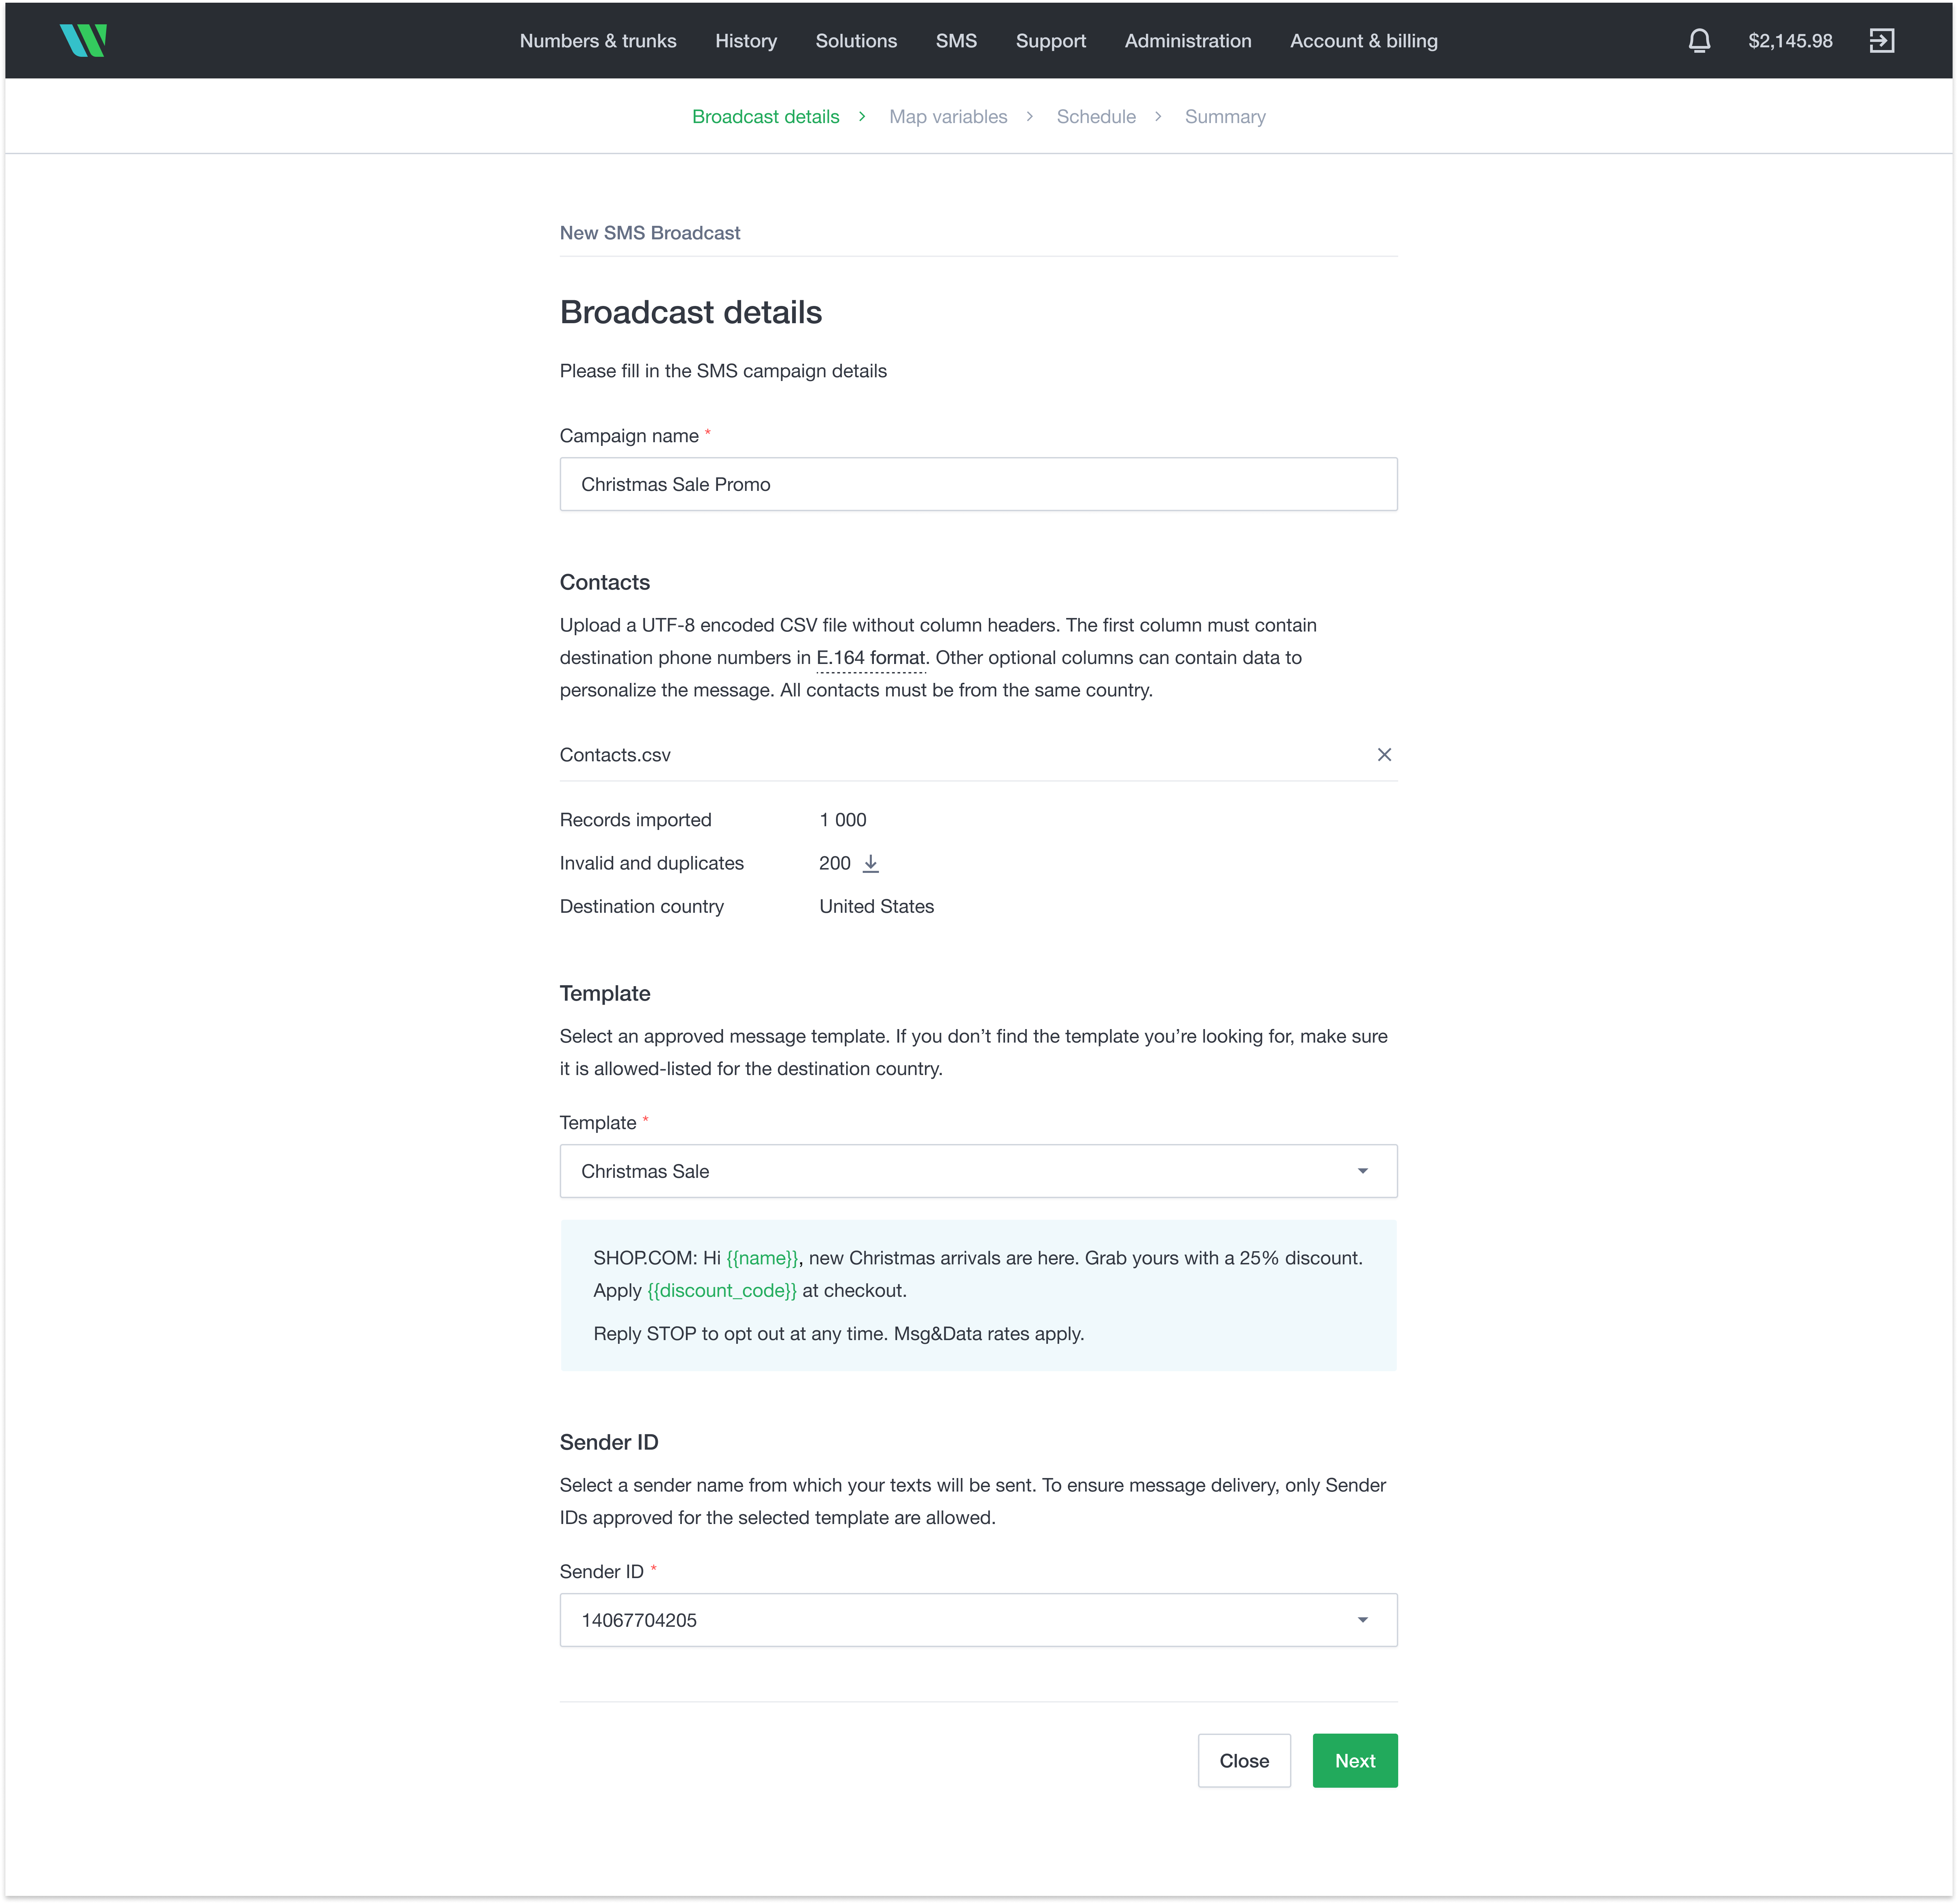 After Wavix processes the file, select a template and the Sender ID you want to use.
Select **Next**
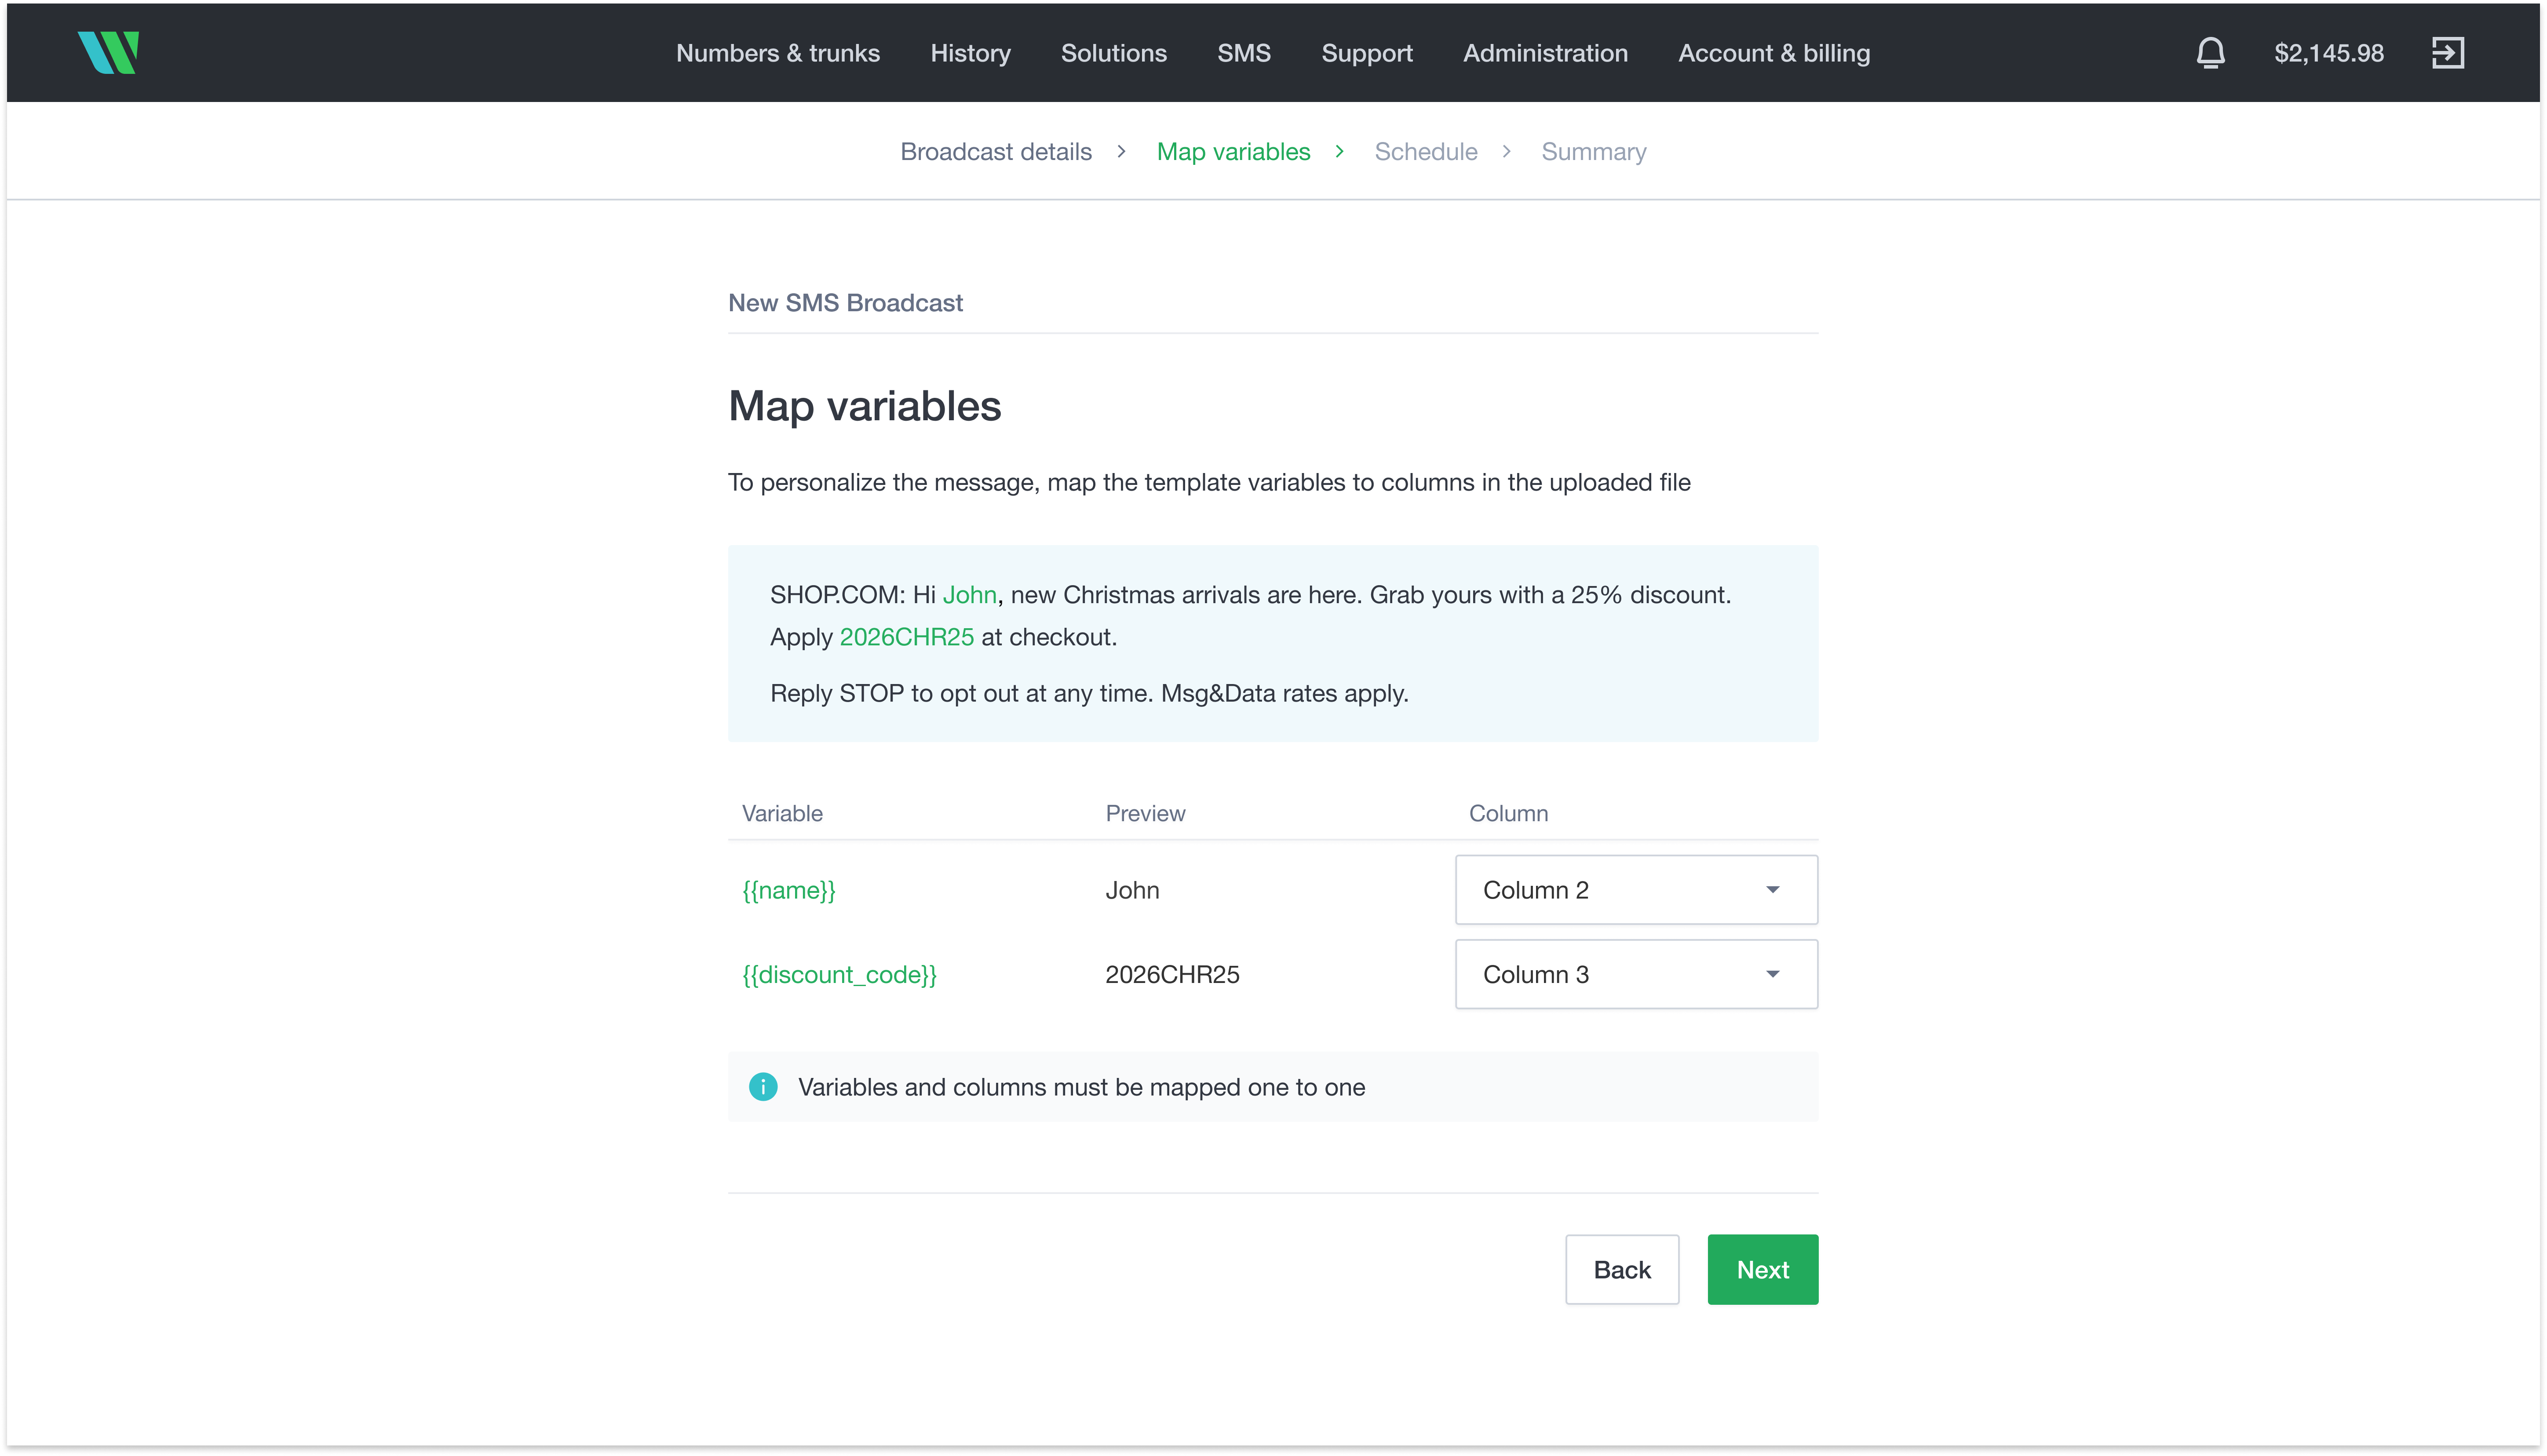
If your template includes variables (for example, `{{name}}`), map each one to the appropriate column in your uploaded CSV (for example, `name`).
After Wavix processes the file, select a template and the Sender ID you want to use.
Select **Next**
If your template includes variables (for example, `{{name}}`), map each one to the appropriate column in your uploaded CSV (for example, `name`).
 Select **Next**.
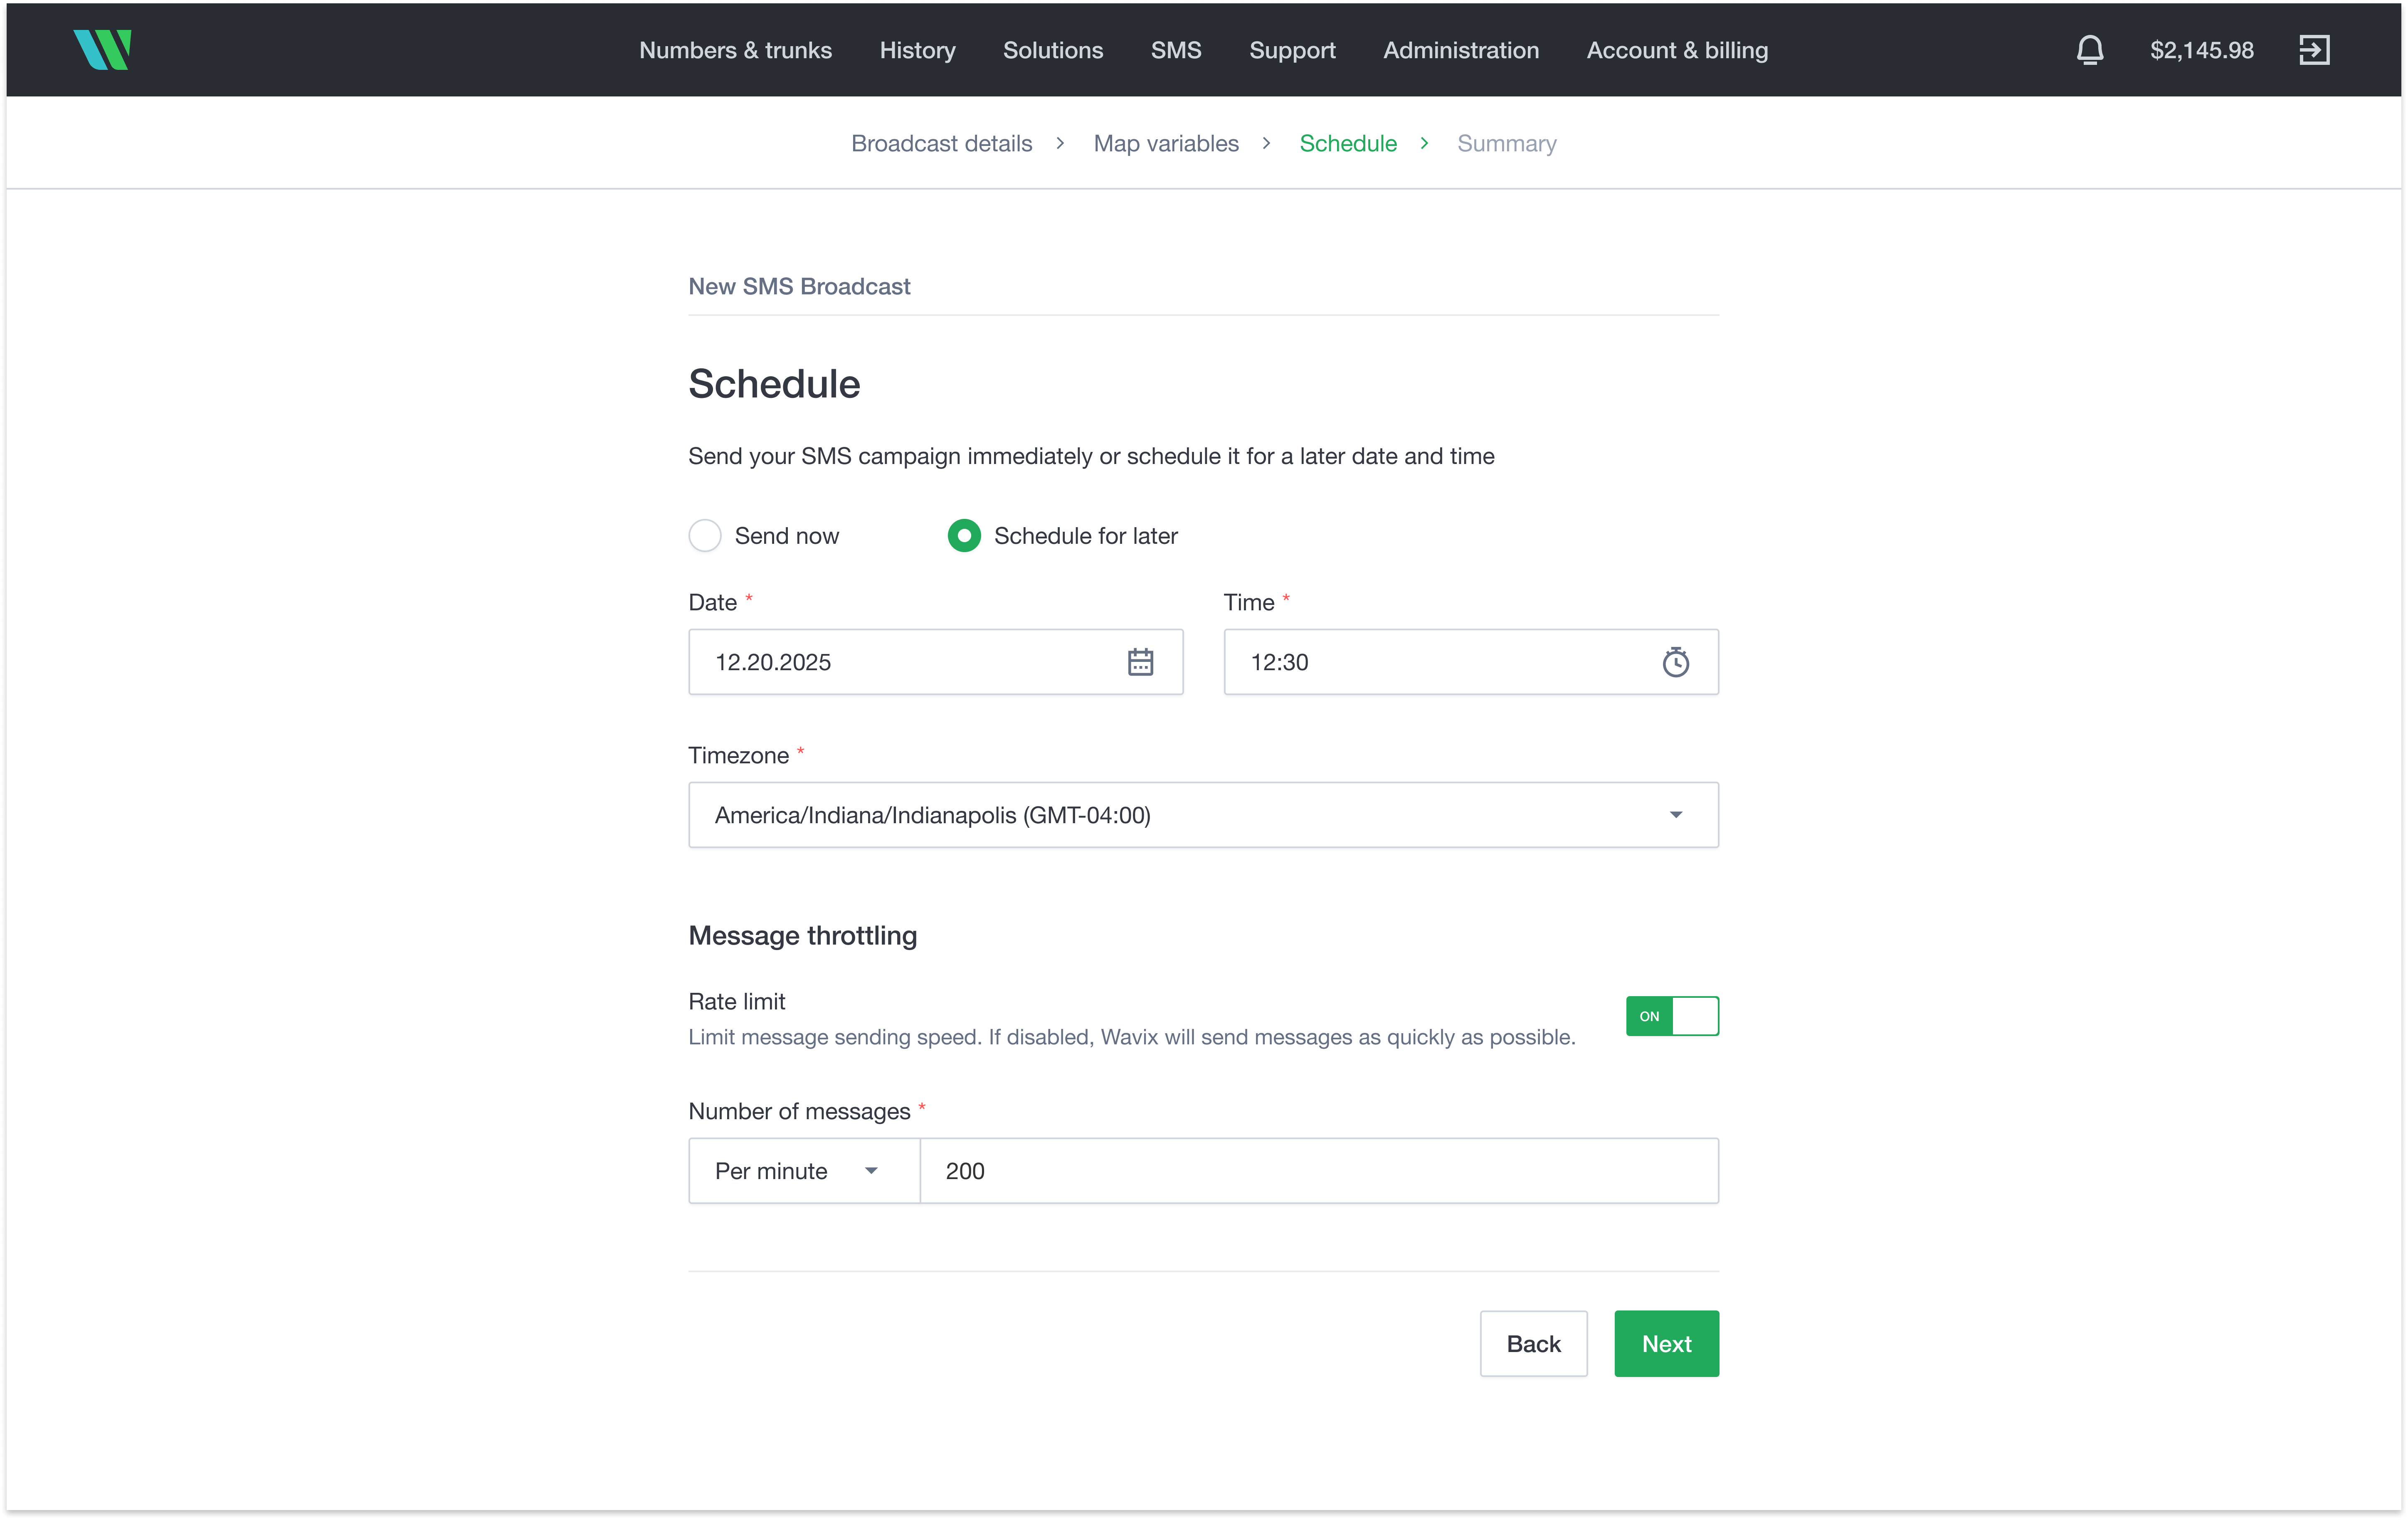
Choose whether to send the broadcast immediately or schedule it for later. You can also set a sending rate to control delivery speed.
Select **Next**.
Choose whether to send the broadcast immediately or schedule it for later. You can also set a sending rate to control delivery speed.
 Select **Next**.
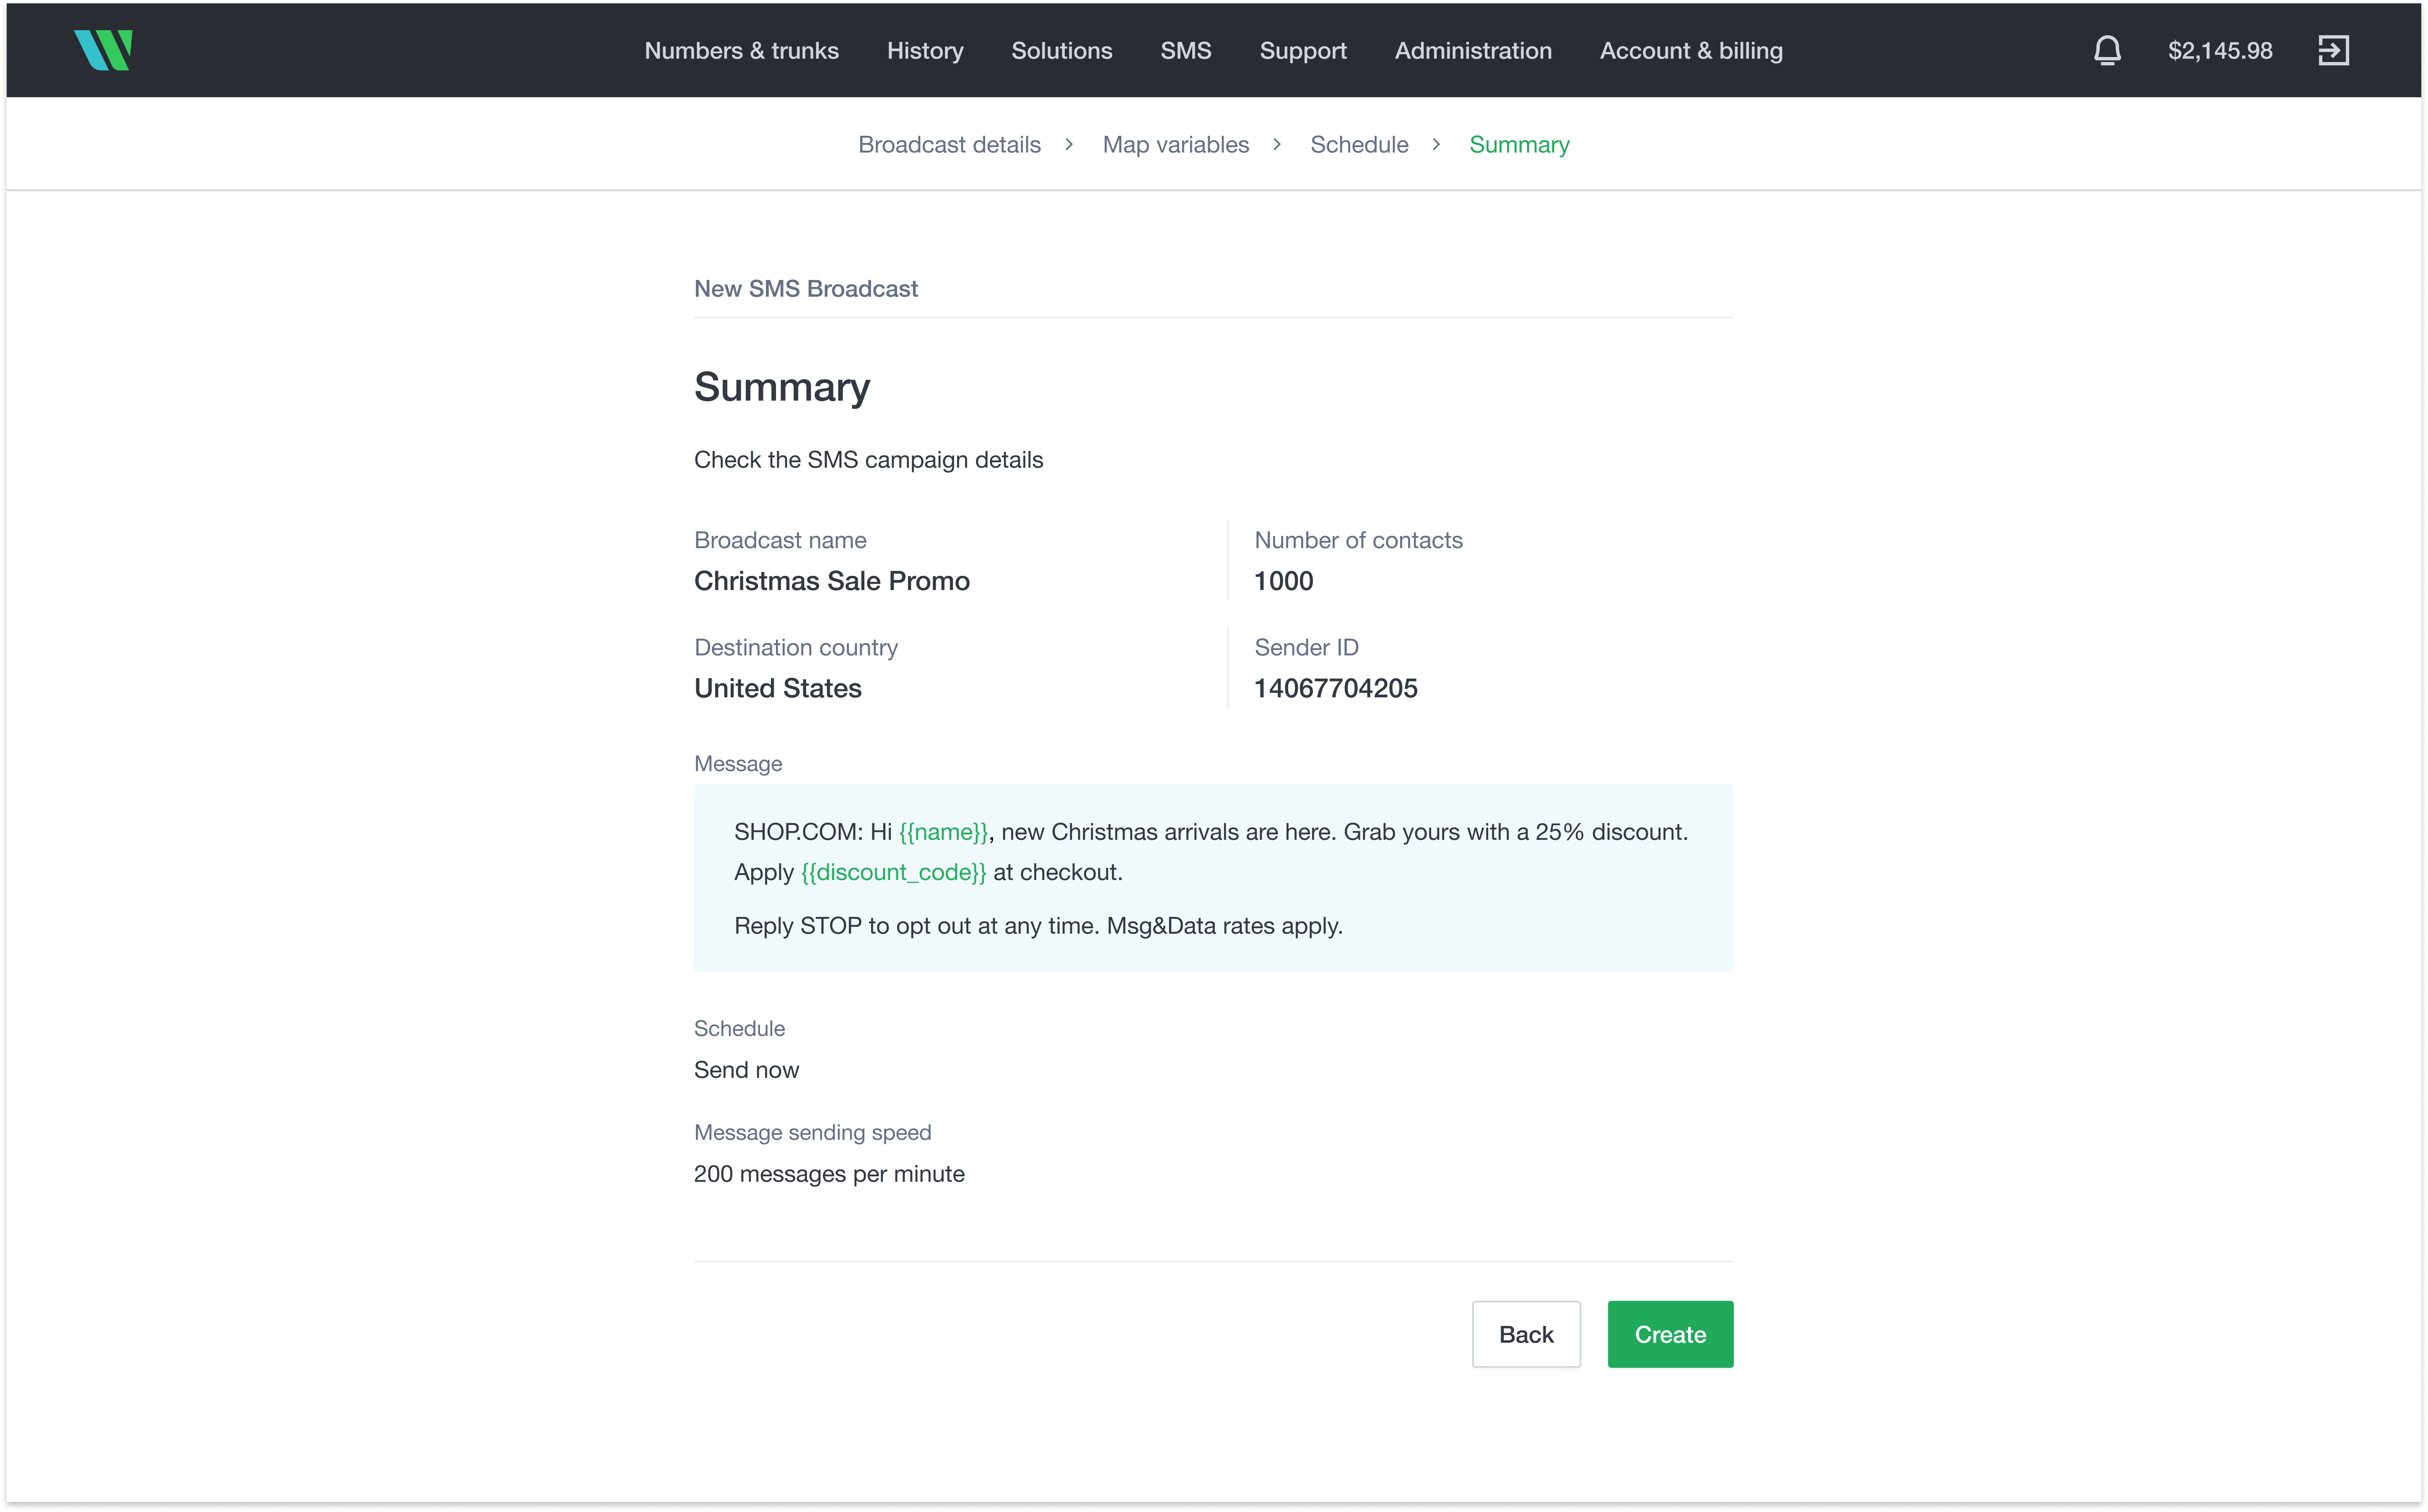
Review all campaign details. To make changes, select **Back**. To start the broadcast, select **Create**.
Select **Next**.
Review all campaign details. To make changes, select **Back**. To start the broadcast, select **Create**.
 ## Step 4: Monitor your results
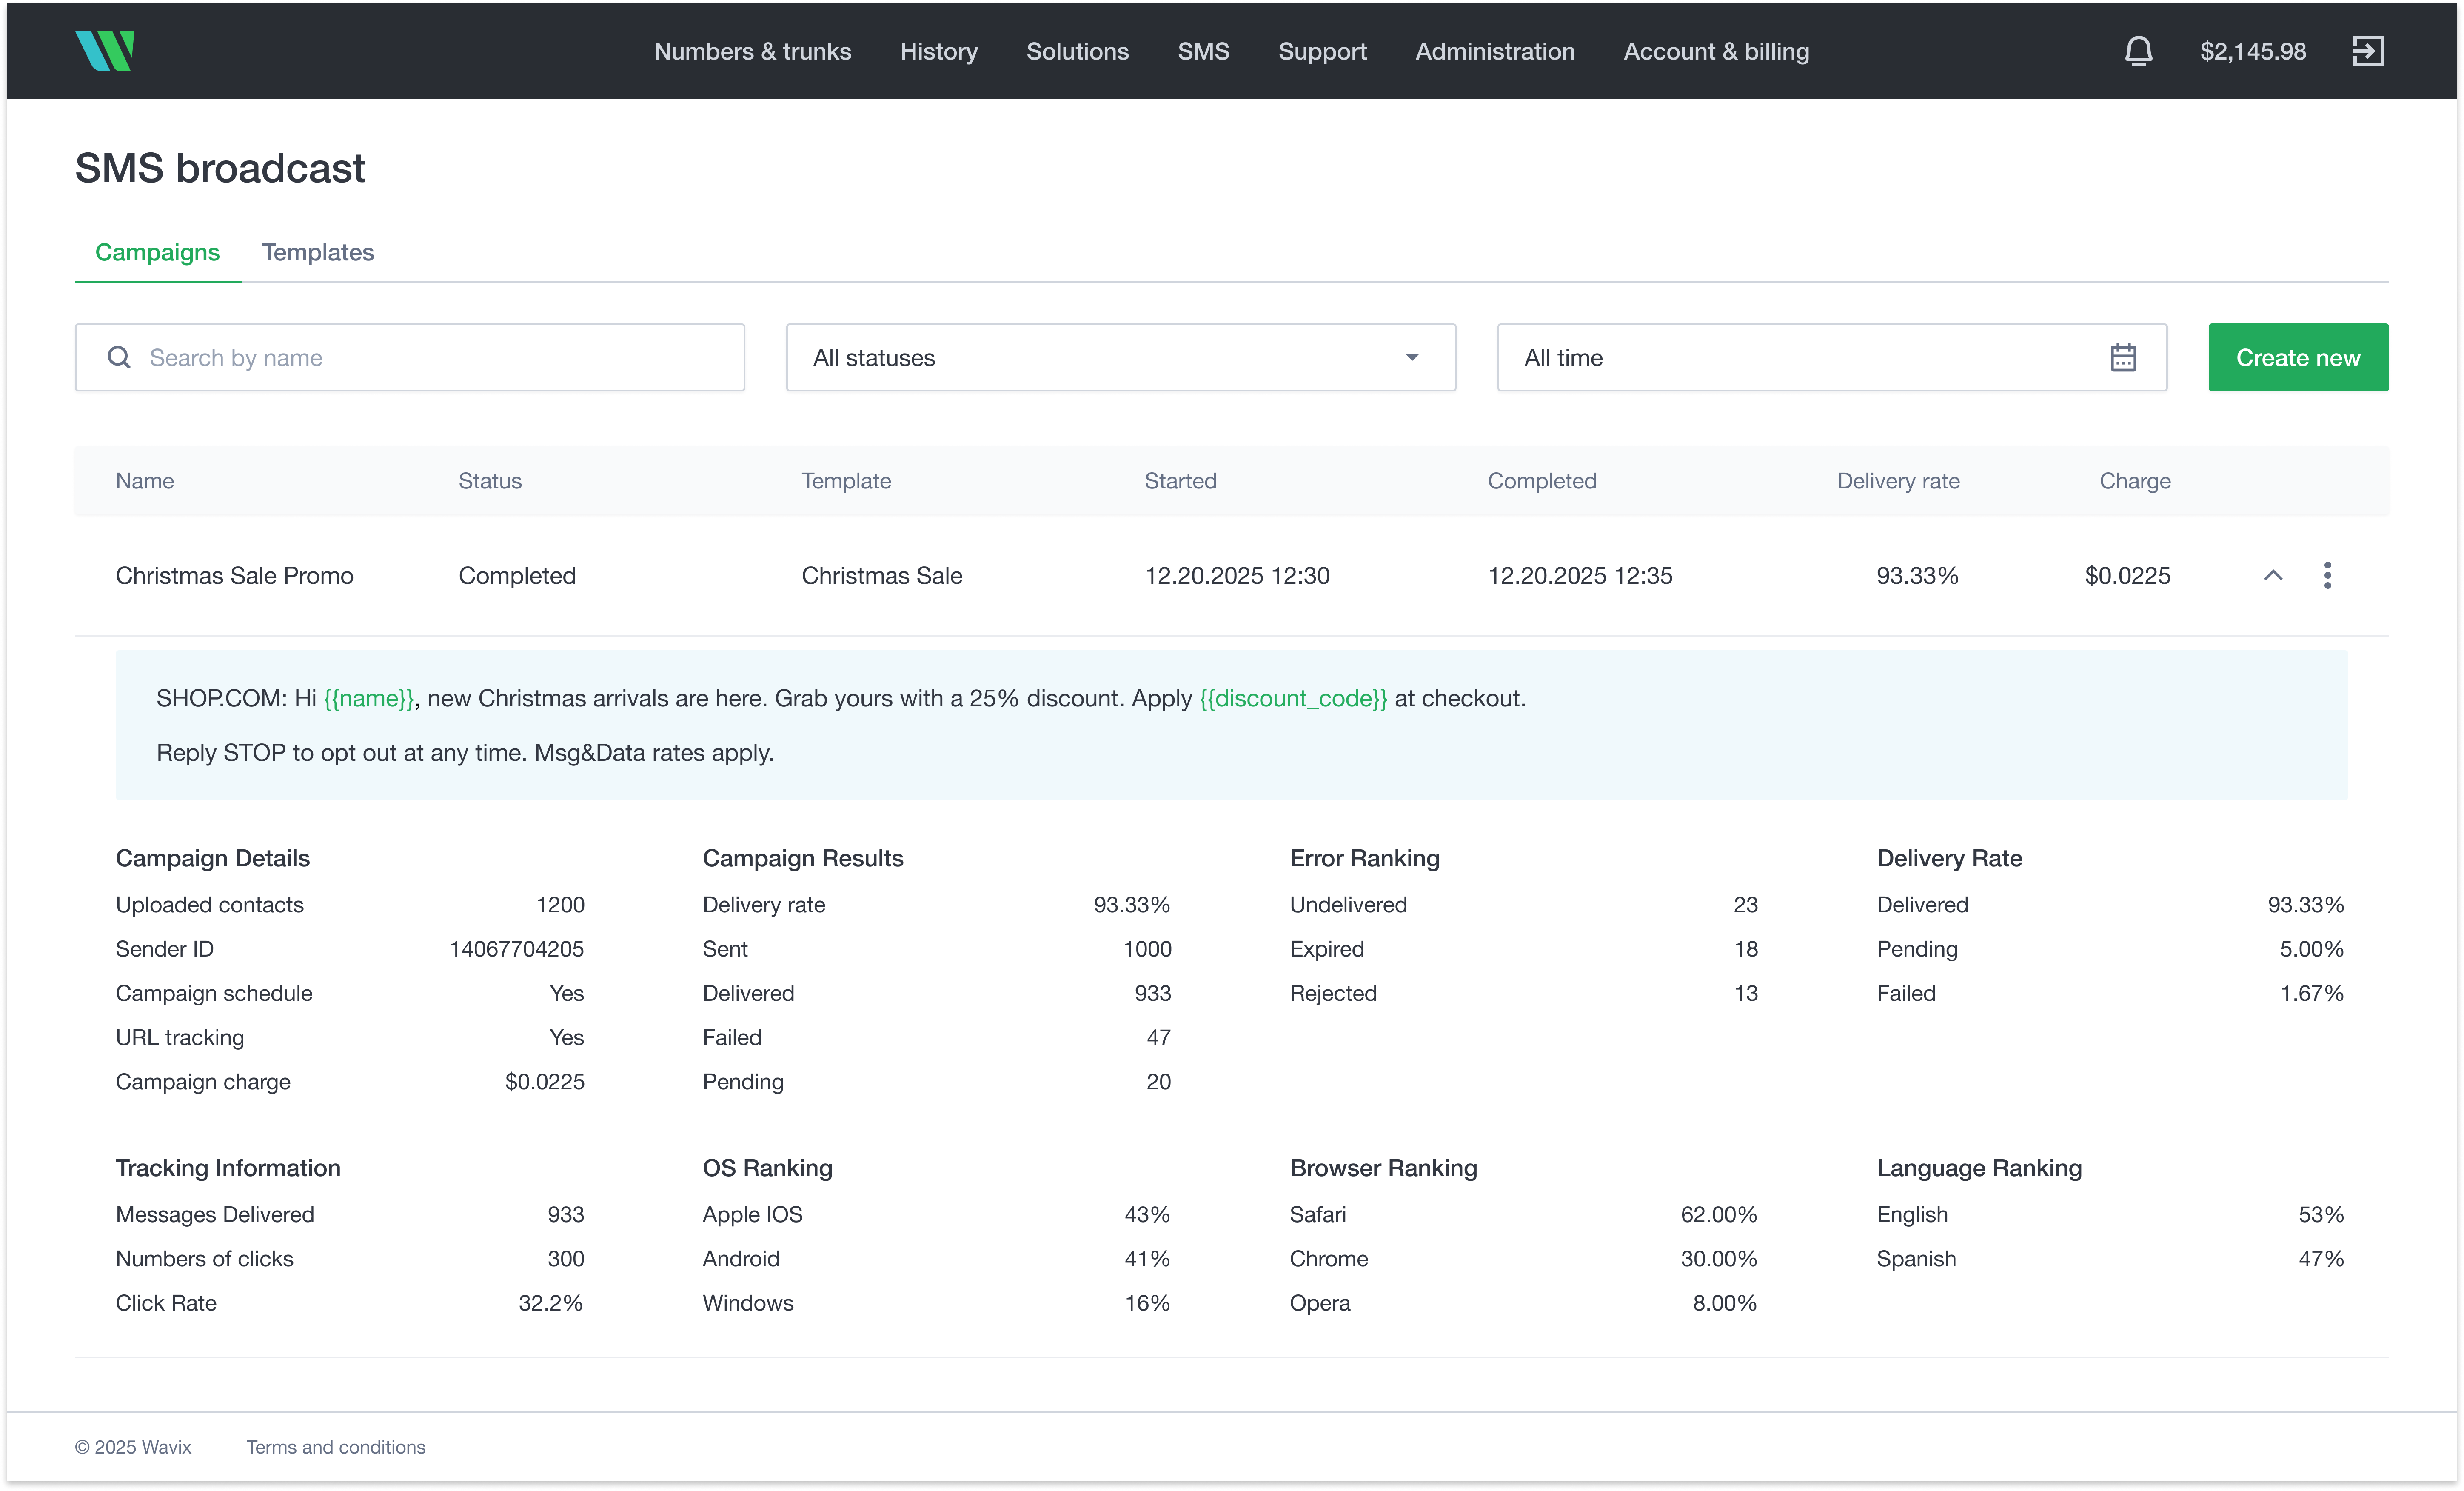
Track the performance of your SMS broadcast in the Campaigns dashboard. You can view:
1. Delivery and failure rates
2. Engagement metrics (e.g., link clicks and CTR)
## Step 4: Monitor your results
Track the performance of your SMS broadcast in the Campaigns dashboard. You can view:
1. Delivery and failure rates
2. Engagement metrics (e.g., link clicks and CTR)
 Use the Wavix [Link Shortener API](/api-reference/link-shortener/list-short-link-metrics) to access detailed engagement metrics
That's it. You created a template, uploaded contacts, launched a broadcast, and confirmed results in analytics. If you used tracked links, review clicks and CTR to understand engagement.
## Tips for better campaign performance
* Keep messages short and relevant.
* Use dynamic fields to personalize content and boost engagement.
* Avoid ALL CAPS and excessive punctuation, which can trigger spam filters.
* Always include an opt-out option if required by local regulations (for example, "Reply STOP").
Use the Wavix [Link Shortener API](/api-reference/link-shortener/list-short-link-metrics) to access detailed engagement metrics
That's it. You created a template, uploaded contacts, launched a broadcast, and confirmed results in analytics. If you used tracked links, review clicks and CTR to understand engagement.
## Tips for better campaign performance
* Keep messages short and relevant.
* Use dynamic fields to personalize content and boost engagement.
* Avoid ALL CAPS and excessive punctuation, which can trigger spam filters.
* Always include an opt-out option if required by local regulations (for example, "Reply STOP").