Buy a phone number from Wavix
Before placing or receiving a call, you need to have an active phone number on your Wavix account. If you already have one, you can skip this section.- Sign in to your Wavix account.
- Click on Buy under Numbers & trunks in the top menu.
- Select the country and region where you wish to purchase a number.
- Choose one or more numbers and click Buy now.
- Review the Cart and complete checkout.
Some numbers require proof of local address or other documents before activation. Upload any requested documents and wait for the Wavix Provisioning team to approve them before the numbers become active.
Receive calls with Wavix and Vapi
Create a SIP trunk on Wavix
- In the top menu, go to Numbers & Trunks → Trunks.
- Click Create new.
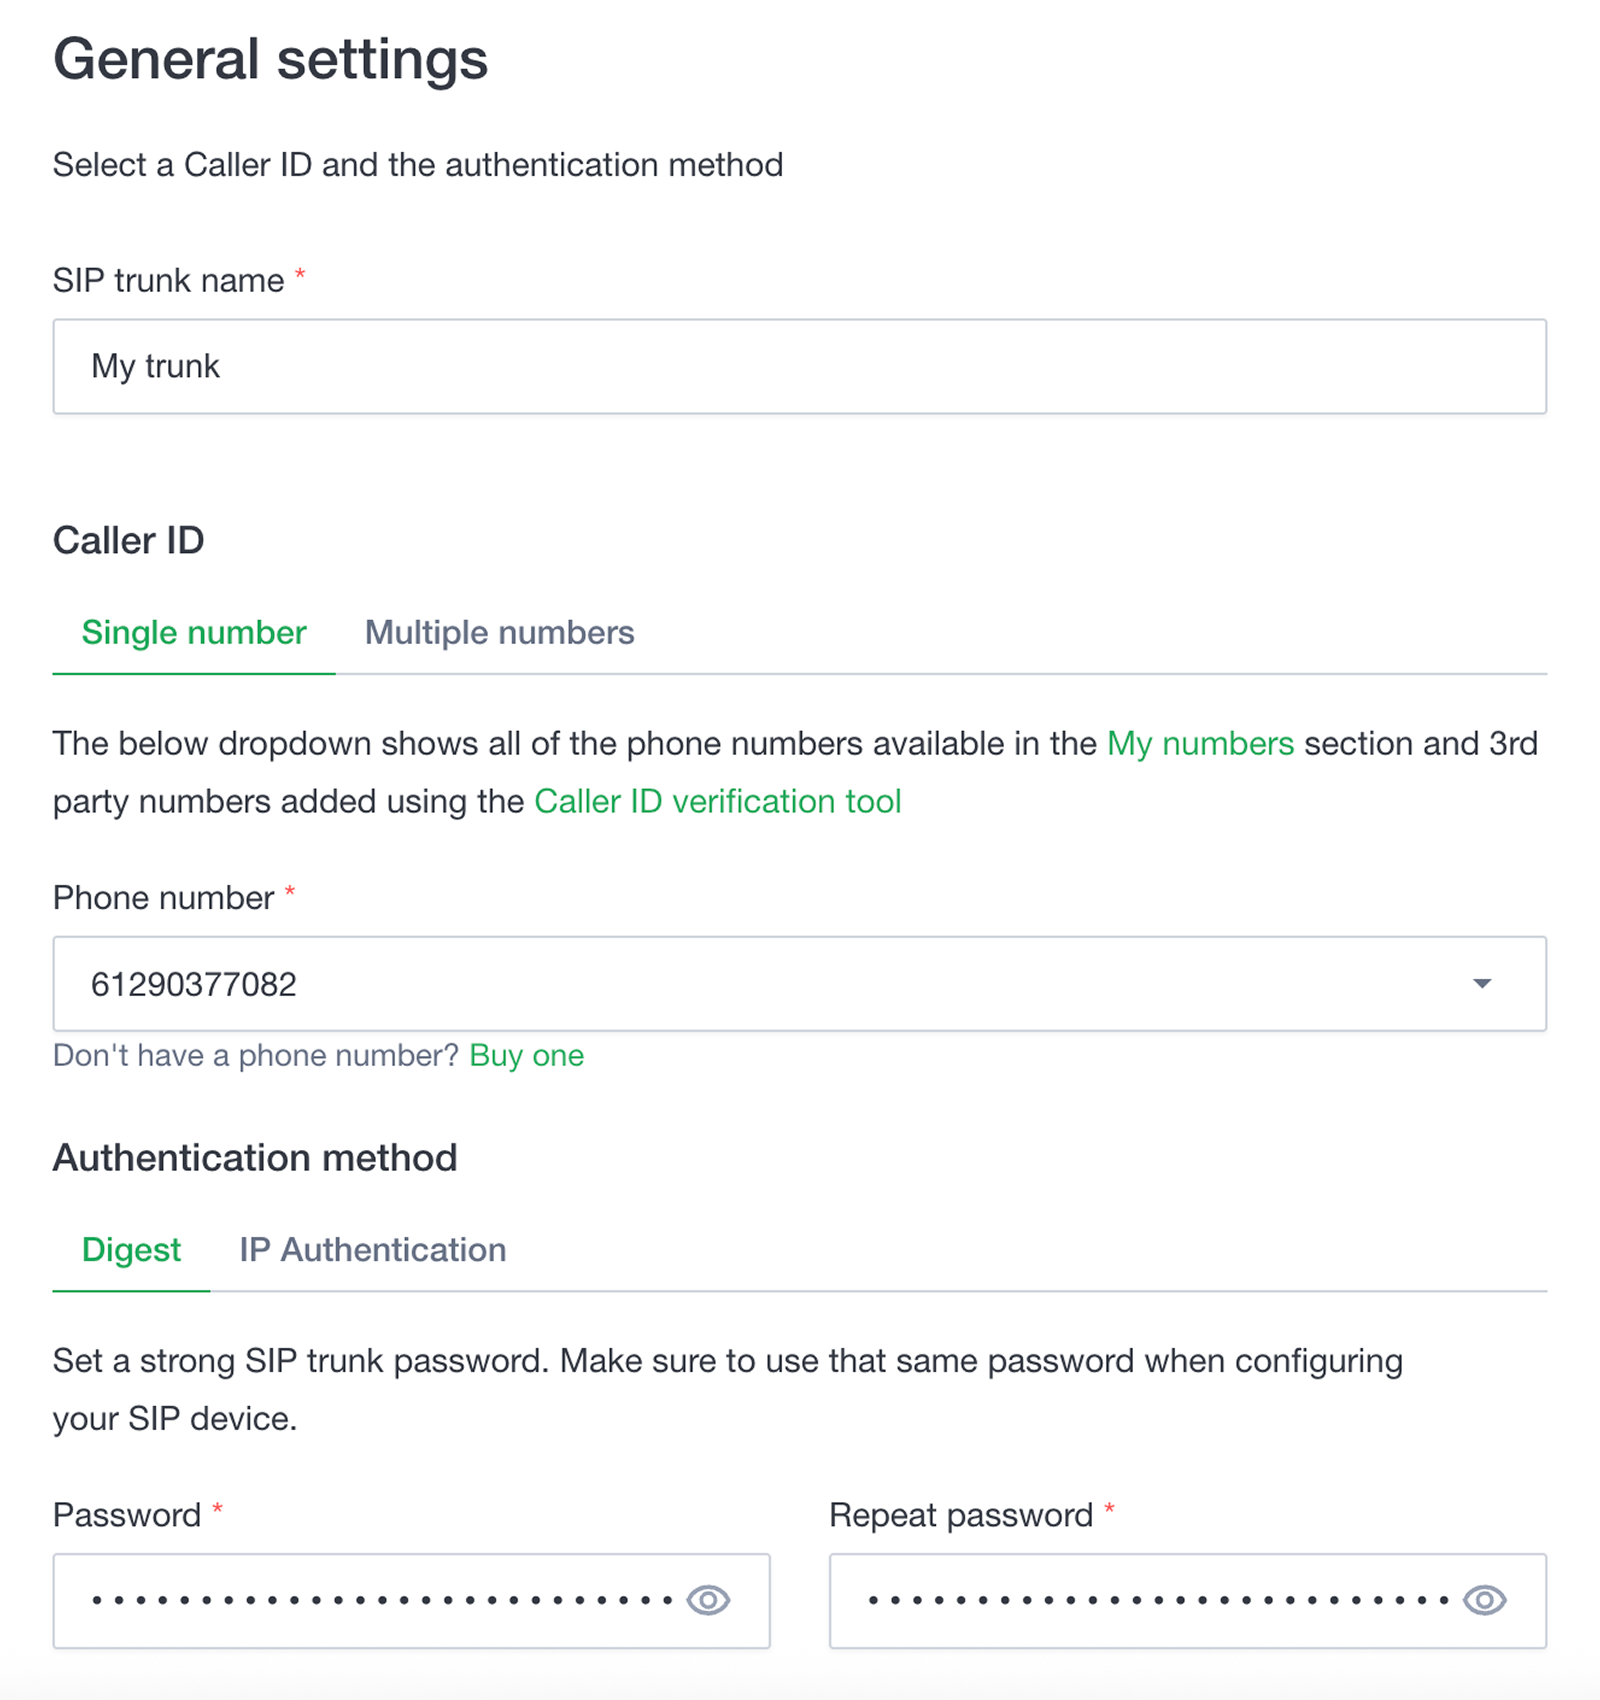
- Under Authentication Method, select Digest.
- Enter a SIP trunk name, set a SIP trunk password, and choose one of your numbers as the Caller ID.
- (Optional) Configure additional limits. If not specified, global account limits apply:
- Max outbound call duration
- Max number of simultaneous calls via the SIP trunk
- Max call cost
- Click Create.

Your 5-digit SIP trunk username is generated automatically and shown in the SIP trunk ID column.
Create SIP trunk credentials in Vapi
- Sign in to your Vapi account.
- Go to API Keys.
- Copy your Private Key.
- Run the POST request below using your favorite tool, such as Postman or terminal.
- Replace
YOUR_SIP_TRUNK_IDandYOUR_SIP_TRUNK_PASSWORDwith the SIP trunk credentials configured at Wavix. - Replace
YOUR_VAPI_PRIVATE_KEYwith your Vapi Private Key.
Make sure you list all Wavix regional gateway IP addresses in the ‘gateways’ array. Failed to do so may result in your calls being rejected with 401 Unauthorized error. A full list of regional gateways is shown at the bottom of the Trunks page in the Wavix Customer portal.
id. Copy it for later use.
Learn more about Vapi SIP trunks in the Vapi SIP trunk documentation.
Associate a phone number with the SIP trunk
To link your Wavix phone number to the SIP trunk credential in Vapi, you need to create a Phone Number resource. Run the POST request below using your favorite tool, such as Postman or terminal.- Replace
YOUR_WAVIX_PHONE_NUMBERwith a number on your Wavix account andYOUR_VAPI_CREDENTIAL_IDwith your Vapi SIP trunk credentials created earlier. - Replace
YOUR_VAPI_PRIVATE_KEYwith your Vapi Private Key.
Make sure
YOUR_WAVIX_PHONE_NUMBER contains the leading ’+’ sign, i.e., +61290597521.
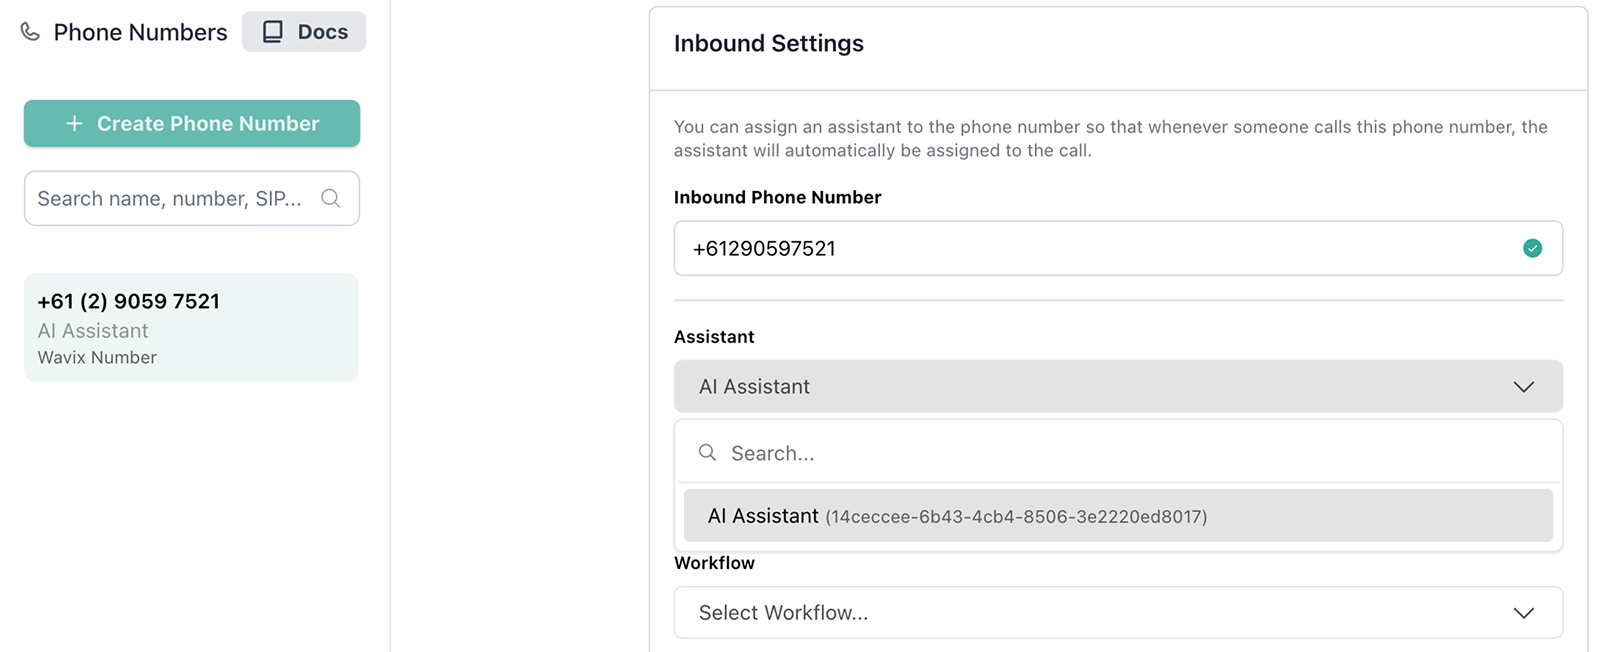
- Sign in to your Vapi account.
- Go to Phone Numbers.
- Scroll down to Inbound Settings and associate an assistant with the number.
Setup inbound call routing on Wavix
Wavix can route inbound calls to a SIP trunk on the platform, SIP URI, or forward them to a phone number. Vapi requires calls to be routed to a SIP URI. To route calls to your Wavix number to the Vapi SIP URI:- In Wavix, open Numbers & trunks → My numbers.
- Select your number by clicking the ⋯ menu → Edit number.
- Set the inbound call destination type to SIP URI, and enter the destination in the format of:
- Save your changes.
Place calls with Wavix and Vapi
To place an outbound call, you’ll need a Vapi Assistant ID and Vapi Phone Number ID.Assistant ID
Assistant ID
- In Vapi, open Assistants.
- Select an assistant you want to use and copy the assistant ID.

Number ID
Number ID
- In Vapi, open Phone Numbers.
- Select a number you want to use as Caller ID and copy the number ID.

- Replace
YOUR_VAPI_ASSISTANT_IDwith your Vapi Assistant ID andYOUR_VAPI_NUMBER_IDwith your Vapi Phone Number ID. - Replace
YOUR_VAPI_PRIVATE_KEYwith your Vapi Private Key. - Replace the
DESTINATION_NUMBERwith a phone number you want to call. Make sure the phone number is provided in the international E.164 format with or without the leading+sign.
Learn more about Vapi outbound calls in the Vapi outbound calling documentation.
Transfer calls between Vapi and Wavix
Wavix supports using theSIP REFER command. To transfer a call, you need two Wavix numbers, one for an active call and one to receive the transferred call. Make sure inbound call routing is set up on the second number.
To enable call transfers with Vapi, you’ll need:
- Create and configure a Transfer Call tool.
- Associate the tool with your Vapi assistant.
Configure Transfer Call
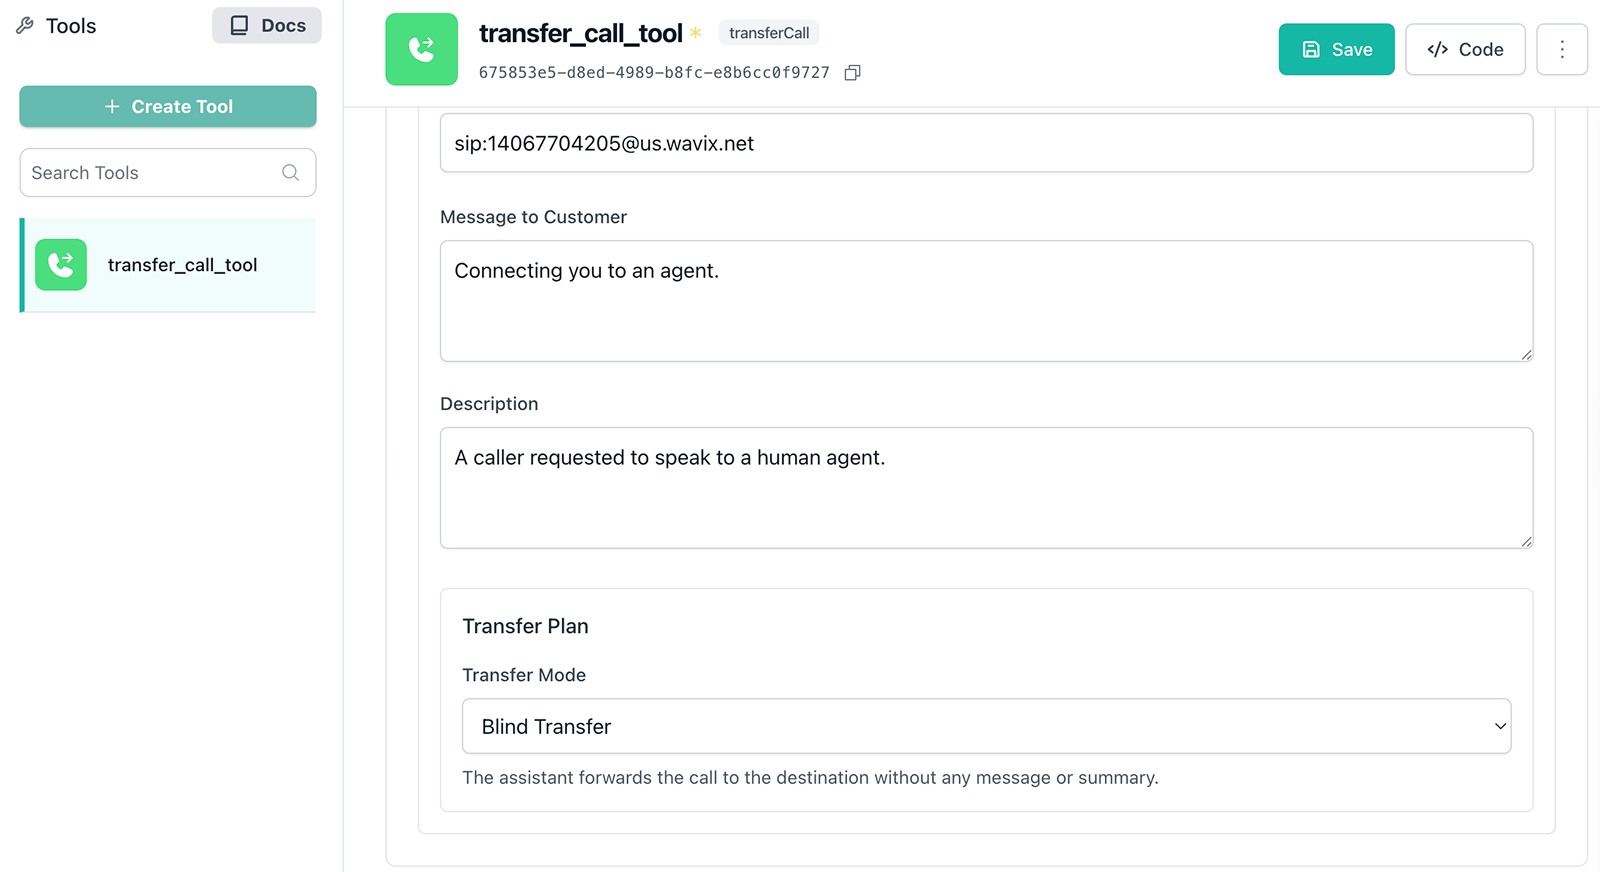
To configure the Transfer Call tool:- In your Vapi account, select Tools.
- Select + Create Tool, choose Transfer Call, and enter a name for the tool.
- Under Destinations, select + Add Destination, then choose SIP.
- In the SIP URI field, enter the address in this format:
[YOUR_WAVIX_NUMBER]@[WAVIX_SIP_GATEWAY]. Example:sip:[email protected]. - In the Message to Customer field, enter the message to speak to the customer before the transfer.
- Provide additional details to help the AI decide when to use this destination.
- In Transfer Mode, make sure Blind Transfer is selected.
- Select Save.
YOUR_WAVIX_NUMBER with your Wavix number and WAVIX_SIP_GATEWAY with one of the Wavix’s SIP gateway.

Learn more about Vapi call transfer in the Vapi call forwarding documentation.
Troubleshooting
- 603 Declined can occur if the destination’s per‑minute rate is higher than your account’s Max call rate (check the value on the Trunks page). Contact [email protected] to request a change if needed.
- Wrong number format. Dial the full international E.164 number, e.g.
19085594899(US) or4408001218915(UK). Do not dial local formats like9085594899. Strip prefixes like0,00, or011before the dialed number.